One of the Joys of Maturity |
|
| Affiliated Advertisers |
Clicking through one of our banner ads or some of our text links and making a purchase will produce a small commission for us from the sale. The Old Guy's Garden Record
Saturday, April 2, 2011 - Grafting Tomato Plants
Johnny's Selected Seeds has a great video about grafting tomato plants that shows two methods of grafting and the resultant plants. It's an excellent introduction to and overview of the technique. Also mentioned was grafting peppers, cucumbers, and eggplant. The advantage with all of the grafts is to use a more vigorous and disease resistant rootstock with a traditional "top" variety. Since it's time, almost past time, for me to be getting our peppers and tomatoes started, I'll have to wait a year to try grafting tomatoes. The initial investment is also sorta steep, as the tomato understock (rootstock), Maxifort F1, runs $21.95/50 seeds. Silicone grafting clips cost $14.95 for a bag of 250. Update (5/7/2011): James Bradley wrote that Hydro-Gardens have smaller, less expensive, packages of grafting clips. Johnny's is also building a good in-house library of garden videos as well as several on YouTube. As a lifelong learner, I certainly enjoyed watching the tomato grafting video, even though I don't plant to try grafting tomatoes this year. I also watched their How to Prune Cucumbers video (twice), before deciding that such pruning really isn't necessary for our method of growing cucumbers on a trellis. If you stake your cucumbers, this video should be really helpful. Geraniums I have just one geranium plant out under the cold frame hardening off. I plan to transplant it into a planter outside fairly soon with a HotKap
Most of the melons and squash in the foreground will be transplanted earlier than usual this year. I'm going to try to get them out one to two weeks before our frost free date in this area. I'll again give them some protection with some HotKaps I bought last year. Peppers
For red peppers which also give us good green peppers when picked before they fully ripen red, I went with Ace and Red Knight, both hybrids with good disease resistance. For our yellow peppers, I again went with Sunray, which grows well on our soil. I'm also trying a new yellow variety from Stokes Seeds, Mecate. I also started some Earliest Red Sweet peppers, an old variety I grow out for peppers and seed production. The Earliest Read Sweets don't get very good soil, as I grow them out in our East Garden for isolation. (And the name, "East Garden," is really overstating things, as it's just a glorified old cornfield!) About the only place to get seed now for the Earliest Red Sweet variety is through the Seed Savers Exchange annual yearbook. I just seeded a few cells of paprika peppers, as we have lots of ground paprika from last year's bumper crop. I stayed with the same three varieties, Alma, Feher Ozon, and Paprika Supreme. I also seeded a cell of a new sweet pimento pepper, Lipstick. I'm looking forward to trying the long, tapered peppers, as the online catalog states, "Many consider Lipstick the most delicious sweet pepper." With snow earlier this week, I was delighted that the weather today was bright and sunny. It was quite windy, though, enough so that I only cracked open the cold frame about 4". I was tempted to try turning some soil in the garden, but contented myself with removing the old grass clipping much that had protected it from wind erosion over the winter. The ground will dry out considerably quicker with the mulch removed, and my old rototiller really doesn't handle mulch very well anymore.
I took the camera out to the barn and pond with me today when I went back there to feed one of our cats. I'd hoped to catch another shot of some blue-winged teals that had visited last spring and even hatched out a clutch of babies. No teals were apparent today, but the view of "our" old barn and the pond with blue skies over them was impressive to me. The barn lot and pond, like our East Garden, really aren't ours. We mow and take care of the area for the owner and get some use of the land, barn, and pond in exchange. Sunday, April 3, 2011 - Starting Tomatoes
The half flat of seeded tomatoes went on our "hot shelf." It's a shelf on an old computer stand in our dining room that serves as a junk catcher for both Annie and I. When I last cleaned behind it, I moved it over the register, but wondered if that would be a good idea. One of our outdoor cats who comes in occasionally, Middie, adopted the shelf during the winter, letting me know the temperature was just about right. So I've made Middie share the hot shelf with half flats of germinating seeds that need bottom heat but don't require light to germinate. All of our geraniums were germinated on that shelf this year (with a humidome top that I spray painted black).
We offer Moira seed to other gardeners through the Seed Savers Exchange annual yearbook, as the variety is no longer available from any commercial source in the United States. Canadian growers can order seed from a source I just found today, Upper Canada Seeds. From the Upper Canada Seeds About page:
I emailed Upper Canada Seeds today to let them know about this posting and to commend them on their offerings. I received a prompt reply from founder David Ackerman, who wrote in part, "It was actually Moiras that got me started growing tomatoes.....they were my grandfather's favourite tomato and when I was helping him garden when he got on in years we suddenly couldn't find any Moira seedlings." That got him started with Upper Canada Seeds.
I was thinking this morning that I wished my favorite weather site had a garden forecast page that noted things like frost alerts, soil moisture, and so on. It doesn't, but when I googled "garden weather forecast," I found that the Weather Channel does have such a service. AccuWeather.com also has a Home and Garden forecast, but it's more focused on its "Lawn Mowing Forecast" than gardening information. The Weather Channel site asks for your zip code and will then display garden related information such as freeze risk, wind speed (important where we live), chance of precipitation, and watering need, along with all the standard weather data you'd expect from a weather site. They also give a super ten day forecast, although most weather experts say five days out is about the limit for accurate forecasts. I think the ten day is useful for alerting one for even a chance of frost, which can totally spoil a garden in the spring or late fall.
The soil has dried out enough so that I could work up a row for our spring peas today. I usually prepare an area in the fall for our peas so that I can just push the seed into the ground sometime in early March. I didn't get the soil preparation done last fall, or more correctly, ended up using the spot prepared for peas for our garlic! The area I tilled is a low spot in what used to be our main garden. I really hope to return the area to yard at some point, but since we trellis our peas, I needed an area that wouldn't shade out other parts of the garden. Fortunately, the soil tested out at 6.8 pH, as it would have been impossible to spread ground limestone in the wind today. After tilling, I raked a small, narrow plateau to provide some protection from standing water. (I'm sure we'll have some heavy, heavy rains this spring.) I hoed a flat bottomed furrow about 2" deep for the seed. I seeded it heavily with some saved pea seed from 2009 that was marked "Sugar Snaps and Super Sugar Snaps." Then I covered the row and tamped it down with the rake. I also firmed the sides of the raised row with my feet. This row will get a full 5' tall trellis in a few days, and the Sugar Snaps (if they didn't cross too much with the shorter Super Sugar Sanps) will use every bit of the height. I'll plant our Eclipse and Encore peas a bit later this spring, as they germinate better in warmer soil. They can go in the main garden, as they only grow 2-3' tall and won't shade out nearby crops. While I had the rototiller out, I also turned our main, raised bed garden and some of the East Garden. I was really pleased at the tilth of the soil, as we've worked hard to add lots of organic material to it. I also first terraced and later, totally enclosed the area as a raised bed to stop some nasty soil erosion that was occurring in the patch.
It's April, and we're just about ready to start gardening outdoors. The weather, especially the wind, needs to moderate just a bit before I start transplanting broccoli, cabbage, cauliflower, onions, and lettuce into the garden. But we're oh-so-close!
Wednesday, April 6, 2011 - Planting Brassicas
With the lull in the wind, I got out and transplanted some broccoli, cauliflower, and cabbage plants into the narrow raised bed I built last summer. I didn't till the bed this spring, as it had been thoroughly tilled last fall. A light raking a few days ago had it planting ready. As I got started, I decided to check soil pH and was shocked when I got a 4.5 (very acid) reading on the first try. Subsequent tests around the bed came in from 6.5 to 6.8, about what it should be. On the first try, I must have hit some peat moss that didn't get distributed very well last fall. Even with a good soil pH (about 7 is ideal for broccoli), I still add a touch of ground limestone to each planting hole when transplanting brassicas (also known as "cole crops"). A bit of lime helps prevent clubroot, which can totally ruin a cabbage or broccoli planting. I also sprinkle a bit of 12-12-12 commercial fertilizer in each hole and work both it and the lime into the surrounding soil.
For our broccoli this year, I mainly went with our old favorite, Premium Crop. I always plant more than one variety to protect against some weird, variety specific crop failure. Our second variety usually is Goliath, but I decided to try a more heat tolerant type I read about last summer, Belstar. Seed catalogs often describe the broccoli varieties, Premium Crop and Goliath, as main head types meant for a single, commercial cutting. I've found they put out lots of delicious (and sometimes quite large) sideshoots after the main head is cut. For years, I've followed our broccoli with green beans. Last year, our Premium Crop and Goliath kept producing so long that we just barely got our planting of beans, which succeeded our broccoli in the same rows, before the frost. I've set aside space this year, not the broccoli row, for an early planting of green beans. All of our cauliflower were the Amazing variety, which requires less wrapping and tying of leaves around the head to keep it from turning yellow and getting bitter. While I put out a whole row of broccoli, I alternated the cauliflower with cabbage. I got in one Alcosa savoy, two Super Red 80, and one Tendersweet this evening, although I hope to transplant a few more in the coming days. Tendersweet is a new one for us and is supposed to have "exceptional flavor for taste-conscious consumers." Since I kept my rows fairly close (6-8") to the edge of the raised bed, there currently is an open row down the center of the bed that I may use for a short season planting. I have lots of lettuce plants, so I may plug some in there, or even direct seed some to give us somewhat of a staggered lettuce harvest. Eventually, the brassicas will pretty well fill the bed with foliage. When I started our broccoli in February, I also seeded a small fourpack with ornamental kale (Maribor). All four cells produced plants, although they are rather small right now. I put one plant in each corner of the raised bed to add a bit of color to the planting. Asparagus
This is just my second patch of asparagus, so I'm pretty much a rookie in knowing about asparagus. We had a fabulous patch, again started from seed, on our farm in the 80's. But we also had lots of manure to spread over the patch each fall. I did a quick search today about picking asparagus and came up with a couple of interesting references. The Ohio State University Extension has a good page on Growing Asparagus in the Home Garden. The Seed to Spoon blog has an entertaining posting from 2009 about going to an asparagus U-pick. Note: I'm trying to link variety names to the supplier when I can. Since I save seed in the freezer from year to year, and seed houses have a habit of changing hybrids fairly often, some varieties that are no longer offered will not be linked. Incidentally, the links, at least today, do not include any of our affiliated advertisers. Thursday, April 7, 2011 - Hardening Off Plants
Hardening off is the process that plants grown under lights or in a greenhouse must go through to toughen their cells to withstand direct sunlight, UV radiation and the wind when transplanted into the soil. Failure to harden off plants usually results in them withering, or at the very least, being set back weeks by transplanting shock. We gradually introduce our transplants to direct sunlight by first moving them tocold frame. We open the cold frame as weather permits, but sometimes just partially open it to still provide the toughening transplants some protection from the sun and wind. After a week or two, we can transplant them directly into the garden or move them to the sunny (or partially shaded, depending on the plant type) part of our porch until we're ready to use them. I really prefer to both harden off our plants under the cold frame a bit and on the porch a while, too. For a little more expert information on hardening off plants, see the Washington State University Extension page on Hardening off Transplants. The suggestions for hardening off transplants were written by Norma Rossel, Quality Assurance Manager for Johnny's Selected Seeds.
We'll have tomatoes, peppers, eggplant, and a few other veggies and flowers to harden off in a few weeks. But the tomatoes and peppers require consistent warm weather and soil for good growth, and this is only early April. We're just getting them started from seed now. But in about six weeks, we'll harden them off and move them into the garden at about eight weeks old. Planting Spinach
Planting was pretty easy. I just strung a line to mark my row and used a one inch thick board to scrape a furrow about an inch deep for the seed. Since the Regal seed came as sized seed (all one size) and was treated with a green colored seed treatment to prevent rot, it was easy to sow the seeds about an inch and a half apart...and still see the seed. Often, just seeing brownish spinach seeds you've sown is quite difficult. They tend to blend in with the brown soil pretty well. I finished up by closing the furrow with my hands and tamping the soil down a bit. Then I came back with the flat of a garden hoe and tamped the seed row down a bit more to insure good soil contact with the seed. There's a bit of a story about that garden hoe. I'd used a variety of cheap hoes in the past, only to have the head break off or the shaft break in a year or two. Several years ago, one of our adult daughters, Samantha, asked me what I wanted for my birthday. I quickly responded, "A good hoe." Sam didn't quite get that I was talking about a garden instrument, thinking instead that I used the vernacular for a lady of the night! We had a good laugh about that one. And the hoe is a dandy. I'm hoping we get some good spinach from this planting. I love it in salads and under shrimp portofino and chicken portobello. But I'm not very good at growing spinach. I often plant it too late, and it bolts. Or, I don't pay enough attention to mulching and weeding, and it gets overgrown by weeds. Or, it just doesn't germinate, and I end up with an odd spinach plant here and there in the row. So while I'm an old hand at growing many vegetables, this one is a challenge for me. Here's part of the "detailed growing instructions" for spinach from the Stokes Seeds site:
Finishing Up the Brassica Planting I tossed and turned a bit last night when I went to bed worrying about our new brassica planting I described yesterday. I had omitted applying blood meal around the plants to discourage hungry deer. Fortunately, no deer visited that part of our garden last night, and I applied the necessary deterrent today.
Since I'd applied milky spore I've also noticed one lone white cabbage moth fluttering around our yard the last week. I guess if it doesn't have a mate yet, I shouldn't be worried, but I still took action. Since I haven't yet replenished my supply of Thuricide And of course, when moving all our transplants around, I found a small fourpack of very healthy Goliath variety broccoli...a day after I transplanted our broccoli. Other Stuff
I take that back. I had to take the camera downstairs to snap a shot of a gloxinia corm breaking dormancy, and on the way back to the office, I popped outside (at 11:00 P.M.) and grabbed a flash shot of the geranium in its concrete planter. Maybe the photo will go viral on the web: Geranium at Night! I also spent a bit of time catching up on my garden records today. If I don't write it down somewhere, I'll never remember when I planted what, where. While a lot of it just gets recorded in this blog, I also keep pretty detailed charts of our various garden plots. BTW: The open ends of the spinach row shown below are on purpose. Flowers will go in the open space at each end of the row.
The graphic at left is my 2003 record of our main garden at the time, Plot A. While there are a number of software programs available today to make planning and charting a garden quite easy, I still like they way I'm currently doing it. Sadly, AppleWorks won't run on new Macs once Apple puts out its OS X Lion (10.7) operating system. But then, I can't afford a new computer right now, and my six, almost seven year old G5 tower still works great. I used AppleWorks for my lesson plan book when I was teaching. It has a neat feature, multiple page masters, that allows one to put permanent information on one page and have it appear permanently on succeeding pages. That gave me my Monday through Friday listings of subjects and groups. I could write daily assignments on the pages without distorting the permanent info.
I began using that same technique to show successive plantings in our garden a few years ago. Of course, I generally don't need five pages for successive plantings, but it's nice to be able to go back and see the history of what has grown where and when.
Gloxinias Breaking Dormancy
I'd had five or six gloxinia plants break dormancy earlier this spring and winter. But as the months wore on and no more gloxinias broke their dormancy period, I began to wonder if I had become the great gloxinia killer! I moved the plants under the lights and gave them a good bottom watering. It always amazes me that the corm retains enough moisture to put up leaves when the soil in the pot is bone dry. (You don't ever water dormant gloxinias. The corms may rot.) In the coming days, I'll knock each plant out of its pot, strip away the soil without roots, and repot them in fresh potting soil. We top out our gloxinias in six inch round pots. Since some of the plants are still in four inch square pots, I'll be "uppotting" a few to six inch pots. Almost Midnight It's almost midnight, and in a few minutes, I'll retire for the day. My evening conversation with the Lord always begins with thanks for another day. I hope your days are as good as mine have been. Saturday, April 9, 2011 - Heavy Rain
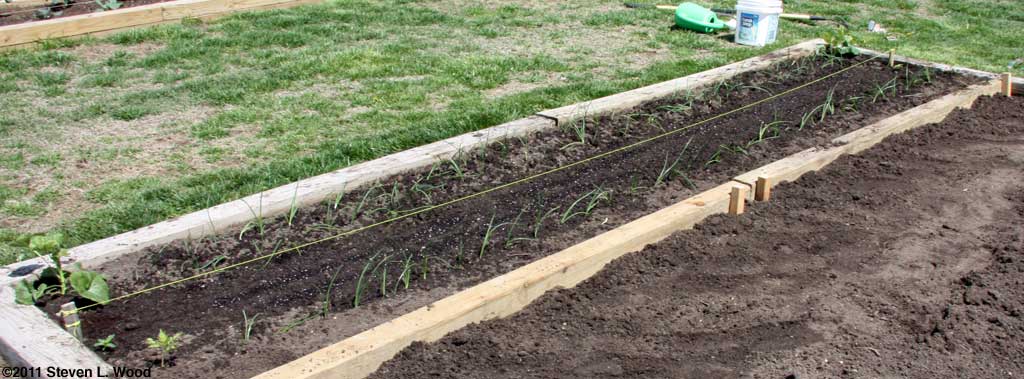
We have a little standing water in our main garden plot this morning, but these conditions make me glad I put our main garden in a raised bed several years ago. It will dry out (and warm) considerably faster than standard garden areas such as our East Garden. I won't be able to transplant the onions and beets and direct seed the carrots I'd hoped to do today, but I also won't be put off doing so for weeks by soggy ground. Mowing the lawn is out for today, so the clumps of grass that were getting tall as of yesterday will get even taller with the cool rain! Our Plot A, shown above with lots of standing water, is the original garden area we used. It had been gardened by the previous owners of this property and was low and pretty well spent when we moved in. Despite having added lots of soil and soil amendments and even a dry sump, it's still low ground where water stands a bit. Currently, it contains our brassicas in a narrow raised bed, peas...almost under water, and our garlic. If I can create another plateau between the peas and garlic, that's where our caged tomatoes will go. There's no hurry on the tomatoes, though, as our indoor seeding of tomatoes is just emerging.
After the rain stopped around noon, I got out and took the shots immediately above and below this text. Despite getting several inches of rain in about three hours, all of the standing water had soaked into our main raised bed. We may get a bit more rain today, but the five-day forecast suggests that I'll be able to put transplants into the ends of the main bed next week.
And while I indicated that I pretty thoroughly map out our garden before I get out my trowels and such, the mapping is often fairly general. I know our onions, carrots, and beets will go at the north end of the bed. Our lettuce will go at the south end. But the center section plan is still just a list of "possibles," as I struggle to make sure I have enough space and follow some semblance of crop rotation. I try to avoid planting the same or a related crop in an area where it grew the previous year. Sometimes I cheat a bit on crop rotation. If I had an early planting of a crop that was taken out mid-summer and followed by another crop, I occasionally will come back with the same crop on the same ground the next season. And take that statement with a giant grain of salt: We're having to hunt clean ground for our tomatoes from soil diseases carried over from one season to the next! I took a few minutes yesterday to update our Gloxinias feature story with a bit more detail about handling Gloxinias through their dormant period. There are a couple nice close-ups of what a gloxinia corm looks like when emerging from dormancy. And...the sun just came out! Wednesday, April 13, 2011 - Planting Onions and Carrots It was gorgeous outside this morning. I got started fairly early, hauling out my garden equipment and various plants to be transplanted. But despite my planning and about four hours of hard, but really enjoyable work, simple arithmetic foiled my plans for getting all our onions, carrots, and beets in. 4+4+8+4+8+8 still equals 36, even for a retired schoolteacher. And 36" is about the maximum width I want for a softbed. That way, I'll not need to step in it and compress the soil. Instead, I will be able to work it from the sides. While the onions might put up with some soil compaction, carrots won't!
I guess I used to put up with wider softbeds, so I somehow got into my mind that I could tightly space my rows and get in all our onions, a full double row of carrots, and a full double row of beets. But I ended up leaving out the beets and shaving one row of onions to a single row. Once I began digging, really pulling soil to make holes for our onion seedlings, I was thrilled with the soil condition. There was enough moisture so that soil would stick to the roots of the plants as I moved them into the ground, and the soil tilth appeared to be excellent. We did some winter composting in this bed a year or so ago, and I was surprised to find recognizable plant scraps, such as a butternut squash stem, still in the soil! For folks who haven't worked with intensive gardening, I left about four inches of border along the long edge of the bed when I started transplanting onion plants we started in the basement last December. I also left ample room at the ends of the row for flowers. I generally measure a four inch space with a palm and did so today. I left four inches between the rows of onions, but tried to be careful to get at least four inches, if not six, between each onion plant in the row. When onions bulb in a crowded environment, they produce bulbs that may not keep very well. Our first row of onions was made up of Pulsar, Milestone, and Red Zeppelins, all varieties that store well into the winter. Our single row on the inside of the bed was all Walla Walla sweet white onions. I left eight inches between our onions on either side of a double row of carrots. I used a 1" board to make my drill (furrow) for the tiny carrot seed. I planted the double row in fourths, each section getting a different variety: Atomic Red; Mokum; Sweet Baby Jane; and Baby Sweet. I still have some Mokum and Baby Sweet carrots grown last summer in our refrigerator. While they're trying to put out roots now, they stored all winter in a green bag Carrots take over a week to germinate and since one must plant the small seeds shallow, they can easily dry out. Daily watering until they come up is a good idea. Unfortunately, I'd forget. So I employ a couple of tricks for helping my carrots get off to a good start. When I seed my carrots, before I cover the drill, I also sow radish seed amongst the carrots. The radish germinate quickly and can break crusty soil that carrots can't. Since the variety I seeded, Cherry Belle, are ready to pick in 21 days, they'll be out of the way before the carrots need the space. I also cover my carrot row with an old board to hold in soil moisture. Of course, I have to pull the board off when the radish germinate. But if one skips the radishes, you can leave the board over the carrot bed the full seven to ten days it takes carrots to germinate. Even with a raised garden bed, I've had trouble with the area I planted today washing newly planted seed "downstream." Our raised bed still isn't as full of soil as I would like. To prevent a disaster with carrots growing wherever, I pulled out a couple of 4X4s I had in the garage, trimmed them to length, and used them to make a barrier on the inside of the softbed to prevent the soil (and plants and seed) from washing downhill. Interestingly, the treated 4X4s were to serve as legs for a plant bench in the basement that never got built. As it turns out, one of the 4X4s is warped enough that it wouldn't serve as a leg for a bench anyway. I wound up my planting a little after 2 P.M., as I don't like to transplant in the heat of the day. So, some of our onion plants and all of our beet plants got a field trip to the main garden today. Probably having had a good time in the sun, they're now sitting on our back porch. The beets are now targeted for another softbed at the other end of our main garden bed. They'll be planted with the remainder of our onion plants and some lettuce either this evening or tomorrow morning.
Before I got started gardening this morning, I set up my Brinno Garden Watch Cam When I get our first round of mowing finished, I'll rake the grass clippings to use as mulch in the softbeds. Mulching with grass clippings, once they've sat and "cooled off" a bit, holds down weeds and makes caring for close plantings rather easy. Our weather continues to be warm, although we have a prediction of an overnight low in the 30s for the weekend. If it stays at the predicted low of 36o F, we'll be okay. But if we get a frost then or later, some of the flowers I transplanted at the ends of rows could be in trouble. Asparagus and Peas
Our asparagus is doing well with every other day pickings. When I took the shot below, it appeared that we may need to start picking daily. And while picking, I'm always pulling out seedling grass plants and other weeds. But I have to be careful weeding the asparagus, as some tiny plants (shown at right) are actually new asparagus starting from seed shed last year (and often pushed into the ground with a finger in bare spots of the patch).
I had a package of mushrooms that were about to become too old to use, so I cooked them with our asparagus last night. Even though it may sound like a strange combination, it was quite good. I cook our asparagus in olive oil and butter with a touch of lemon juice. I also add some seasoned salt, regular salt, and some pepper. A sad statement on the human condition is that it's easy to be generous when you personally "have enough." When I drove one of our granddaughters home Sunday afternoon after one of her frequent overnights, I grabbed the green bag of asparagus out of the refrigerator to give to our daughter's family. While there and talking to our daughter, she remarked that said granddaughter was unusual in her eating habits. She loves fruit, tomato juice, asparagus, and other veggies. Our daughter attributed it to them living with us until the granddaughter was two. I'm obviously rambling today, so I guess it's time to quit. Hope your gardening is going well.
Our beet transplants turned out to be way too large for good transplanting. I started our beets inside on February 28, so I'll need to remember next year to start them a couple weeks later. I had planned to transplant a fairly tightly packed double row of beets, but because of the size of the plants, had to go with a single row of plants spaced far wider than normal so that I wouldn't damage the roots too much. I also got in a row of onions and a couple of rows of lettuce transplants. I gave up any hope of recording which beet varieties went where, as the beet plants came out of the flat in clumps instead of neat rows. I did notice that our Golden Beets didn't look good, so our planting includes Kestrel, Merlin, Chioggia, and Red Ace - all mixed up in the row. Chioggia, a red and white ringed beet, is our only open pollinated beet this year. All the rest are hybrids. Our Chioggia seed came from the Seed Savers Exchange in 2009, but I've noticed the variety available this year from several other seed sources (Twilley, Stokes, Johnny's, Territorial, etc.). I had the Garden Watch Cam
This morning, I got out and planted another row of peas (and snapped the shot above). I use Encore and Eclipse for our shelling peas. Both are very sweet peas, but also need warmer soil to germinate than peas you'd push into nearly frozen soil in early March. Seed catalogs seem to be leaving out that essential information this year! Eclipse is advertised as a "supersweet pea," a "breakthrough...achieved through conventional breeding NOT through genetic engineering." Encore is just a variety that has produced well for us.
You may notice in the diagram at left (Click either diagram for a larger image.) that I'm already looking at what I'll be planting after our first crops in the main bed come out. I use different colored lines to remind me that I'm working with a succession planting on the chart. The Dark Forest?
No, the shot above certainly isn't "the dark forest," but it is a ground level shot of our asparagus just before I picked this morning. It's an interesting perspective, though. I just rested the lens of my camera on the lens cap when taking the photo.
Pent up inside after days of being able to garden was a bit unnerving today. I was able to make good use of the time, though, as my other web site, Educators' News, turns ten years old on Monday. I've already posted the beginning of a special Anniversary issue for Monday. I also took time to upload a number of asparagus photos I've used here over the last week to Pics4Learning, a "copyright-friendly image library for teachers and students." Students and teachers may use any image from the site to illustrate reports or on worksheets, any non-commercial, educational purpose) without payment of royalties or prior permission. I also took a stab at getting the last of our transplants started. I ran out of sterilized potting soil, so I only got some marigolds, cucumbers, eggplant, and basil seeded. I had a number of rather old packets of marigold seed. Rather than put one or two seeds in a fourpack cell, I just dumped each packet in its own plastic flower pot and will transplant whatever grows a bit later. I still need to start more lettuce for succession plantings. Our asparagus didn't need picking this morning for the first time in days. The cold rain must have slowed it down. But our plants we've already put out still look pretty good. The exception is the oversize beet plants I set out yesterday. Many of them are flat on the ground, possibly never to pull themselves back upright again. Ah, but there's still time and beet seed in the freezer.
BTW: Johnny's Selected Seeds is an employee owned company. And no, they're not an affiliated advertiser for Senior Gardening. While looking around the web a bit about seed company ownership, I ran across The Safe Seed Resource List, a listing of companies that signed the Safe Seed Pledge for 2010. That's a bit dated, and there are reputable companies that just won't sign on to something like the pledge that still refuse to sell genetically modified seed. But the listing is a nice starting point for anyone looking for seed houses that lean towards organic, open pollinated, and/or non-GMO seed sources. Monday, April 18, 2011 - Potatoes Today was a busy day filled with scuffle hoeing parts of the garden and around some trees planted last year, but the big event of the day was getting our potatoes planted. April is a bit earlier than I usually plant our potatoes, as they tend to like warm ground. But the next two rows in our garden plan was for potatoes, and we seem to be having an early spring. So after driving my mower in to the repair shop today (That'll take care of our tax return!), I got started. But what I didn't do was get out a camera, so today's posting is straight text. I planted our potatoes in our main, raised bed garden. I haven't grown potatoes on that ground before, although the potato rows are almost too close to where our caged tomatoes grew last year. Potatoes and tomatoes are related and share some of the same plant diseases, so I'll need to be vigilant in watching for signs of disease and also spray the potato plants early with Serenade In hopes that our peas will be up and out of the way before our potatoes need their full space, I just left two feet between our row of peas (not up yet) and our first row of potatoes. I usually space rows of potatoes three feet apart and at least that much from any other crop. We'll see how this one turns out. Potatoes "like" well drained acidic soil. Since our main bed had been heavily limed a year ago, I would normally have used a good bit of sulfur to drop the soil pH in the potato rows. Since our soil was too damp to till the rows, and they'd been thoroughly tilled a couple of weeks ago, I used a spade to make a 6-8" deep trench for the potatoes. I added a bit of bone meal, since I have plenty left over from bulb planting, a light sprinkle of 5-10-5 fertilizer, and a lighter sprinkle of Maxicrop After adding fertilizers to the trench, I partially filled the trenches with sphagnum peat moss. I'd caught a closeout deal at our local TSC
Update: I added the image above of the potato trenches on Tuesday (4/19/2011) after we'd had heavy rain overnight and light rain most of the next morning. I planted a fifteen foot row of Kennebecs (brown potato) and another of Pontiacs (red potato). Since I'd bought a five pound sack of each variety and was planting pretty short rows, I was generous when I cut the potatoes, leaving at least three eyes on each potato set. I also planted the sets about six inches apart in the row, which is much closer than the recommended twelve inch spacing most folks use. We've suffered from bare spots where sets didn't grow the last two years, so I decided to experiment a bit with a close planting. For your plantings, five pounds of seed potatoes cut into sets with two or three eyes on each should usually plant at least a thirty foot row! Besides being really busy today, one of the reasons I didn't get out the camera was that I knew I was breaking or at least pushing the envelope on a lot of good planting practices today. The soil was damp in places, but I should get away with digging in it, as it's supposed to rain both tonight and tomorrow. I didn't reduce the soil pH to normal levels for potatoes, but again, the peat moss may do the trick. The second row of potatoes, the Pontiacs, comes right up to where our caged tomatoes grew last year. We had problems with both bacterial spot and anthracnose in our tomatoes last year. And, our raised bed is really rich soil. I could end up with lots of top growth and very few potatoes in the ground. So, today's posting probably isn't going to be your best garden guide for growing potatoes. But sometimes when you "break the rules," things turn out okay. I just didn't want to go through growing potatoes again in the nasty, compacted clay soil in our East Garden where I've grown them the last two years. Our first crop there did fairly well, but last year we got almost nothing due to dry conditions. (Watering in the East Garden involves toting water.) Our main garden plot is filling up. I still have to plant green beans and kale and also transplant pepper plants when they're ready and the weather is warm enough. I also will have tomatoes to put out, but some of them will go in our old Plot A area, just north of our raised beds. The rest, our open pollinated Moiras for canning and tomato seed production, will go in the East Garden, far away from any chance of cross pollinating with any of our other tomatoes. One other job I've been working on for several days bears mentioning. Last summer, while out walking in the garden at night, I almost poked myself in the eye by walking into one of our T-posts that hold the trellis for our peas and cucumbers. It was an old, but good post, but the white paint on the top had worn and rusted off. So a few days ago, I began wire brushing our T-posts and repainting the tops with gloss white spray paint. While I was out shopping on Saturday, I picked up a can of dark green rust preventative spray paint to do the lower parts of the posts. While I may not get all the T-posts completely cleaned up, they'll all have a bright white top. We're into one of those rainy spring weather patterns where it's a bit difficult to get anything done outside in the garden. I've already planted our softbeds at the ends of our main, raised bed garden, that can be accessed in pretty much any weather. But we're waiting on the soil to dry out enough to do one more round of rototilling in the center of our main garden before planting kale, green beans, and much later, transplanting pepper plants.
The rain and cool, but not cold temperatures have turned our lawn green. Normally, I'd be frustrated that the rain prevents me from getting out to mow, but our mower is still in the shop for repair. I guess I'll just grin and bear it.
I'd seeded our marigolds in flower pots, however, so they took a bit more work. I carefully lifted a section of soil from the pots, separated the tiny plants, and transferred them to fourpacks. I didn't transplant all the marigolds, as some of the pots still have seed emerging. When things had warmed a bit outside, I went out to pick asparagus. There weren't many spears to be picked today, but I added what I got to a rather full green bag of asparagus already in the refrigerator. I also surveyed the crops we already have in and up.
I'd no more than gotten the bottom wire And as I'm writing up this posting mid-afternoon, it's raining so hard that I can just barely see the garden from my second story office window.
With the wet weather pattern we're in, I'm sure farmers are beginning to get concerned about getting their crops in. Low lying fields that have already been planted may have to be replanted due to flooding. I farmed for just a few years and well remember the race to get our corn in before May 10. The old axiom is that you loose a bushel an acre per day for field corn planted after May 10. With some of the new, short season hybrids, I'd guess that's not the case anymore, but it still is beginning to look like a tough spring for our area farmers. We still have plenty of time to get our sweet corn, melons, peppers, and tomatoes planted. It's actually too early to plant the supersweets we grow for sweet corn, as they require a good bit warmer soil than we now have. But little by little, we're getting the garden in. As a senior, I think that's one of the tricks to having a nice garden. Don't overdo in any one day.
Saturday, April 23, 2011 - Dianthus, Storms, and Phones Out For the next five days, the least probability of precipitation here is 50%, so outside gardening will be limited to working raised beds from the side (or on walking boards) and transplanting some flowers around the side of the house. We have a nice sidewalk that wraps around the eastern half of our house with a small area of flowerbed between it and the house. That flowerbed has lots of shrubbery in it already, but we've begun putting in perennials in the open areas. So far, we've put in tulips (almost all of whose blooms got shattered by recent storms) and daffodils. I also got some dianthus going out front two years ago, and last year added four marked down hostas from a local discount store to the front flowerbeds.
You can just barely see some red and white blooms of the one dianthus peeking through the other plants in the image (above left). Looking down in the image below, one can see the pretty red and white flowers. We also had solid red and purple blooms that year (2009).
I should note here that the Stokes Seeds' general growing information for all dianthus states, "Keep seed pods picked off to prolong flowering." I usually do this, but from the photos above from 2009, just getting to the dianthus took a bit of work. Dianthus are listed in the Stokes Seeds catalog under annuals and perennials. The Carpet Series Mix I started with are described as a biennial, but are grouped with annual dianthus. Their description says they are a "dwarf hardy dianthus that flowers slightly earlier than dwarf annual types, and adds that "plant breeders crossed Sweet William with annual dianthus" to create the series. My experience so far is that the plants are true perennials. While it's getting really late to start dianthus indoors, they can be direct seeded into a flowerbed in May. They germinate best at soil temperatures around 70o F, according to Stokes. And they do produce lovely flowers. I'll be interested to see how our plants from saved seed perform. Hummingbird The first of "our" hummingbirds arrived this week. I've had a feeder out and ready for them for weeks. As I watched it drink at our feeder, I wondered if it were the only one. Silly boy. As I watched, another hummingbird "made a strafing run" on the bird at the feeder. They're already fighting for dominance at the feeder! A Big Storm We had another severe thunderstorm last night. Our power blinked several times, but stayed on. We discovered only this morning that the loudest crack of thunder (no rumble), that sounded simultaneously with a brilliant flash of lightning, apparently took out our phones. (There was lots of incredible lightning last night, so it's really hard to say which strike took out the phones.) This morning, instead of picking asparagus as my usual first outside chore of the day, I was at the phone box on the side of the house, determining if the problem was ours or the phone company's. It turned out that the problem was interior phone wiring. Over the seventeen years we've lived here, I think I've replaced the same interior phone line four or five times. And I'll get to do it yet again, as the lightning once again took out just that line, leaving the other two leads unharmed. From the looks of the clouds outside and the online weather radar, I'll just be able to get his posted before rain fade takes out our satellite internet connection...again.
Tuesday, April 26, 2011 - Too Much...of Everything We've had over eight inches of rain here this month, with lots more predicted in the next few days. I can see asparagus that needs to be picked from my office window, but am having to work up my resolve before slogging out across squishy turf to pick it. My ancient copy of Dreamweaver MX is refusing to properly display several elements of this page as I write, as I've loaded too much text and too many graphics, lots of large photos, and almost daily ads, for it to process them all properly. Fortunately, the pages still seem to load and display properly in various web browsers. The wind continues to whip our poor plants already in the garden with 30-50 MPH gusts. I inadvertently enabled an email account I had abandoned, and my mail client began to download thousands of spam messages. I finally had to do a "force quit" to stop the inundation. The mower repair shop called to say my mower which wouldn't start for me has started every time the service technician has tried it! At least they can repair the steering that is again broken for the third time in twelve months. Whine...whine...whine... But...I could be living in a flood plain, or in one of the countries we so often read about in the news. So my prayer this morning was one of thanksgiving for another day and for forgiveness of my wretched, unappreciative spirit. But Lord, could you calm the wind a bit so the roof won't leak so badly? I am a person of faith, even though I don't write about it much. I wasn't for a long time, but in the depths of my despair when my first marriage ended and we lost the farm, the Lord lifted me up and graciously granted me a new life and family. Even when there's "too much" of many things, there's so much to be thankful for and praise the Lord. I looked out at our raised bed garden plot yesterday afternoon during the pounding rain. I was shocked to see that all of it, other than the soil I left piled up to hill our potatoes, was under water. Our monthly rainfall is now up to 11.36 inches, although we've avoided the worst of the weather tragedy that has struck across the south of our nation. (And no, I didn't think to get a photo of our underwater garden.) By this morning, the raised bed had drained. When I walked (squished) beside the garden in my "mud shoes," I didn't detect any damage to the plants we already have out. The bed had drained before the morning sun could burn the plants through standing water. I have noticed that our asparagus production has dropped to just a few spears each day. What was up this morning wasn't ready to pick. I hope with some drying and sunshine, production will pick up again.
The ten day forecast shown at right is from Weather.com's Gardener's Local Forecast, a site I featured earlier this month. Something I mentioned only in passing really deserves a bit more here due to its importance to seniors. The site has a long bunch of weather factors shown in graphic, including a UV Risk Forecast. Since many of us have absorbed too many rays over the years and must remain vigilant about not exposing ourselves to more sun damage, the UV Risk Forecast can be a really helpful reminder.
Both the EPA and SkinCare.net have good pages about dealing with UV. The latter's The Danger of Ultraviolet Rays has lots of good information, including some I especially try to follow:
So I garden early and late when I can and keep my protective clothing on when I must work at peak UV exposure hours. (And yes, I still have those rare days when I'm approaching heat exhaustion and dehydration when I say, "Screw it," and strip off the hot, protective garb...and then pay for it later with another trip to the laser surgeon!)
And yes, I am working on a feature story about gardening and skin cancer, but it's not done yet. I hope to enlist my neurosurgeon son-in-law and my cancer surgeon to proofread it first before sharing it with you. Full disclosure: Coolibar is not one of our affiliate advertisers. Amazon Getting back to gardening a bit, I spent a few minutes transplanting the last of our marigold starts from the single pots I'd seeded them into fourpacks. I also had to add a "shop light" to my shopping list, as one that I bought only a year or so ago had its ballast unit fail. A whole new shop light is cheaper than just a replacement ballast unit! But then, I've never had a replacement ballast I've bought and installed fail either.
From the
at Senior Gardening |


 I woke up to the sounds of a strong thunderstorm this morning, so that pretty well told me we wouldn't be doing any outdoor gardening today. (We're the white dot in the sea of orange and red in the radar image at right.)


 We have a gray spring morning today with a pretty good line of thundershowers headed our way. From the looks of the five day forecast, watering the garden won't be a concern in the near future.


 Having to take such preventative measures is a total pain, but...I also have around thirty scars on my hands, arms, and face where skin cancers and
©2011 Senior-Gardening.com