One of the Joys of Maturity |
|
| Affiliated Advertisers |
| < | Clicking through one of our banner ads or some of our text links and making a purchase will produce a small commission for us from the sale. The Old Guy's Garden Record
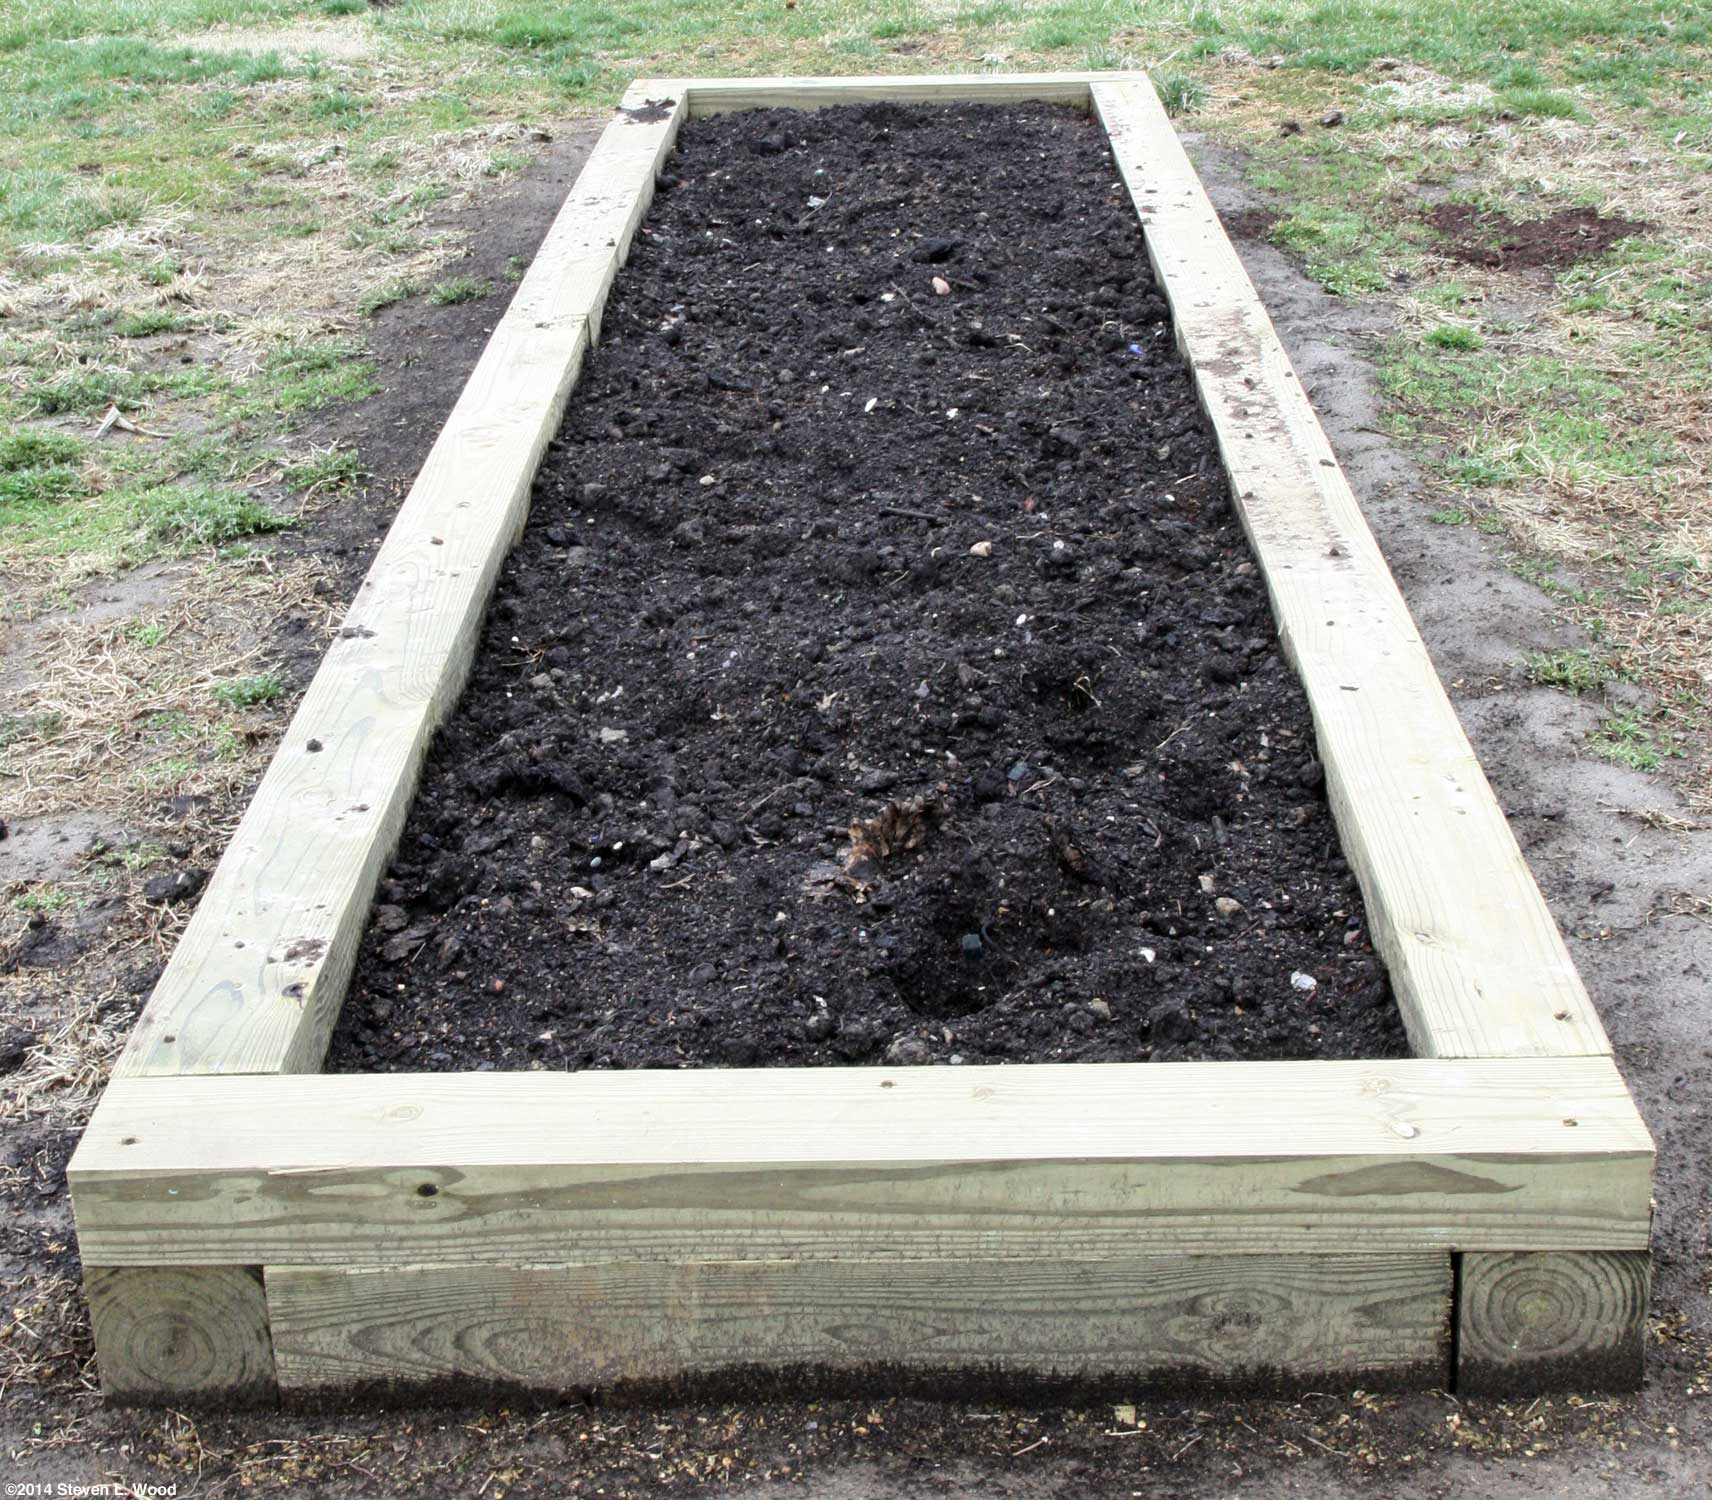
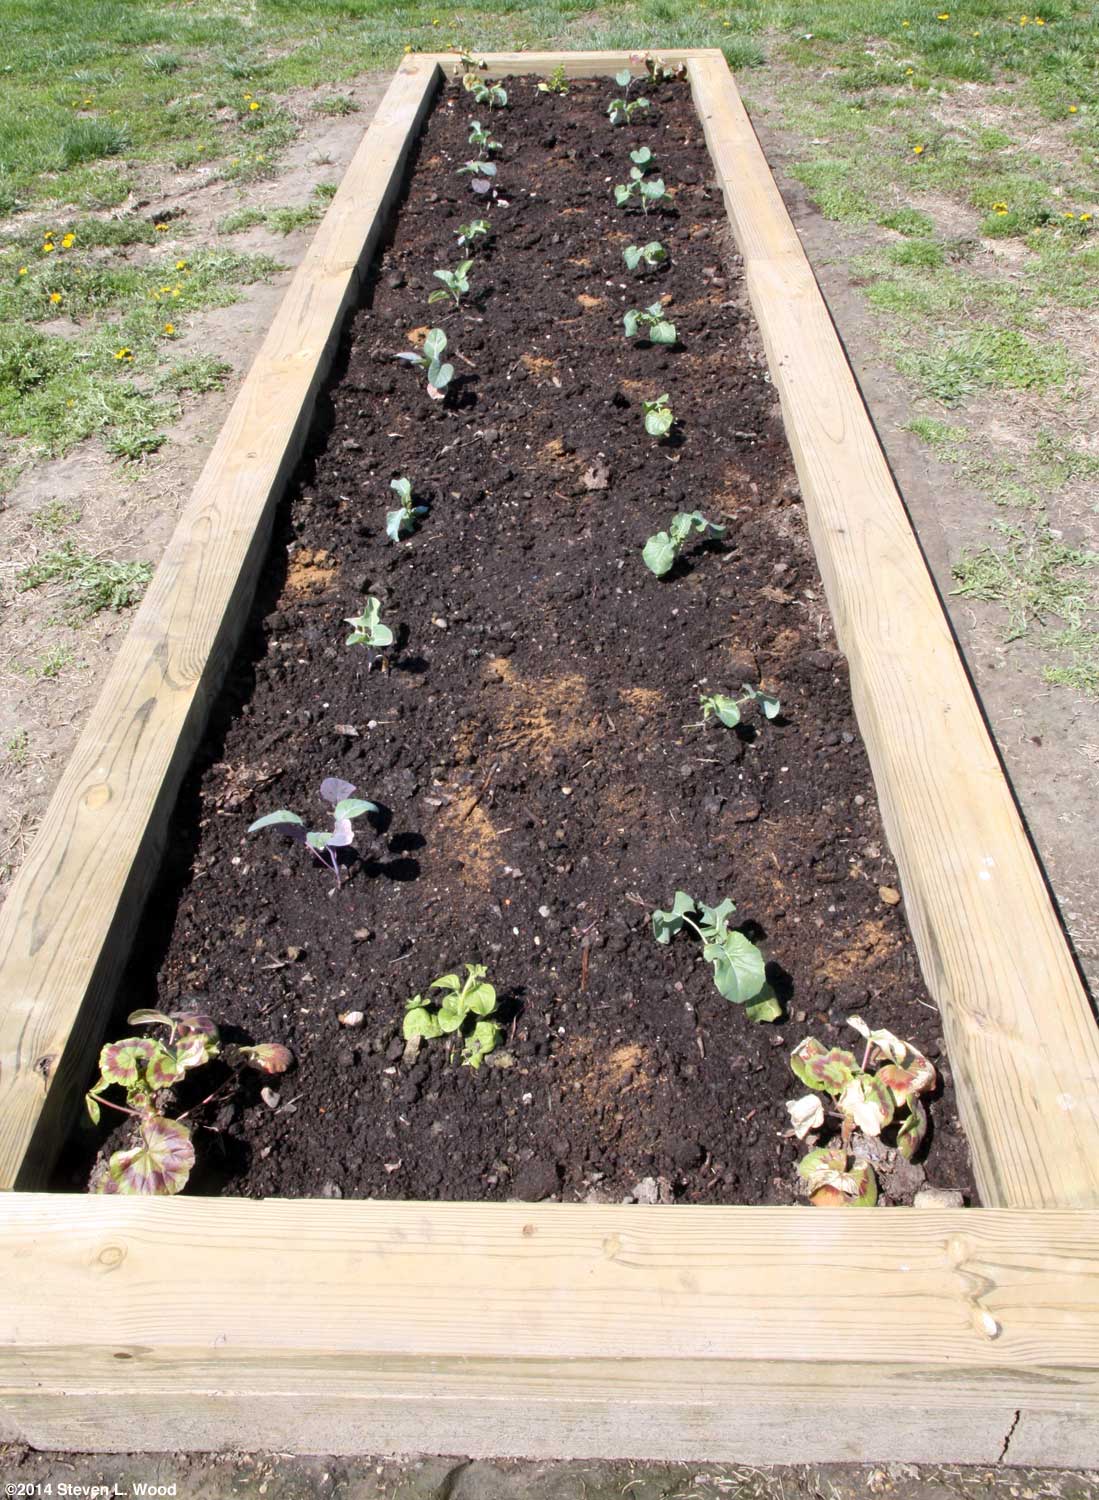
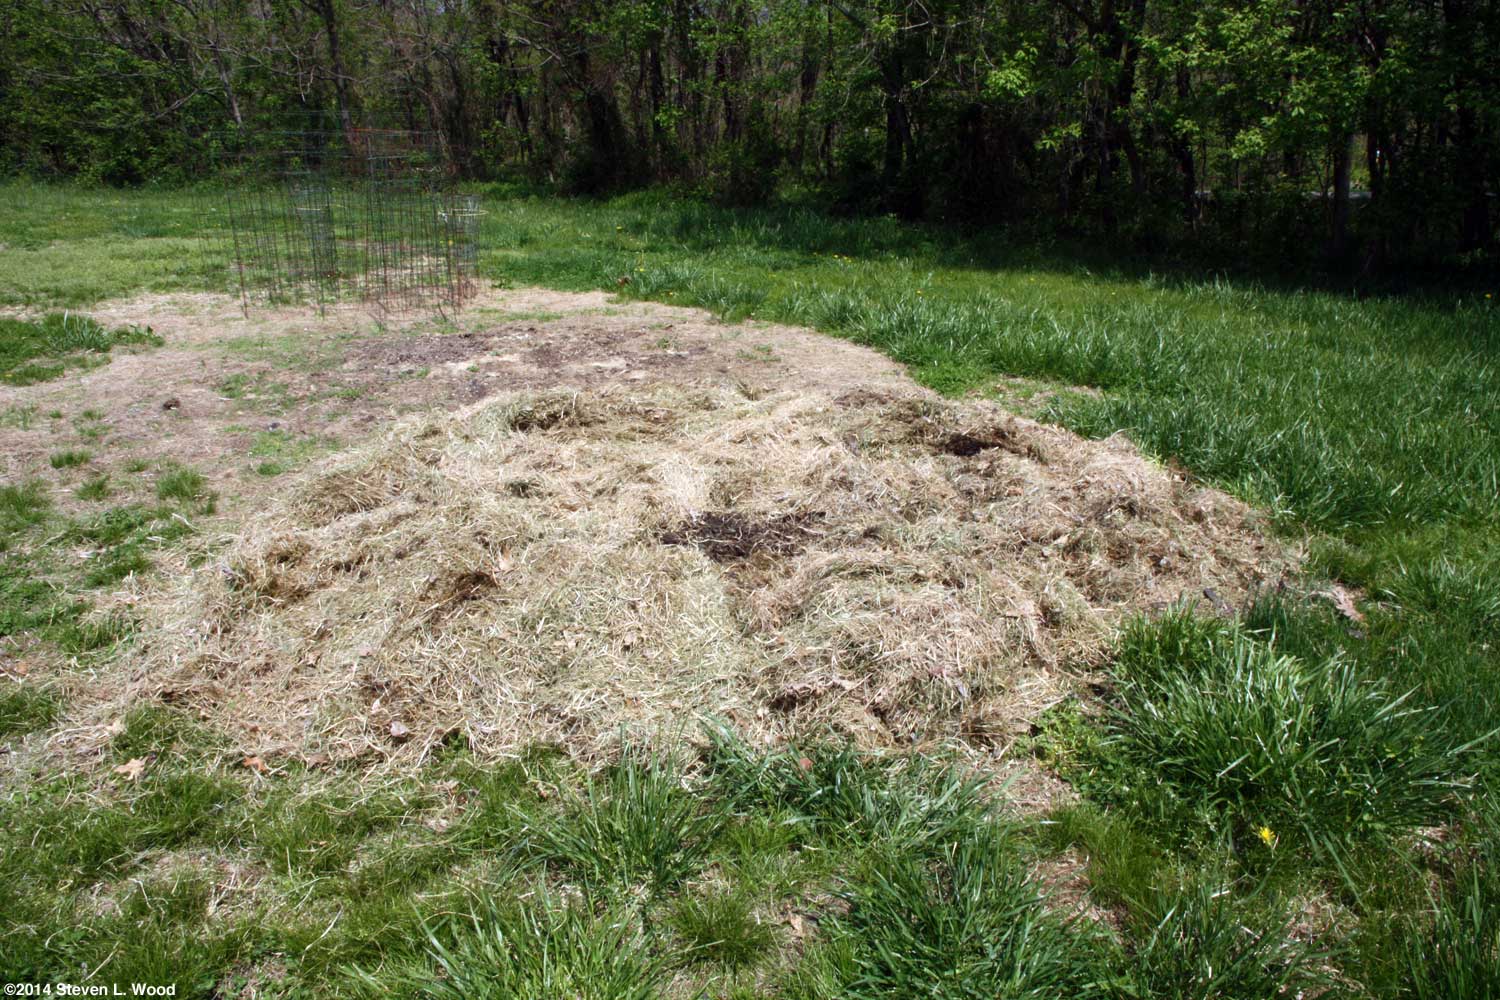
I usually try to start each month with a posting previewing what I hope will occur during the month. But this time around, I've simply been too busy to write, or possibly too sore to write until this evening. Blessed with a couple of beautiful spring days, I decided to add another narrow raised bed in a spot we've gardened for years. I'd planned to plant broccoli and cauliflower in the area, but also remembered our standing water problems there last spring. So I bought a truckload of very heavy landscape timbers and got to work. I spent most of Monday leveling ground and getting the base layer of timbers anchored. Since these were 6" x 6" x 8' timbers, that was most of the heavy work. Today, I laid the second layer of timbers using 4"x 6" x 8' lumber. Since I didn't do anything different from what I describe in our feature story, Building a Raised Garden Bed, I won't repeat the details again here. Once I had the bed framed, I added a couple of bales of peat moss and a whole lot of compost to fill it nearly to the top. Part of the truckload of compost went to raise the soil level in our main raised garden bed, with the rest used to fill holes in the yard.
With any luck, I may be able to begin transplanting broccoli and cauliflower into the new bed early next week. Since I fall tilled our large East Garden, I may be able to transplant leftover brassica transplants there soon, too. Possibly a whole lot cheaper and easier than what I did! |


|
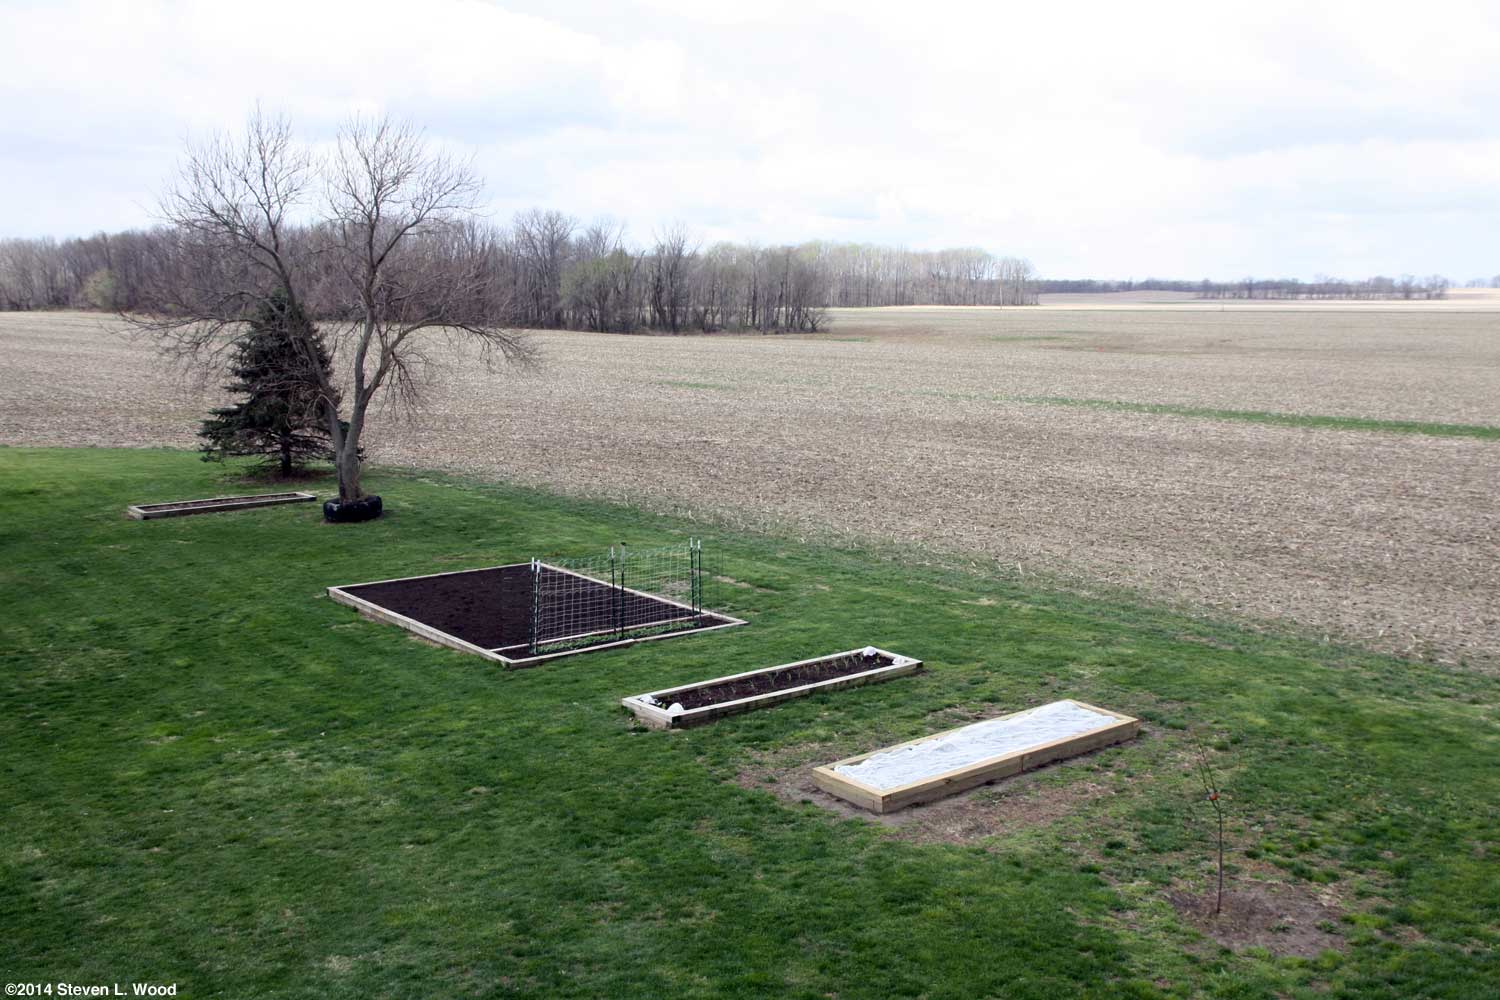
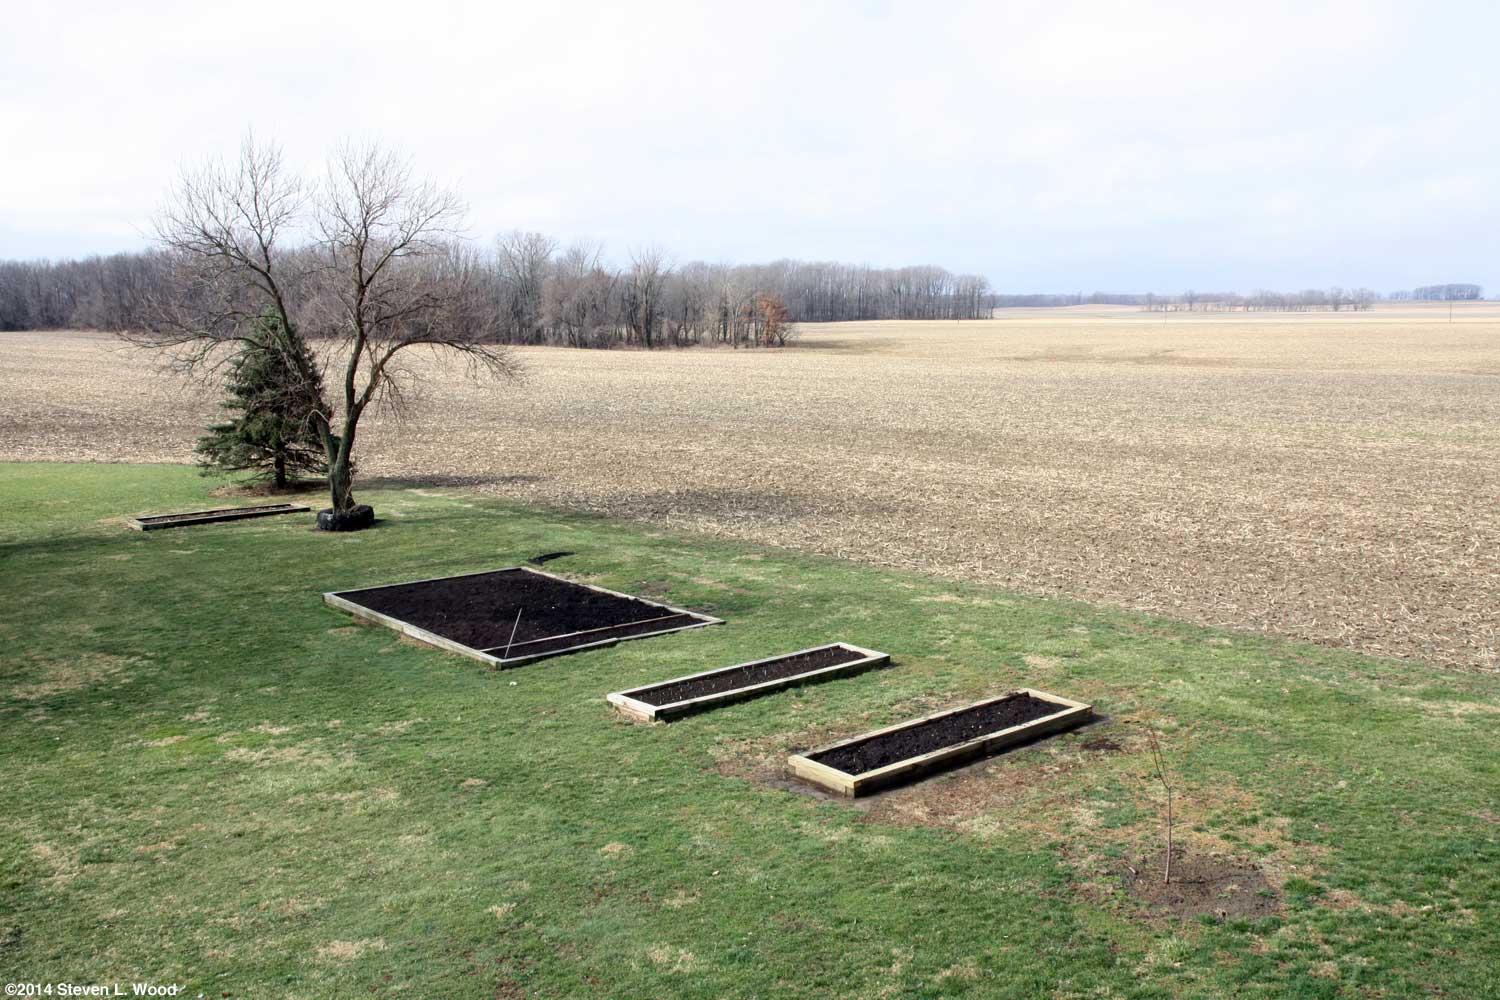
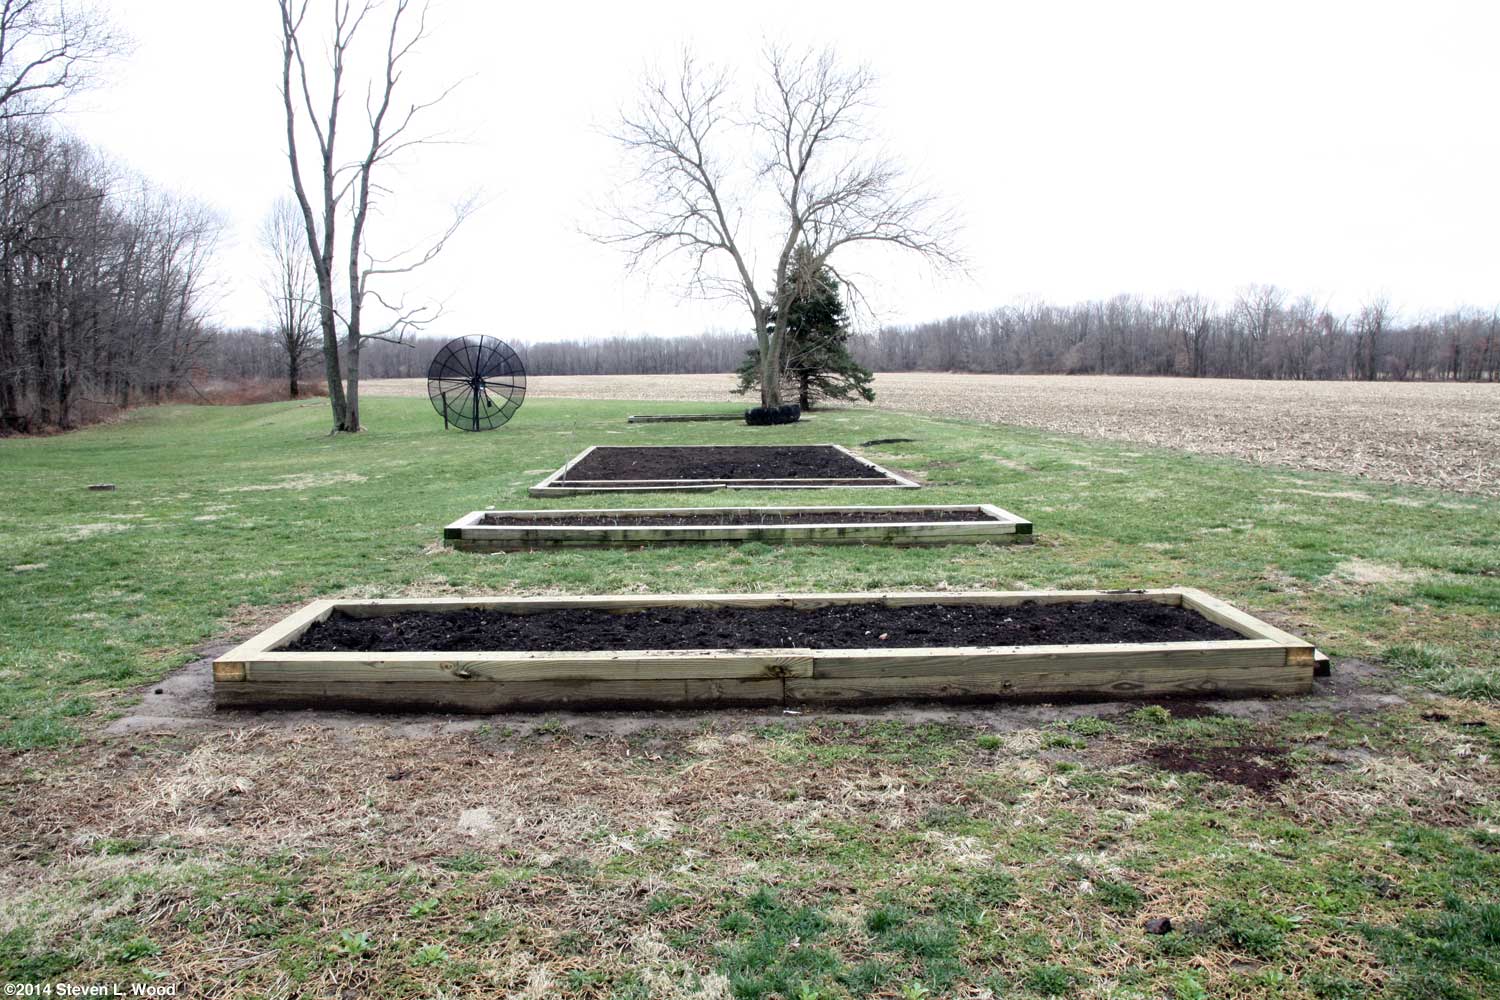
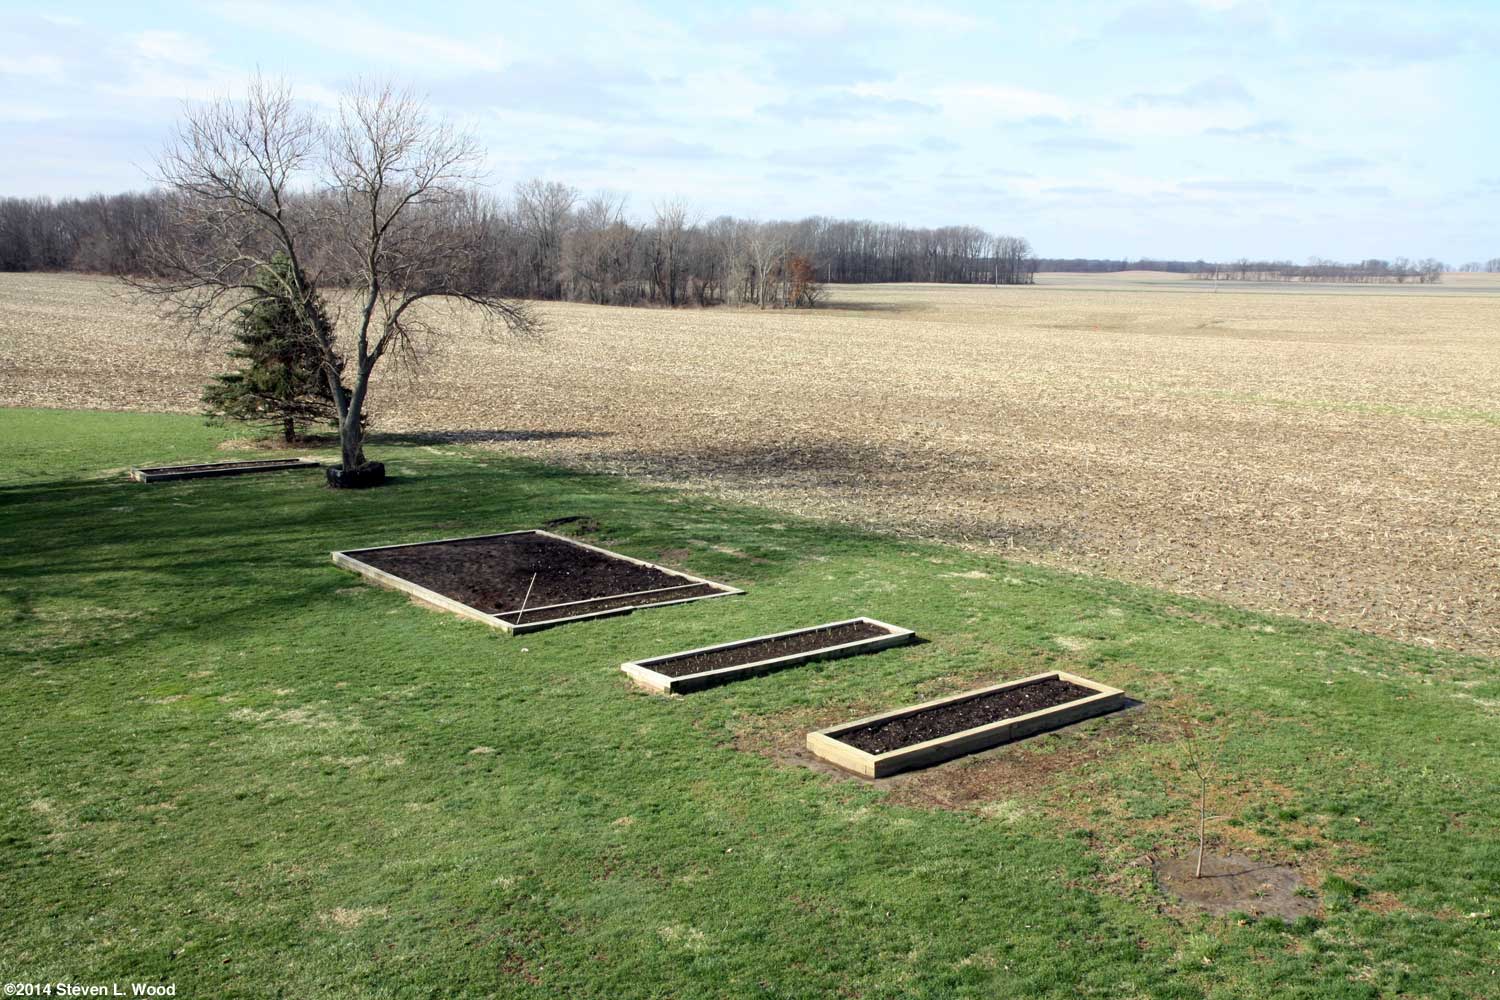
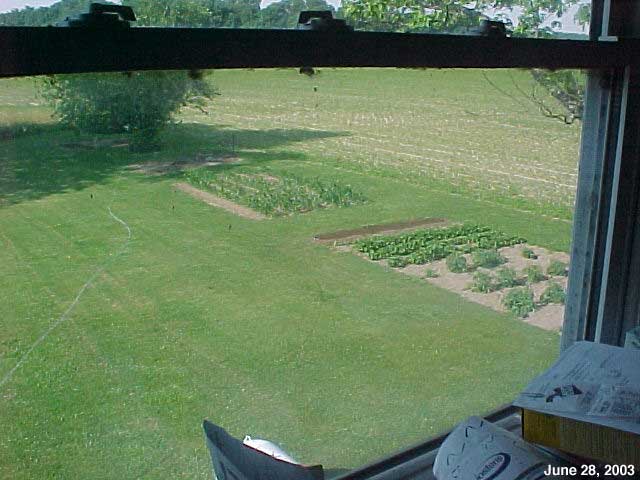
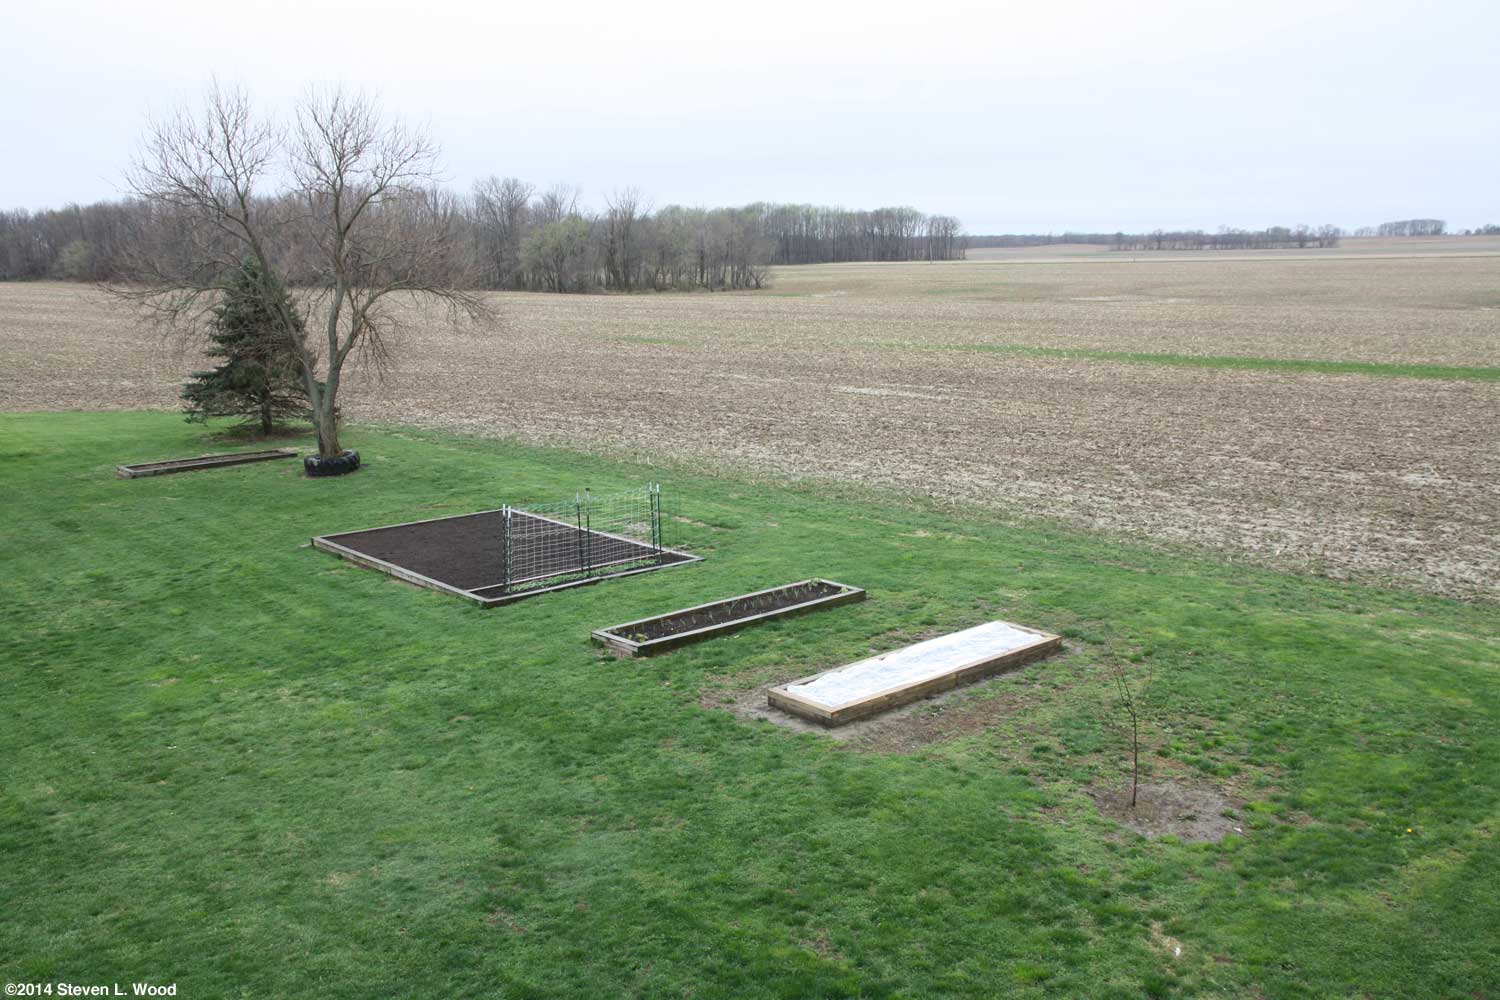
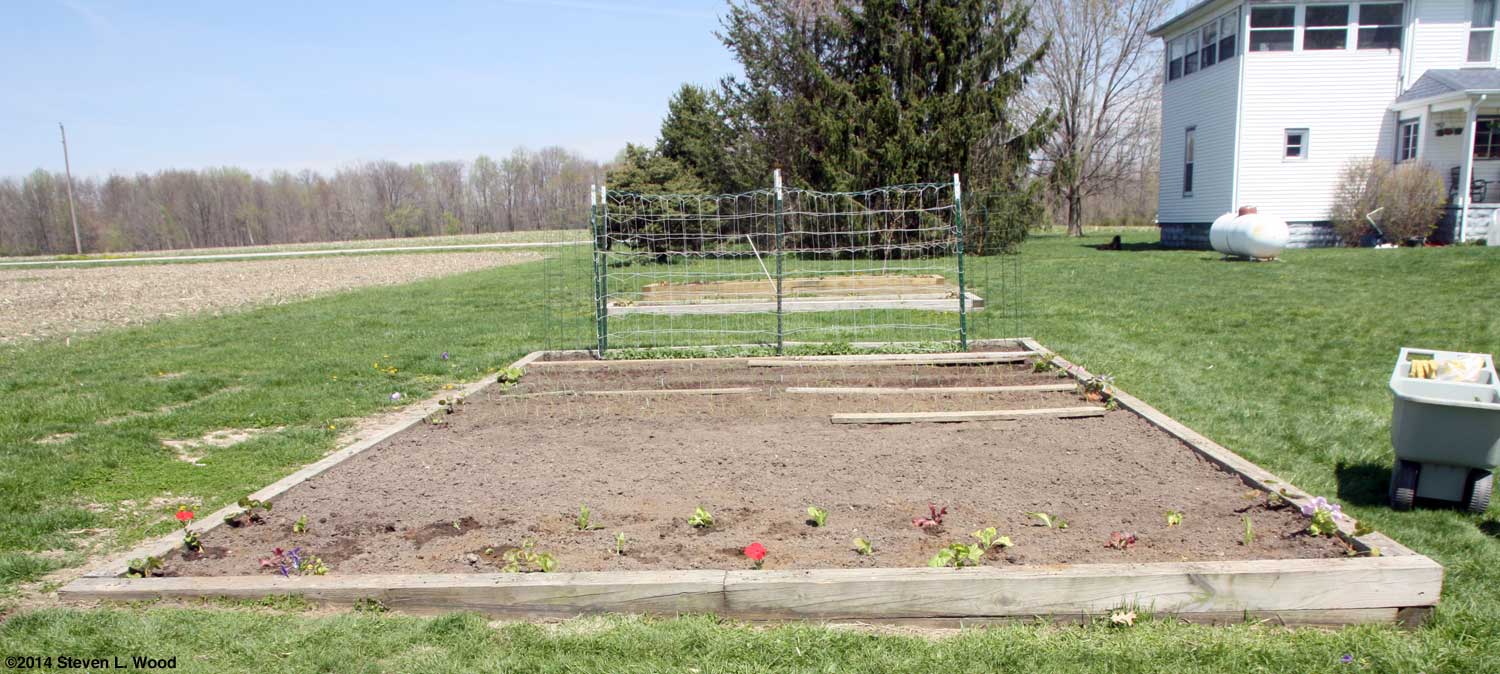
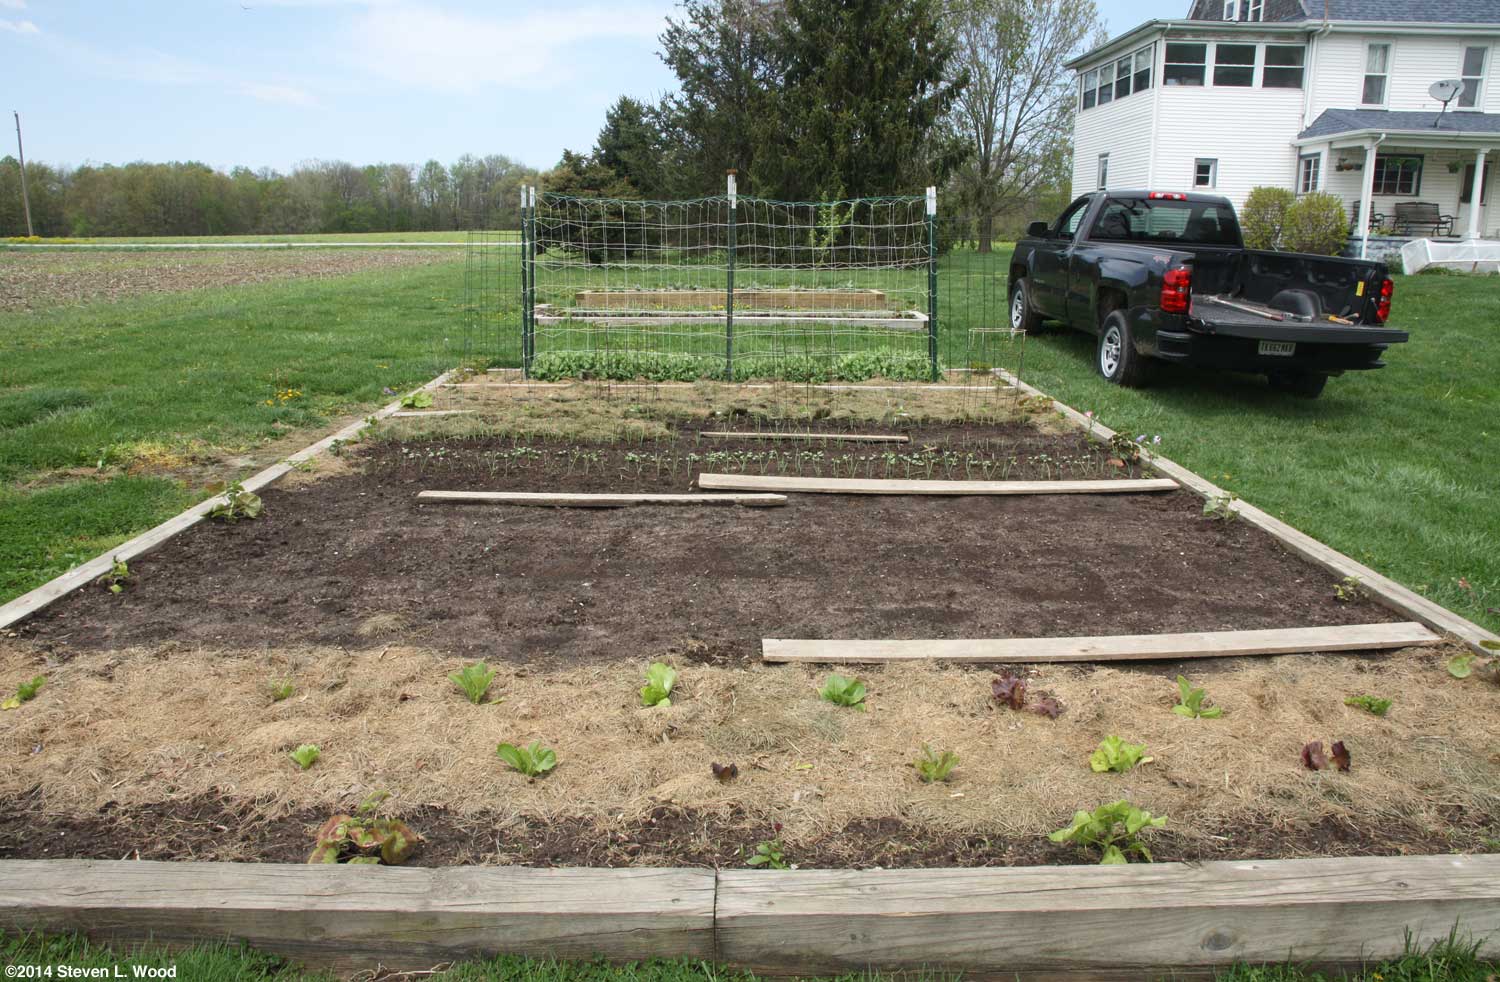
With the addition of one more raised garden bed, I thought I might relate here what got us into using raised beds. While I'd always envied the raised beds shown and used on the old Victory Garden TV show, our first raised bed got started as a terrace to prevent soil erosion. The image at right shows how our back yard slopes steeply down from our current main raised bed. After terracing two sides of the bed in 2008, I went ahead and enclosed the bed in 2009, making a rather large, 16' x 24' raised bed. Since that time, I've added three much more sensible narrow raised beds, the last two measuring 4' x16' on the outside with approximately 3' x 15' of usable space inside. Our first narrow raised bed was a bit wider, as I was building it around an established asparagus bed. Raised beds have the advantage of drying out more quickly in the spring than surrounding ground. They can be worked from the edges in almost any weather, possibly the biggest reason for me to build the raised beds. Keeping the garden soil contained is also an advantage for us, as our precious topsoil used to run down the yard in heavy rains before I terraced our main garden bed. Raised beds carry some significant disadvantages as well. The way I build them, they're quite expensive. Timbers, rebar (for anchoring the timbers), peat moss and compost for the latest raised bed came close to $200! During extreme dry spells, even with lots of organic matter added to the soil, they can become very dry, requiring lots of irrigation (which our deep well won't support from July through September). Getting a rototiller into the two, newer raised beds requires a couple of wood blocks for the tiller to climb. But one doesn't have to do a lot of tilling in these beds.
Our two newest narrow raised beds are a joy to work. Each has had lots of peat moss and compost added to the native soil. And simply by being a raised structure, weeds seem more obvious in them and get pulled with greater regularity than in our traditional garden plots. The bed on the near right with garlic tips showing was constructed in 2010. The one at right just constructed this week has the same dimensions as the 2010 bed, but was far easier to build since I'd done it before. However, in just four short years, I find that I have far more sore muscles from the experience of heaving around 85 pound landscape timbers than I remember having previously. From the photo below, one might think I'm done constructing raised beds on our property, but I have one more to go. When I save up enough pennies to afford red cedar landscape timbers (which cost almost triple standard, treated landscape timbers), I plan to enclose three sides around our shallow well with a raised herb bed. I decided on cedar timbers because they would be around a water source. While the current, pressure treated timbers no longer contain any arsenic, I'm a bit shy about using chemically treated wood around a water source, even a backup source such as our shallow well.
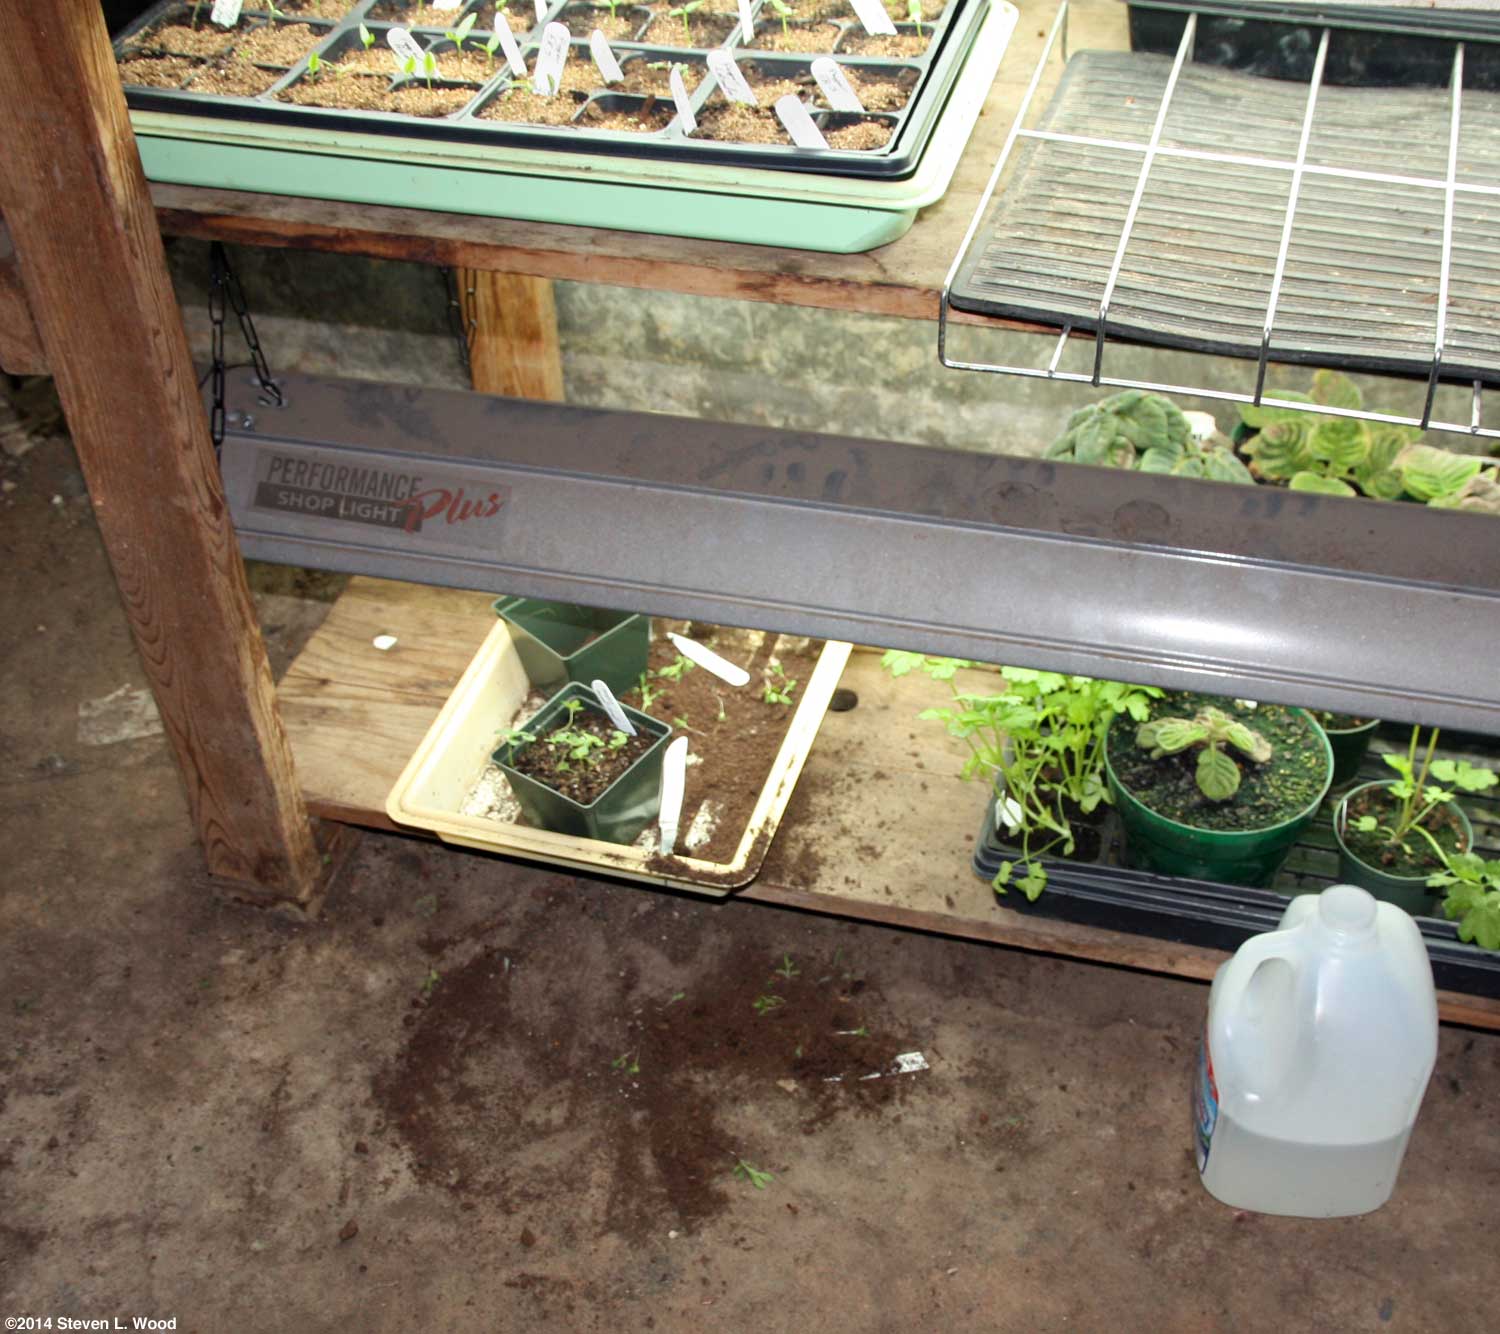
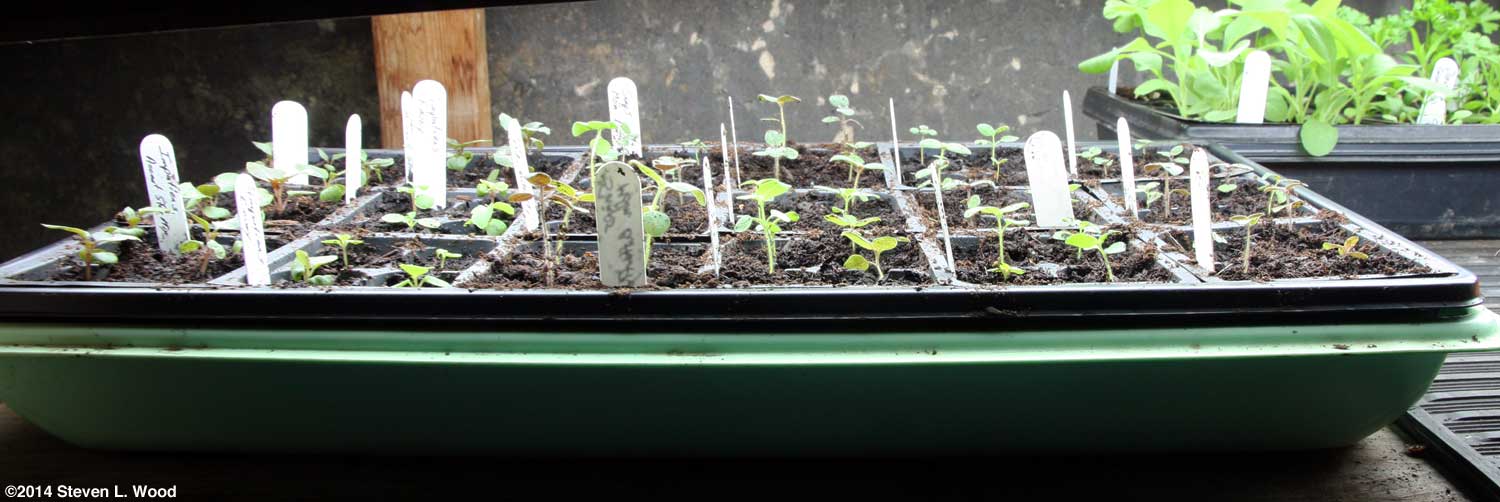
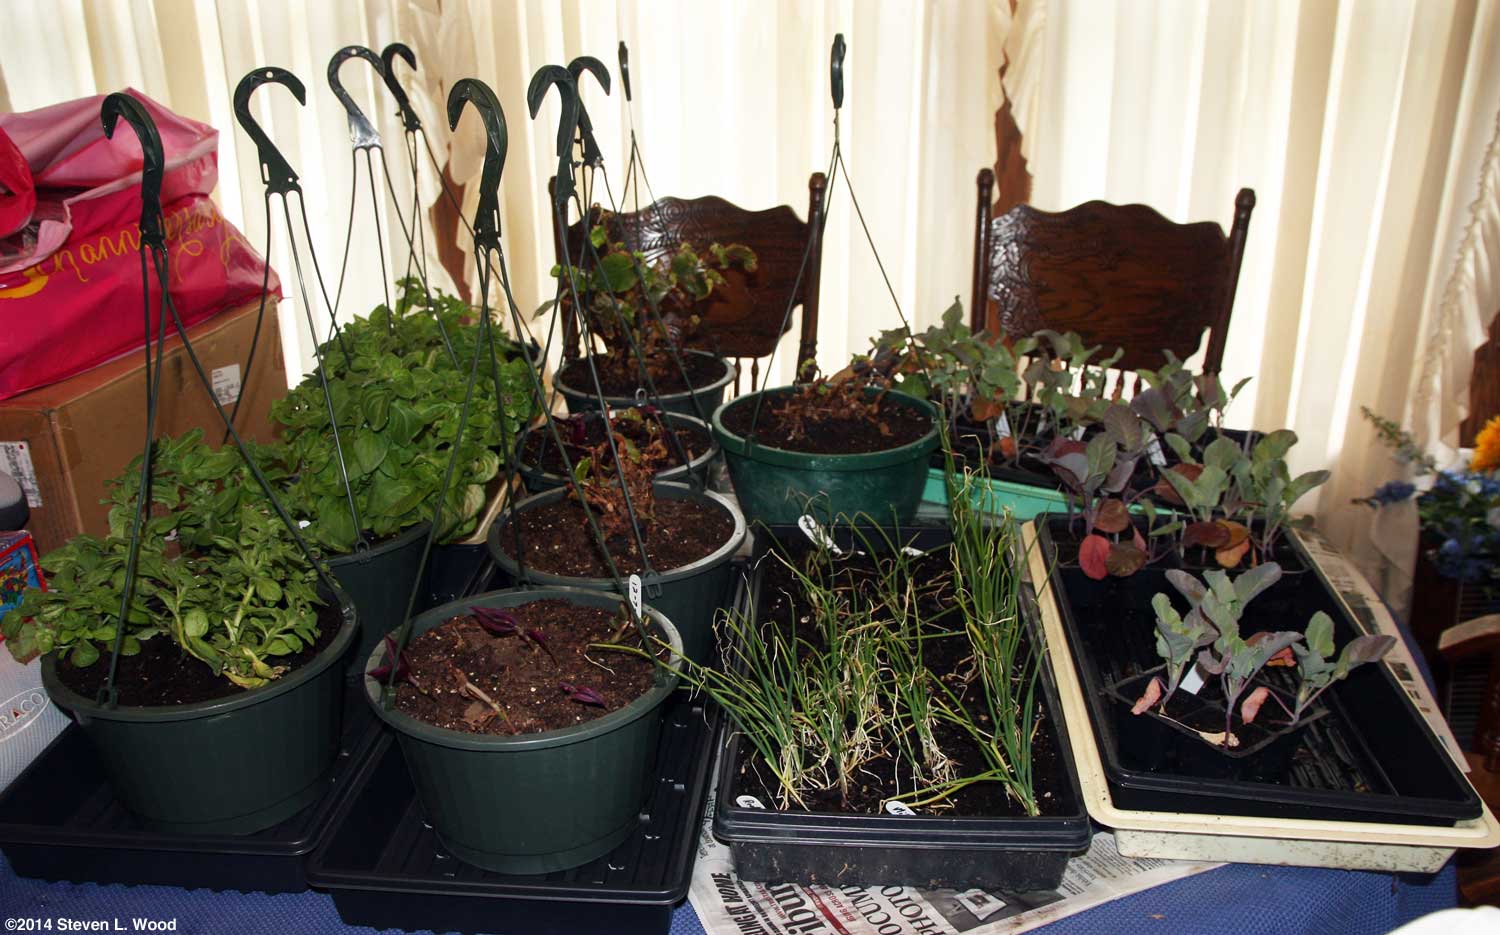
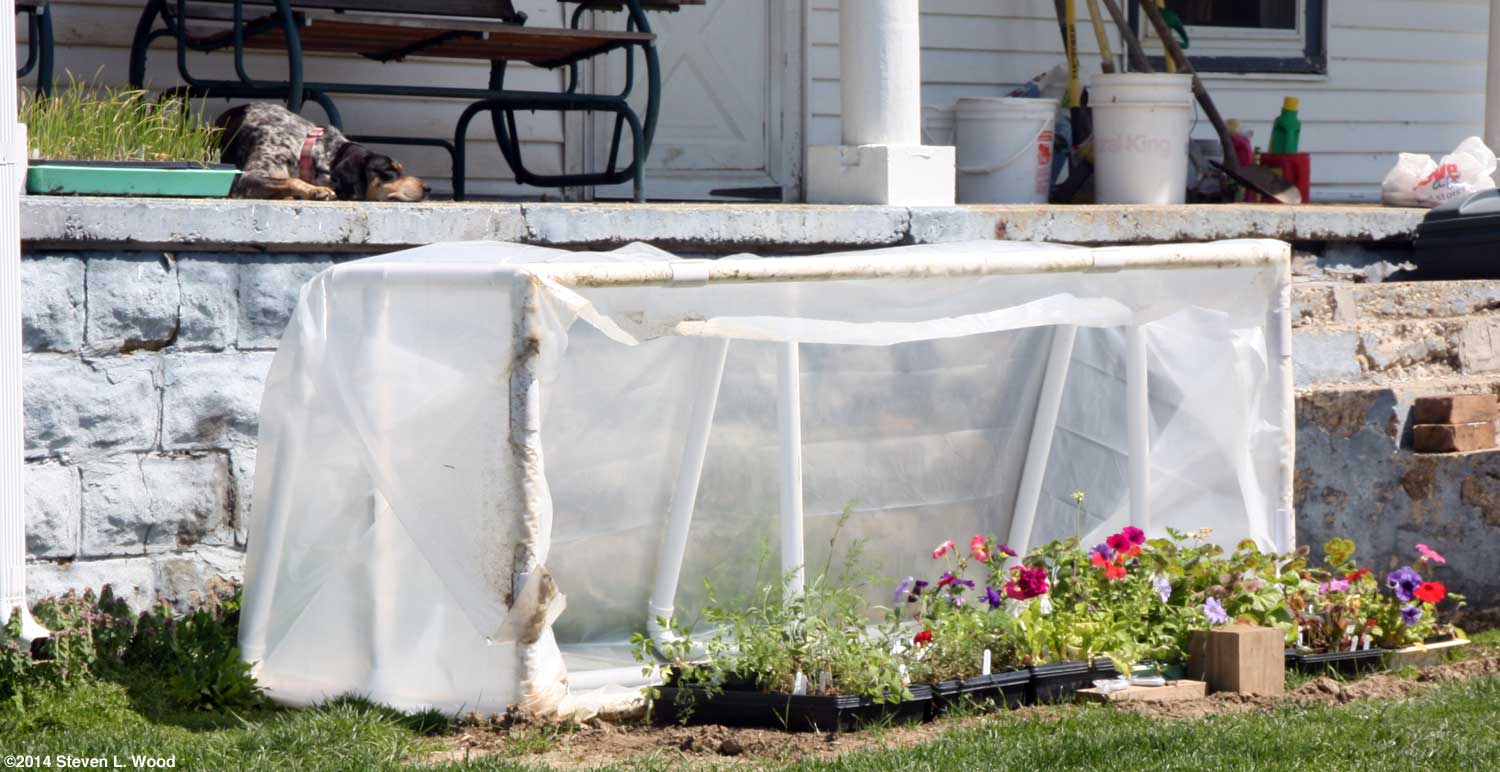
And as I write, I can hear the sound of rain outside. I purposely left our cold frame fully open this morning to allow the plants under it to experience their first rainfall, part of the hardening off process. I'll need to partially close the cold frame soon so that the rain doesn't beat down the tender young transplants. The tray of sad looking onions on the left are the ones I started in early December as a germination test of sorts. They've suffered from being in the tray too long. And then when I first carried the tray out to the cold frame, I dropped the tray! Considering everything, the onions are really doing pretty well. If you can't tell, the rain, warm weather, and raised bed building has given me gardening fever. I'm eager to get started!
Friday, April 4, 2014 - April Showers Bring...
April showers may bring May flowers, but they also produce a lot of standing water and flooding problems for folks living, gardening, or farming in low lying areas. We're on high ground, but still have a good bit of standing water from the approximate six inches of rain that has fallen already this month. Weather conditions such as we're having aren't all that unusual for this time of year in this area. We needed the rain, but getting so much at once will set back some of our gardening plans. Fortunately, we'll be able to work from the edges of our raised beds as soon as the rain stops and the cold front following the rain passes through.
I found the pot of catnip halfway across the plant room floor in rather sad shape, but I think some of the plants may recover. The cat(s) totally destroyed a pot of dianthus plants grown from expensive commercial seed. Since I have other dianthus grown from our own saved seed and was dumb enough to leave catnip where the cats could get to it, I couldn't get too mad about the whole affair.
The flat of impatiens and snapdragons transplanted yesterday had gone to a higher shelf and didn't suffer any damage. As I wind up writing this Friday morning posting, the rain has finally stopped. It's been replaced by steady winds of 40-50 MPH! It's spring "hold onto your hat" weather!
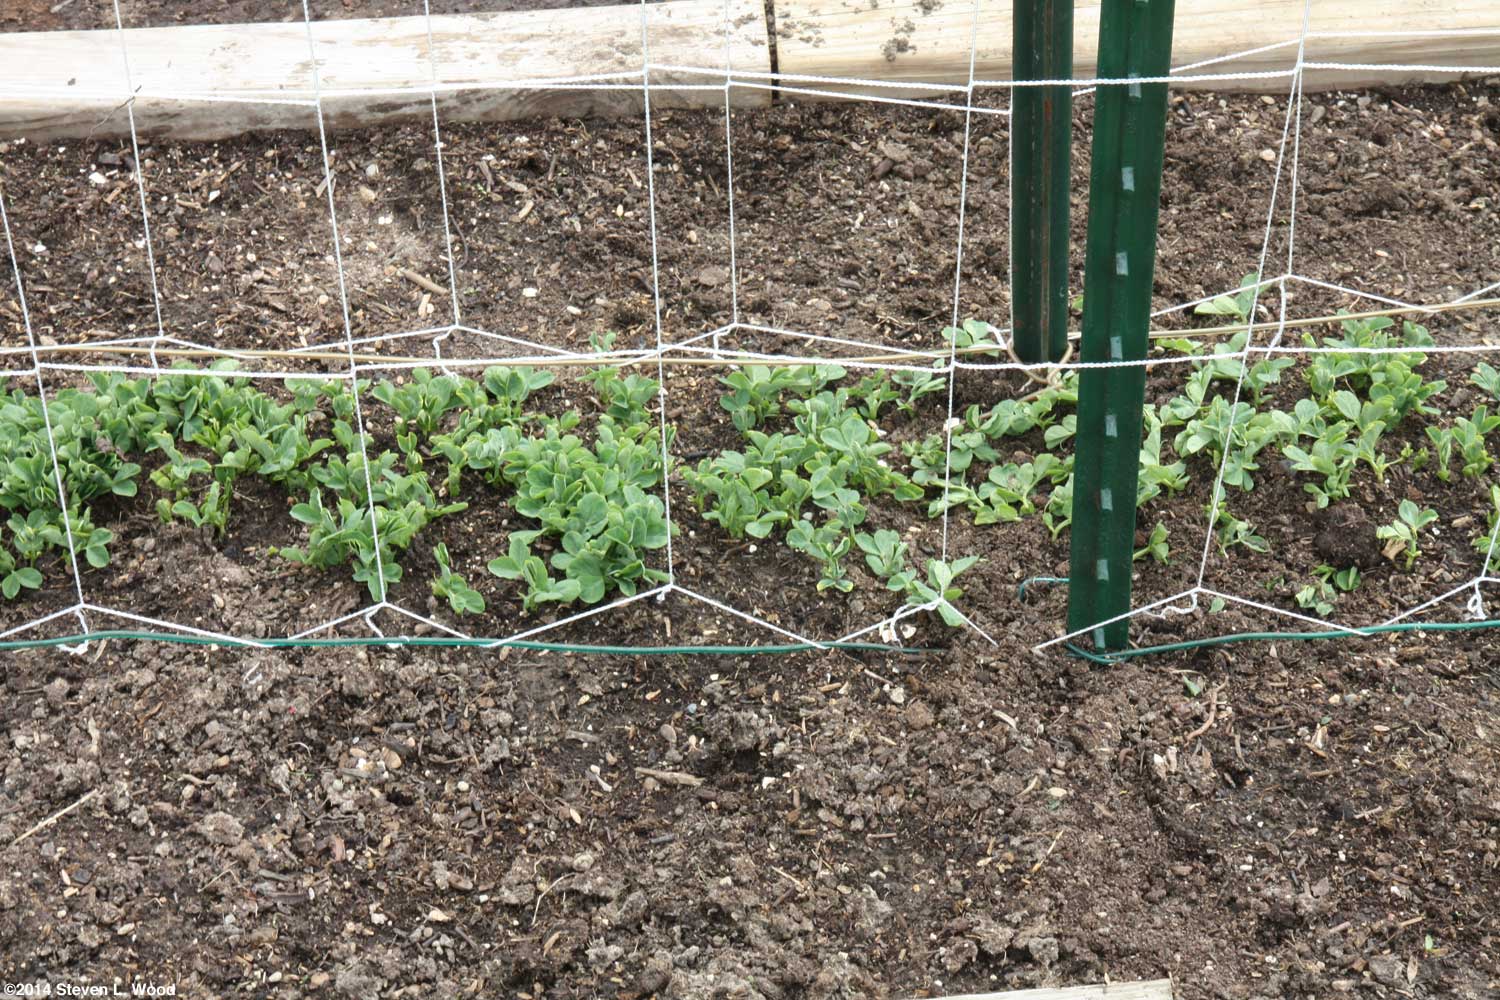
The row of peas I seeded at one end of our main raised garden bed on March 12 are up about a half inch. They'll need to fill in a bit more before I put up a trellis for them to climb. I also need to push in a few more Champion of England seeds, as I found a packet of them I'd missed in March. With clear skies this morning, I fully opened our cold frame to finish hardening off our brassica transplants. By noon, I had to close the frame to its propped open position, as a flat of lettuce I had moved to the cold frame yesterday was already showing some stress from the full sun.
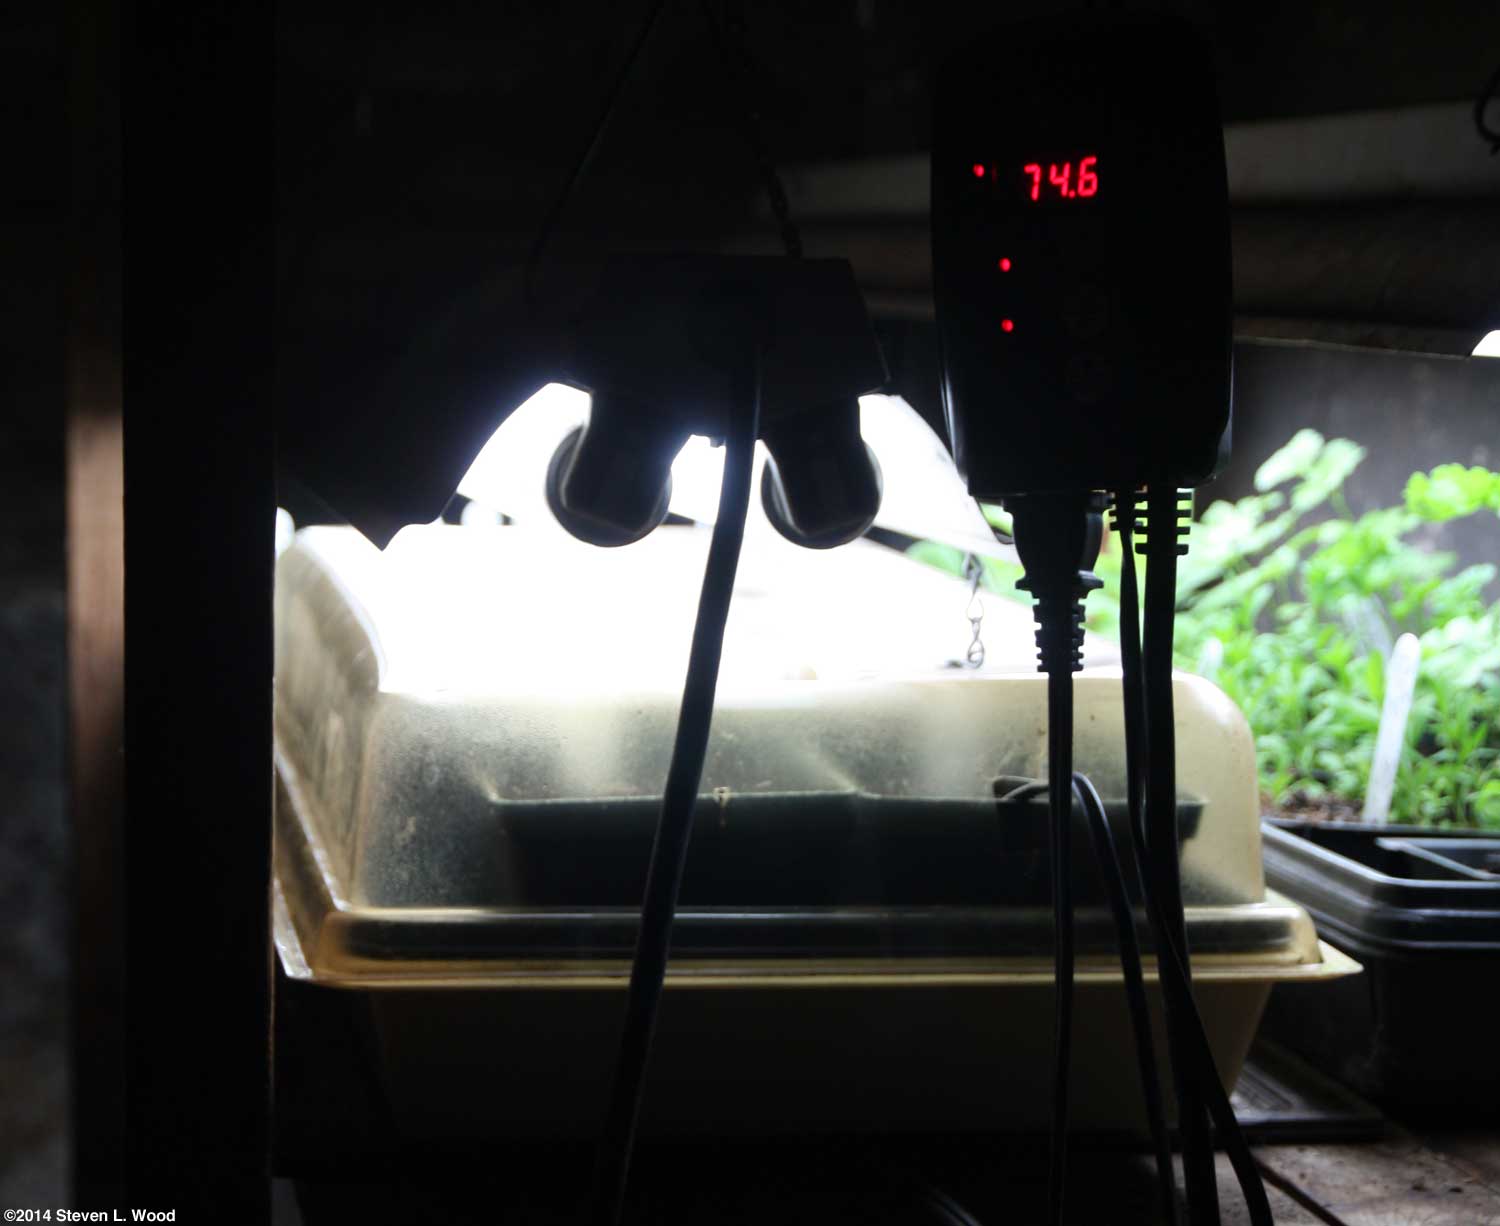
I start our melons in 4 and 4 1/2 inch pots so that I don't have to move them to larger pots before transplanting. If I could fit them in the tray and under the humidome, I'd use even larger pots! I lightly cover three or four seeds per pot with sterile potting mix. I'll go back and thin the pots where necessary to just two plants per pot. The flat of seeded pots is covered with a clear humidome and rests on a thermostatically controlled soil heating mat. While the image at right shows a temperature of 74.6o F, that's only because I just turned the heat mat on. The thermostat is set at 80o F, and actually could go as high as 85o F, as seedless watermelons take a lot of bottom heat to germinate well. For cantaloupe, I started two pots of Sugar Cube, a wonderful personal sized melon that we really like. I started one pot each of Athena, Avatar, and Roadside Hybrid. For watermelon, I seeded two pots of Crimson Sweet, a standard that serves as a pollinator for our triploid (seedless) varieties and also produces great melons. I also started a pot of Moon & Stars, an old favorite that can produce huge, tasty melons, although they're pretty seedy. Moon & Stars also serves as a pollinator. Our triploid varieties started are Trillion and Farmers Wonderful. Both produce melons similar, although a bit smaller, to Crimson Sweet with only small, immature seeds.
I allotted less space to melons this year for several reasons. I found last year that we needed to allow more space between our melon rows. During the drought of 2012, we couldn't water the melons we had planted enough (225 foot row), and had to pick and choose which vines would get watered and survive. And our new rotation plan for our East Garden dictates less space for melons (80 foot row) unless we want to give up space for sweet corn and potatoes. Later in the day, I had just enough sterile potting mix left to fill five pots, so I started some Boule d'Or, Passport, and Tam Dew honeydew melons and Saffron Curcurbits still to be started include butternut squash, cucumbers, and pumpkins. All for one reason or another need to be started a bit later.
Other than raking out the new raised bed and turning part of our compost pile, I really didn't do much gardening today. The truckload of compost I bought last week was composted leaves and had a lot of foreign material in it (wires, pieces of plastic and styrofoam, rocks, etc.). Other than the junk in it, the compost looks to be pretty good stuff. And our overwintered compost pile won't be ready until mid- to late summer. To make up for my lack of diligence in gardening, granddaughter Katherine and I, mostly Katherine, transplanted a huge Maverick Red geranium into the planter that sits on our old cistern cover. I'll probably have to cover that plant with something several more nights this month to protect it from frost. But Kat enjoyed getting her hands dirty and putting a plant in the soil. Transplanting the geranium into the planter reminded me that I still had a flat of geraniums in fourpacks and three inch pots that needed to be moved to larger pots. So Katherine and I worked on the back porch and transplanted twenty-three geraniums to four and a half inch pots.
Your Annual Nag about UV Exposure Once or twice a year, I feel compelled to nag my readers to protect themselves from the sun's harmful ultraviolet rays. I'm acutely aware of the dangers of sun exposure, as I've had quite a few skin cancers removed over the last twelve years and regularly have to use a rather expensive fluorouracil cream product on potential cancers. Being fair skinned, having gotten several severe sunburns during my childhood, and then riding a tractor for eight years with a thin T-shirt on when I was farming, I'm probably experiencing just what I deserve. Beyond getting appropriate medical care, protecting oneself from UV radiation while still being able to do the outdoor things we love is a major concern. The CDC notes that the hours between 10 A.M. and 4 P.M. (Daylight Saving Time) are the most hazardous for UV exposure outdoors, with UV rays being greatest during the late spring and early summer in North America. Heavy clouds do filter out some UV, but not as much as you'd think.
When I get into serious gardening in warm weather, I generally wear a T-shirt with a sun protective shirt over it along with a hat. And since I've had cancers on and in my hands, I wear gloves almost all the time when working outside. At one time, Coolibar Here are some related links about UV radiation and protective clothing:
Tuesday, April 8, 2014 - Transplanting Brassicas
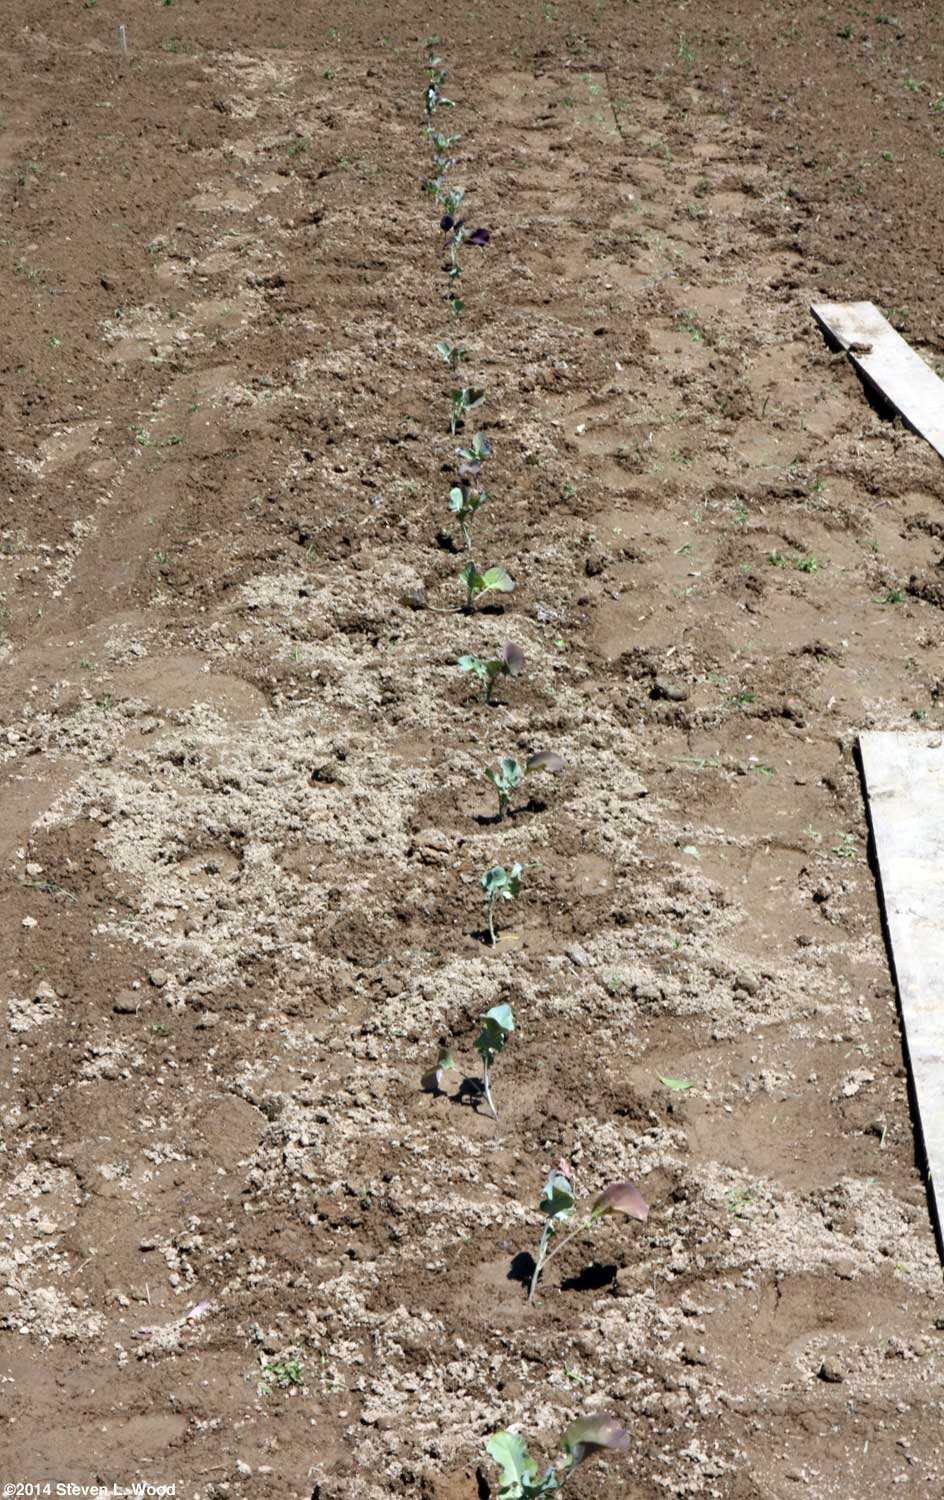
The damp soil in the bed was ready for planting, as I'd raked it out a few days ago before our days of rain started. I'd also checked the soil pH and found it to be an ideal 6.8 for brassicas. I worked a little 12-12-12 solid fertilizer and lime into each plant hole I dug before watering the hole with a very dilute solution of Quick Start I spaced the plants eighteen inches apart in the row with nineteen inches between rows. By staggering the rows, the plants should have plenty of growing room.
Once done with the brassicas, I transplanted a Maverick Red geranium at each corner of the bed. While the brassicas should be able to weather a frost, the geraniums are a bit of a gamble. I've been saving my used waxed paper coffee cups all winter in anticipation of using them as cutworm collars. While our new bed didn't seem to have any cutworms in it when I built the bed and worked to soil, we've had some real disasters in the past with cutworm damage. We purposely have lots of transplants left. They will serve as replacements in case what I planted today doesn't take. Once I'm sure we have a good stand of brassicas in the raised bed, the extra transplants will go into our large East Garden plot. The soil there isn't nearly as rich as in our main garden, but using the extra transplants there does produce a little more broccoli and cauliflower for us. Friday, April 11, 2014 - Double Trellis for Tall Peas
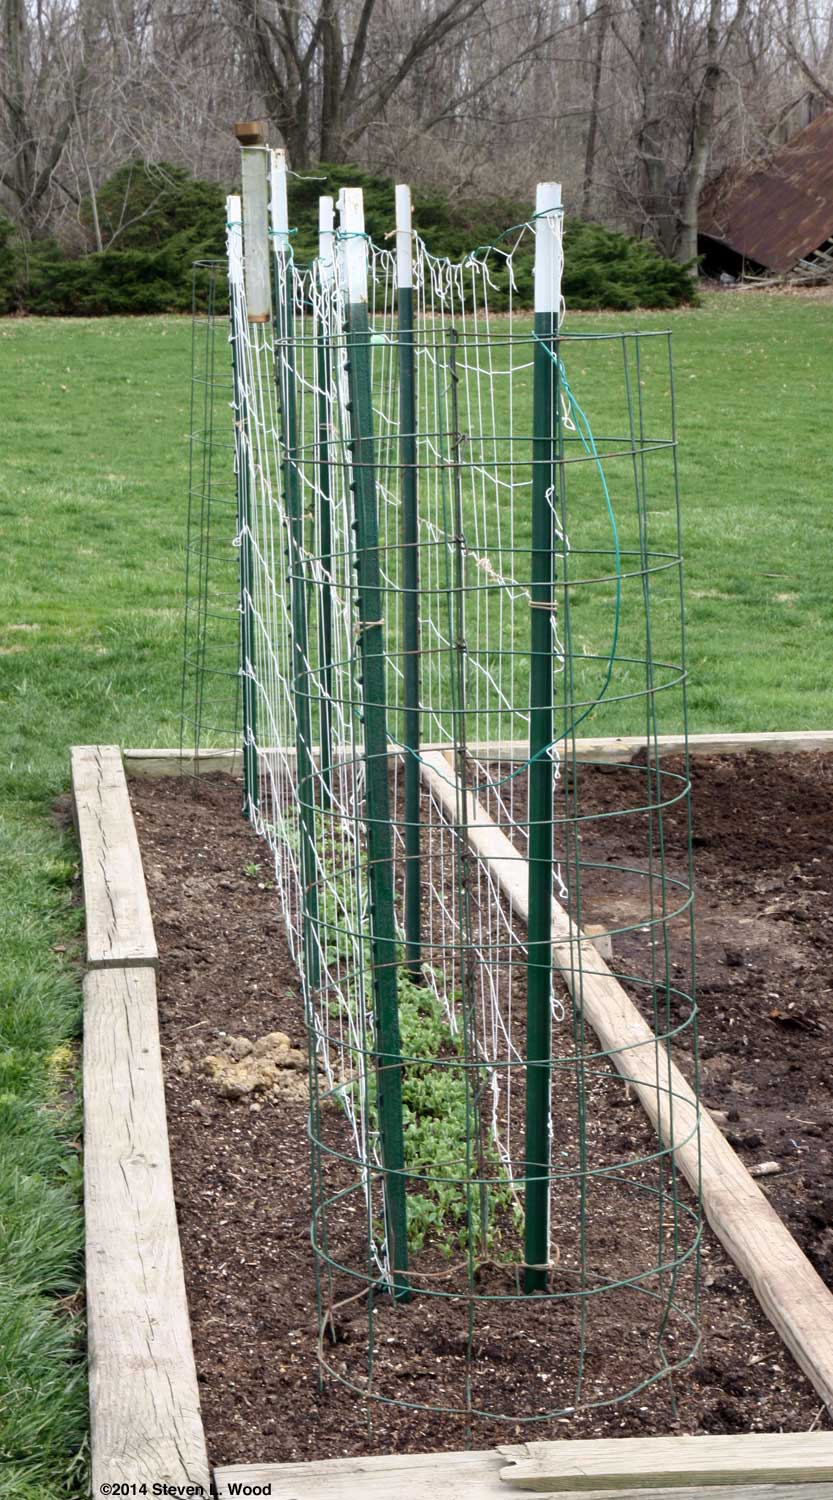
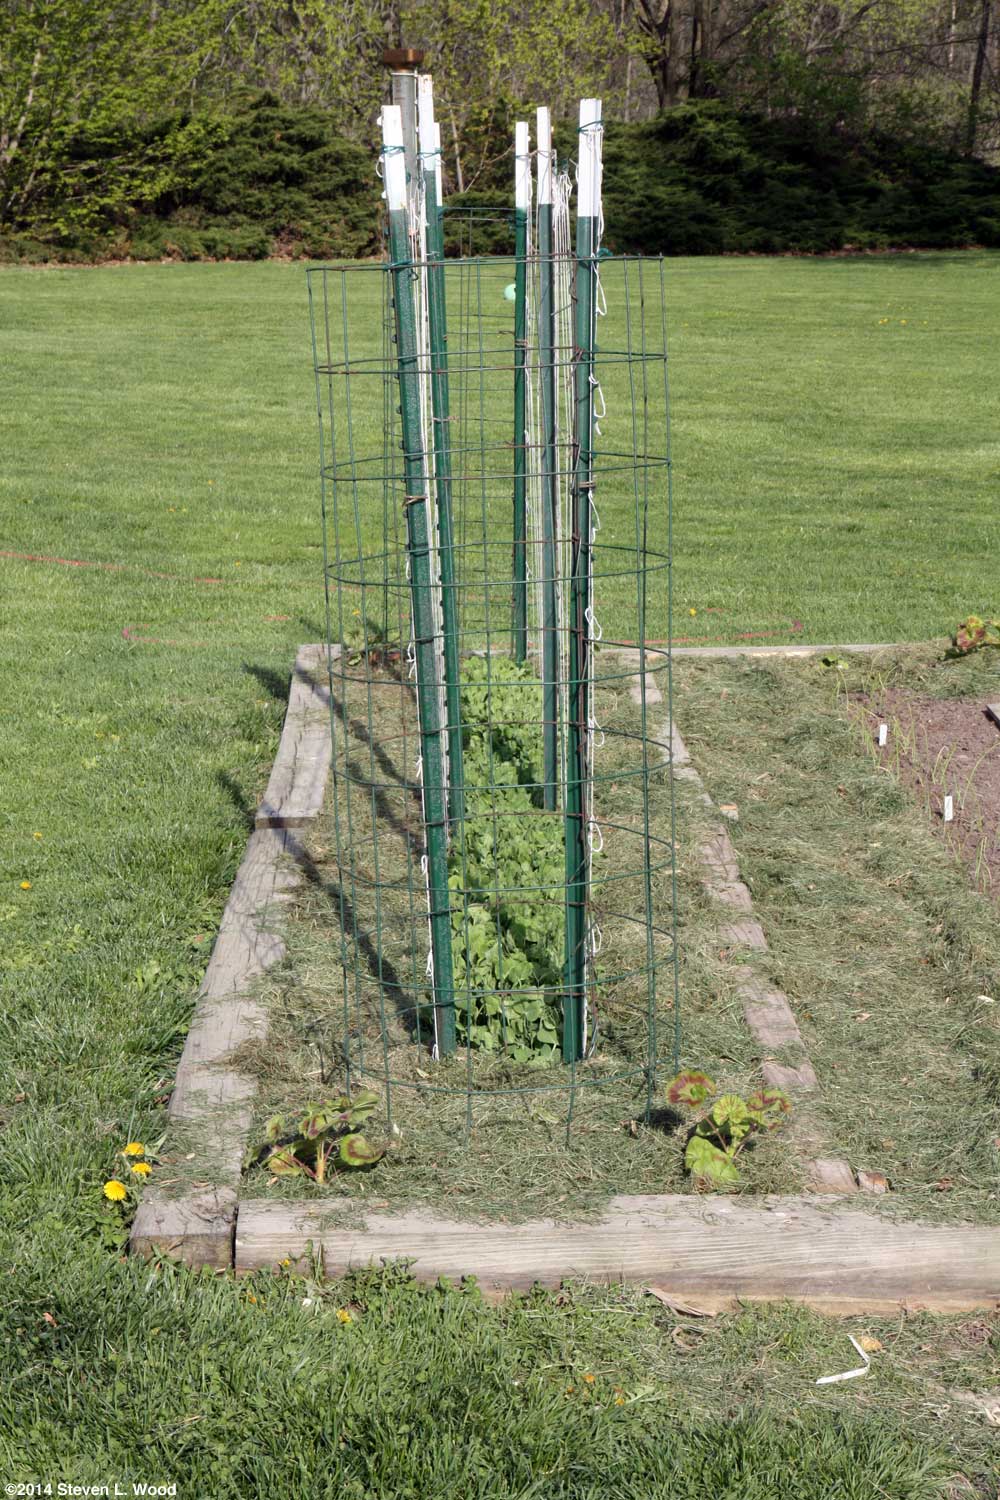
The easy solution for our wind problem would be to grow our tall peas in a less windy, more protected area. Unfortunately, our large East Garden, which is somewhat protected from the wind by our house, garage, and some bushes, is at best marginal soil. Peas do best in rich, well drained soil (What veggie doesn't?). This year I'm trying a double trellis, one on each side of our wide row of peas. Hopefully, the peas that only anchor to other pea vines will still be supported enough that they won't blow over inside the double trellis. Of course, the double trellis will make picking peas inside the trellises difficult, but that's better than having our growing season for the delicious vegetable cut short by vine damage. The trellises I put up today are just twelve feet long. I reserved space at either end of the pea row for caged tomato plants. Last year, I tried anchoring our tomato cages to the T-posts of our trellises to keep the tomato cages from blowing over when they get top heavy with fruit and vines. That worked out quite well. I put the cages in place today just to make sure I left enough room for them. The tomato plants won't get transplanted until May 1 or later. I use seven foot T-posts A Little Cautious
We started our asparagus from seed, transplanting the first of it in 2006. An incredibly dry summer in 2007 slowed the maturing of our asparagus roots. Then I got the wild idea that I wanted to enclose the patch into a raised bed in 2009. Asparagus roots spread quite a ways, and I ended up seriously damaging ours, delaying our first light pickings of asparagus until 2010. That's a long time to wait for asparagus. And having now started two different asparagus patches from seed over the years, next time I'll just buy roots!
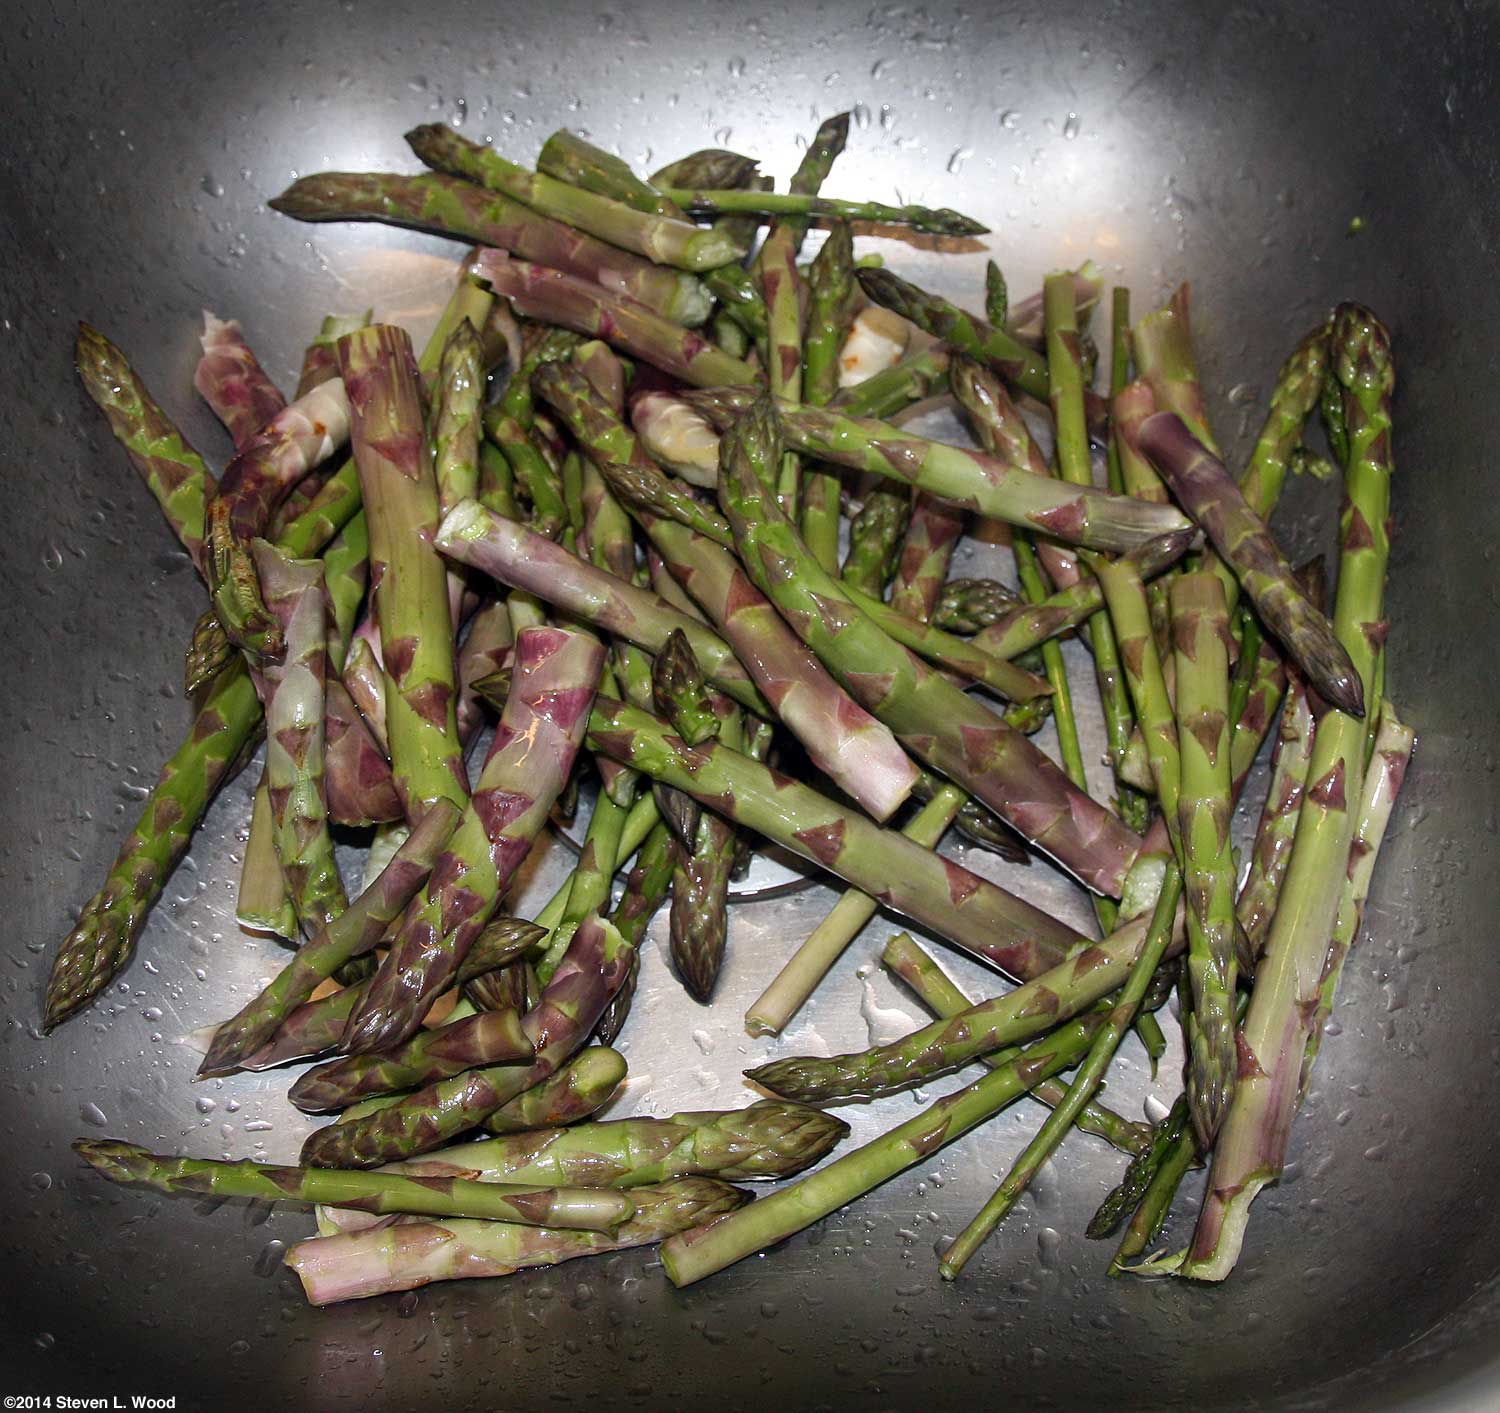
Her asparagus patch was originally part of some ground the farm renter kept mowed. The asparagus usually got mowed down once or twice each summer and had no fertilizer or manure applied to it. We took over mowing that area a few years ago when Bonnie suggested we make use of the asparagus patch. To my amazement, with just a little fertilizer, weeding, and, well, a whole lot of compost, the patch has become a major producer after almost twenty years of neglect. While I'd picked a spear or two of asparagus through the week, I picked enough today that we may be able to have some for supper tonight or lunch tomorrow. The first asparagus of the year is always a treat. By the end of May, we actually get sorta sick of it...and then find ourselves wishing we had more by July. Mowing Along with all the joy of working in the garden the return of spring brings, it also signals the beginning of another season of mowing. I had the John Deere truck out a week ago to do our annual mower service, so we should be ready to go. Some of our grass is ready to be mowed any day now.
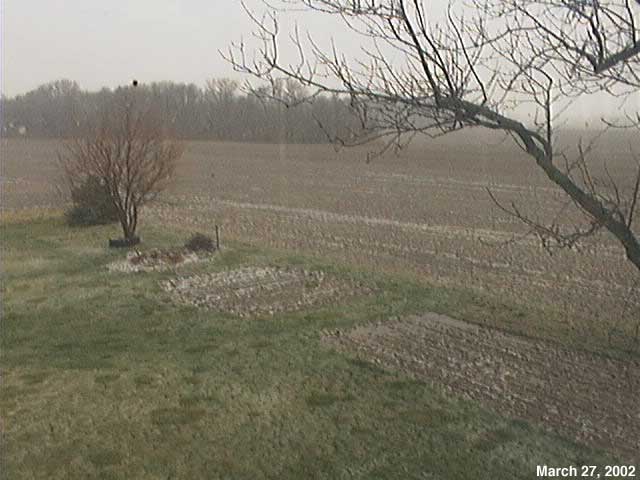
Knowing we had rain on the way, I got our first round of mowing done on Saturday and Sunday. The grass in our yard was pretty thin, but the field next to us was fairly high. I raked part of the field after mowing, planning to use the fresh green clippings to help heat up our compost pile. I also rototilled our large, main raised garden bed, getting it ready for transplanting onions and direct seeding carrots sometime this week. Thinking about planting carrots last night, I checked our written and photo records to see when we've seeded our carrots in the past few years. The earliest we got them (and our onions) in was April 12 in 2010. The latest was May 12 in 2009, so I guess we're not in too bad of shape if I get them in this week. While looking through photos of the main garden over the years, I pulled together a small collection of shots from approximately this time of year. The main shot that heads this page only became possible several years ago when repeated lightning strikes took out a magnificent, old, maple tree (and our afternoon shade) that partially obscured the view of our garden from our sunroom windows. The early photos were taken with some now primitive digital cameras, but also show what our garden plots looked like before we began putting in terraces and raised beds.
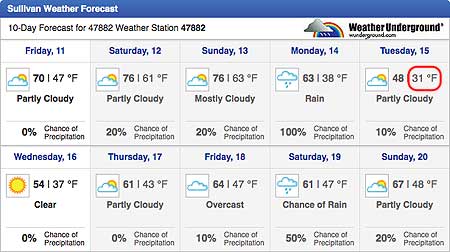
Wow! It's almost midnight! I can just squeeze this posting in for Sunday, April 13, 2014. Monday, April 14, 2014 - Getting Ready for a Late Frost
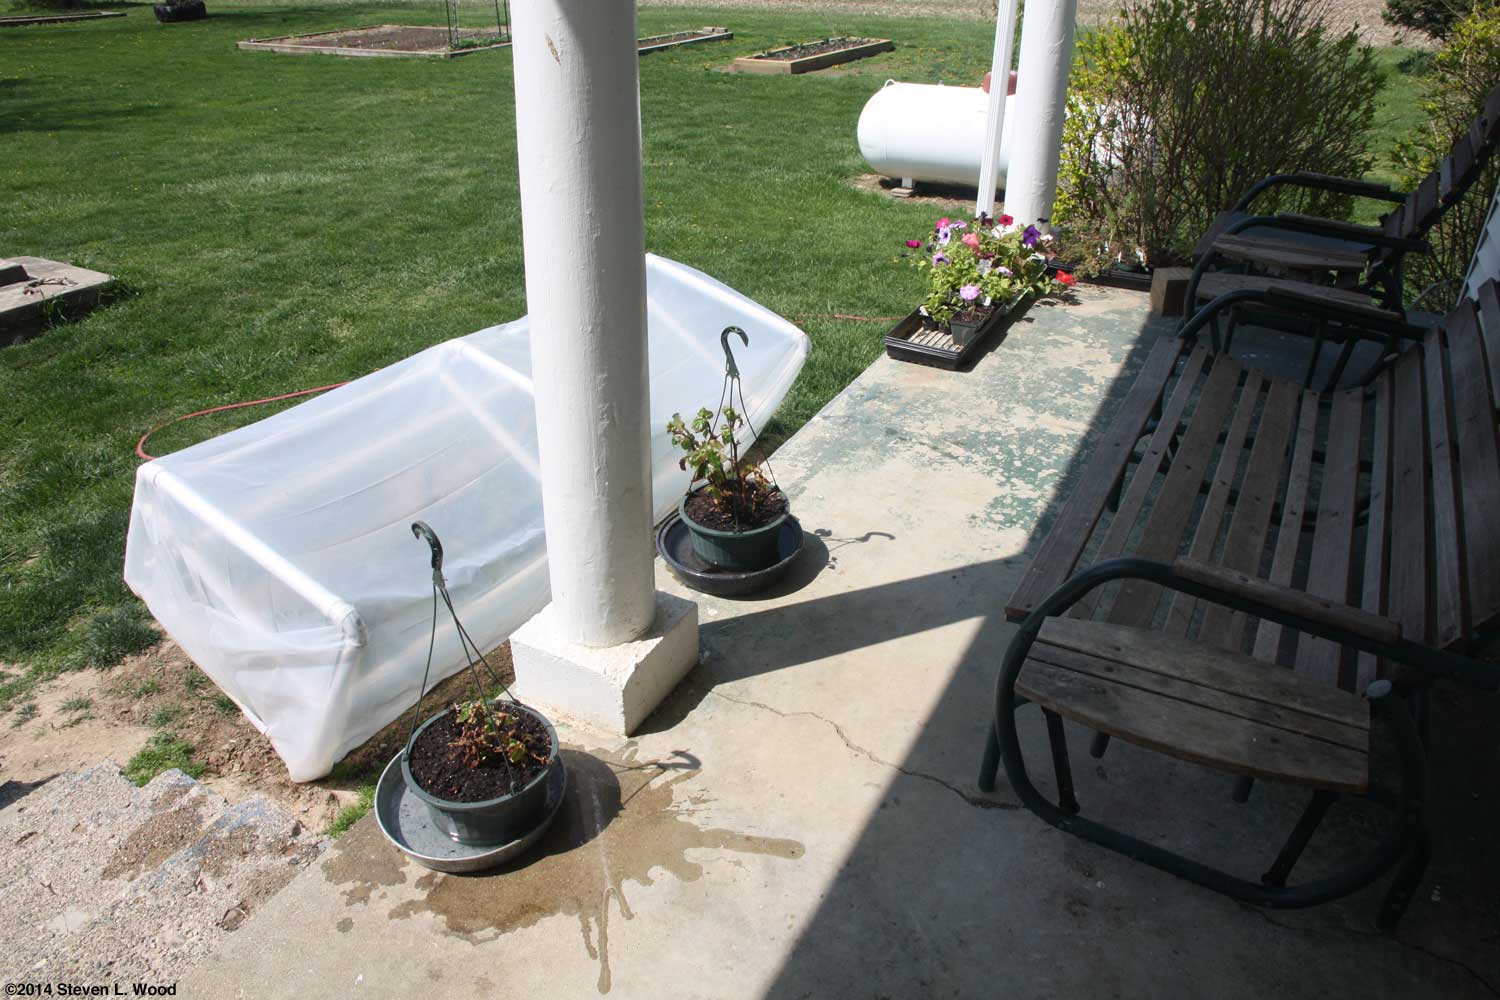
Our cold frame is closed and sealed for the day. All of our hanging basket plants and trays that lined our back porch are now on our dining room table. I hope we're ready now for the frost.
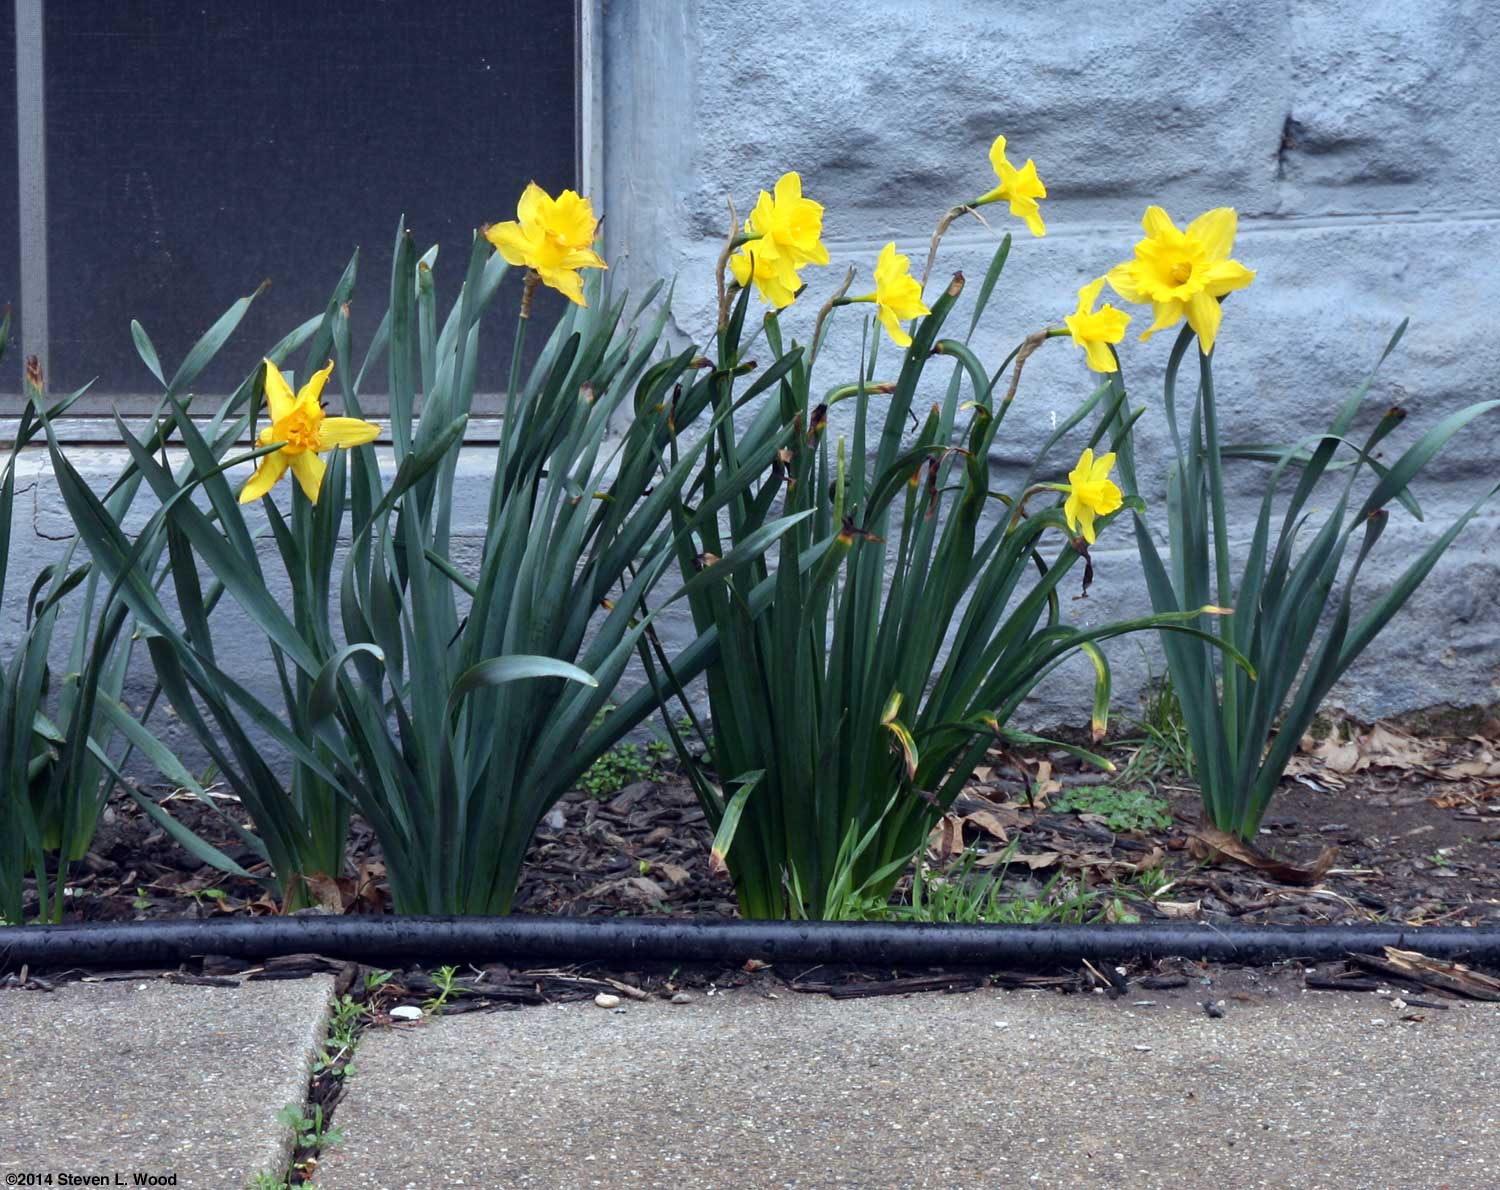
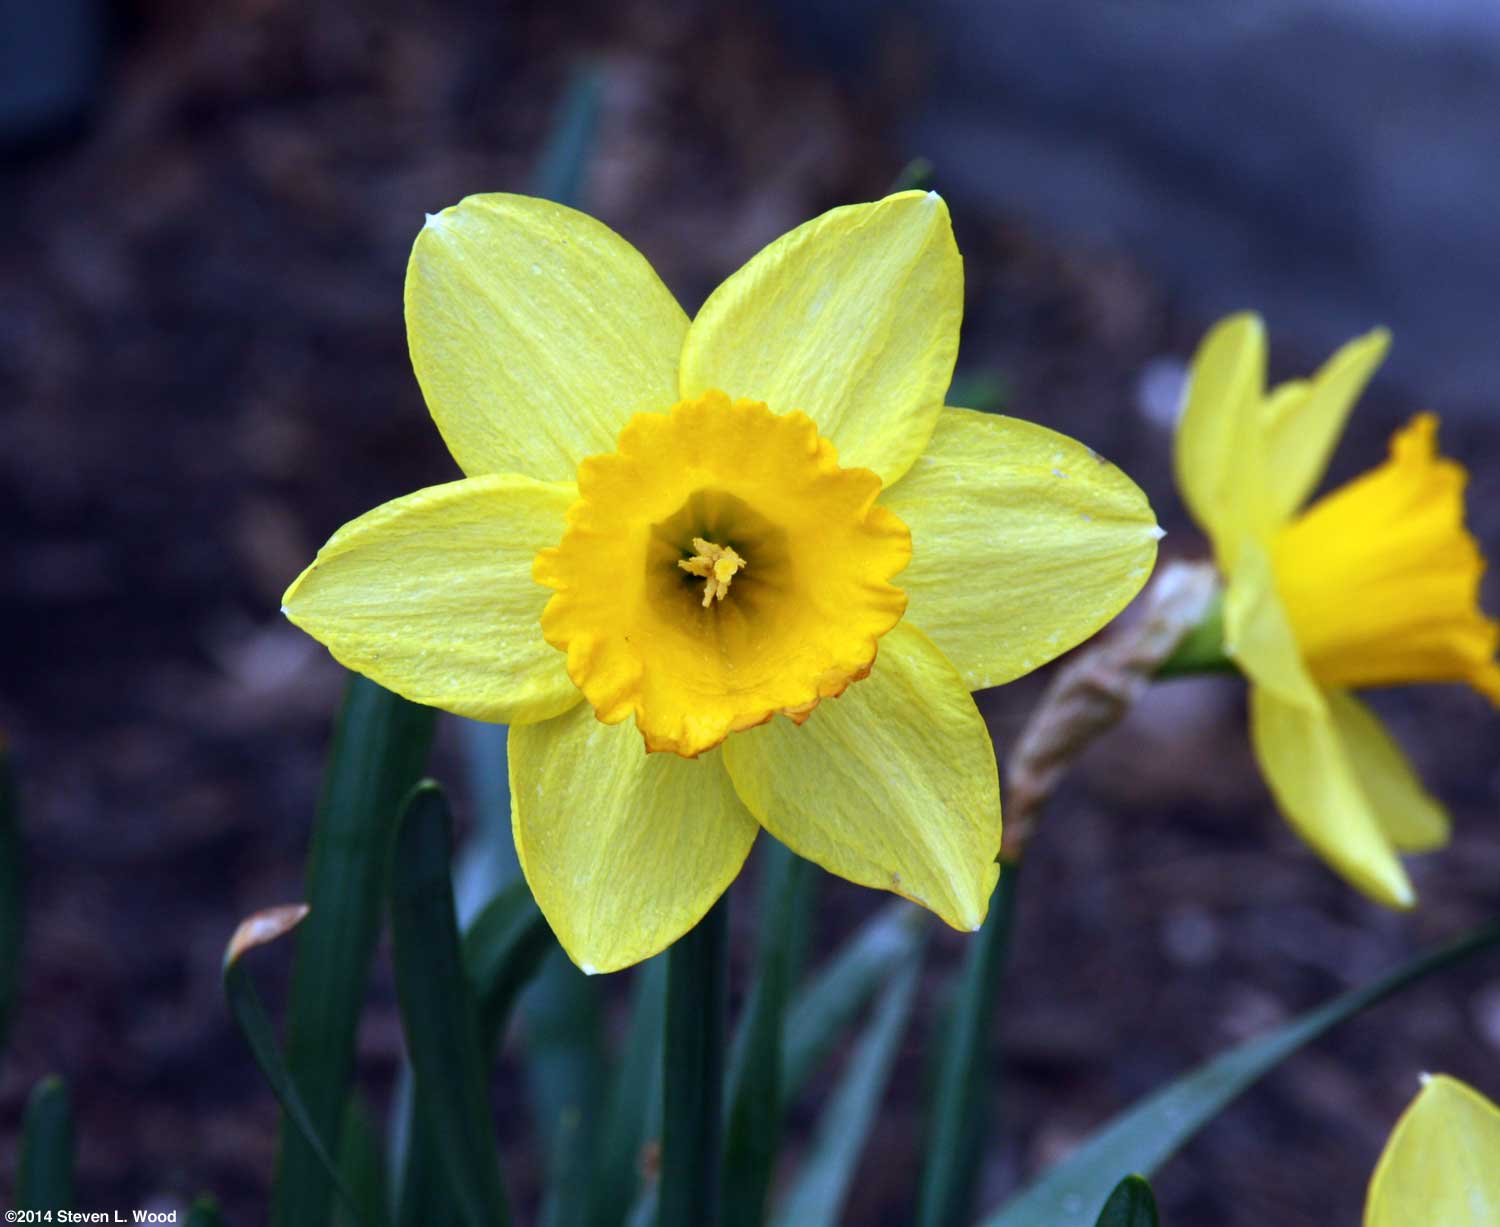
When I went outside this morning to work, it was around 64o F. In the three hours since then, the temperature has dropped 10 degrees. One might wonder how I get away with regularly taking over our dining room table in the early spring. The easy answer is that I buy off my beautiful and incredibly tolerant wife with treats from the garden such as fresh asparagus. We got our first heavy picking this morning. I have it rinsed and drying in the kitchen sink. And like many (most) gardeners with flowers, we're enjoying the few daffodils that grow along the east side of our house. Our dogs like to dig and lay in that flower bed, making growing much of anything there a challenge. When I went outside to snap a couple of shots of the daffodils, I took some Hotkaps Now I think we're ready for the frost.
When I propped our cold frame open this morning, the outer max-min thermometer registered a low of 32o F. The thermometer inside the cold frame recorded a low of 39o F, considerably increasing my confidence in the new cold frame. With a predicted overnight low of 28o F for tonight, we'll need all the protection we can get. All of our hanging basket plants and trays of transplants that had been on the back porch remained on the dining room table today.
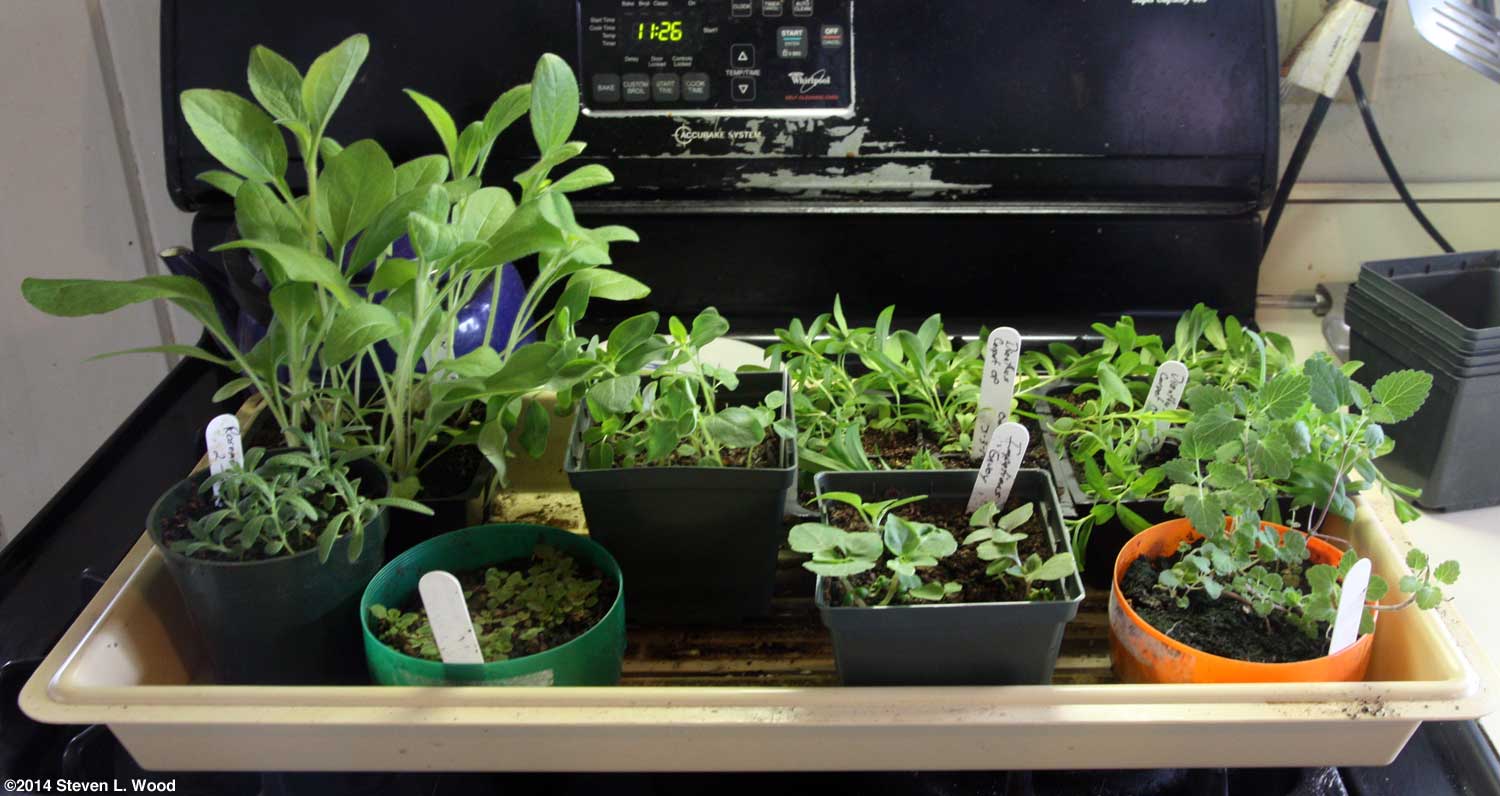
We got through the chilly nights with little or no damage to our plants. Several of the tall geraniums looked a little scrunched from the hotkaps being pushed down over them. And carrying two flats of herbs to the cold frame this morning proved to be a delight of aromas. While the cold frame is shown opened above, I closed it to the propped open position to protect the flats of herbs I'd added today. During the first day out in full sun and wind, transplants need a little protection as they acclimate to their new environment.
When I started my Mac Mini, I was greeted with an appropriate desktop photo from the rotation of files I've saved over the years. I'd just checked our peas out in the garden, finding no frost damage at all (as expected...peas are pretty hardy). The desktop photo was of pea vines in bloom.
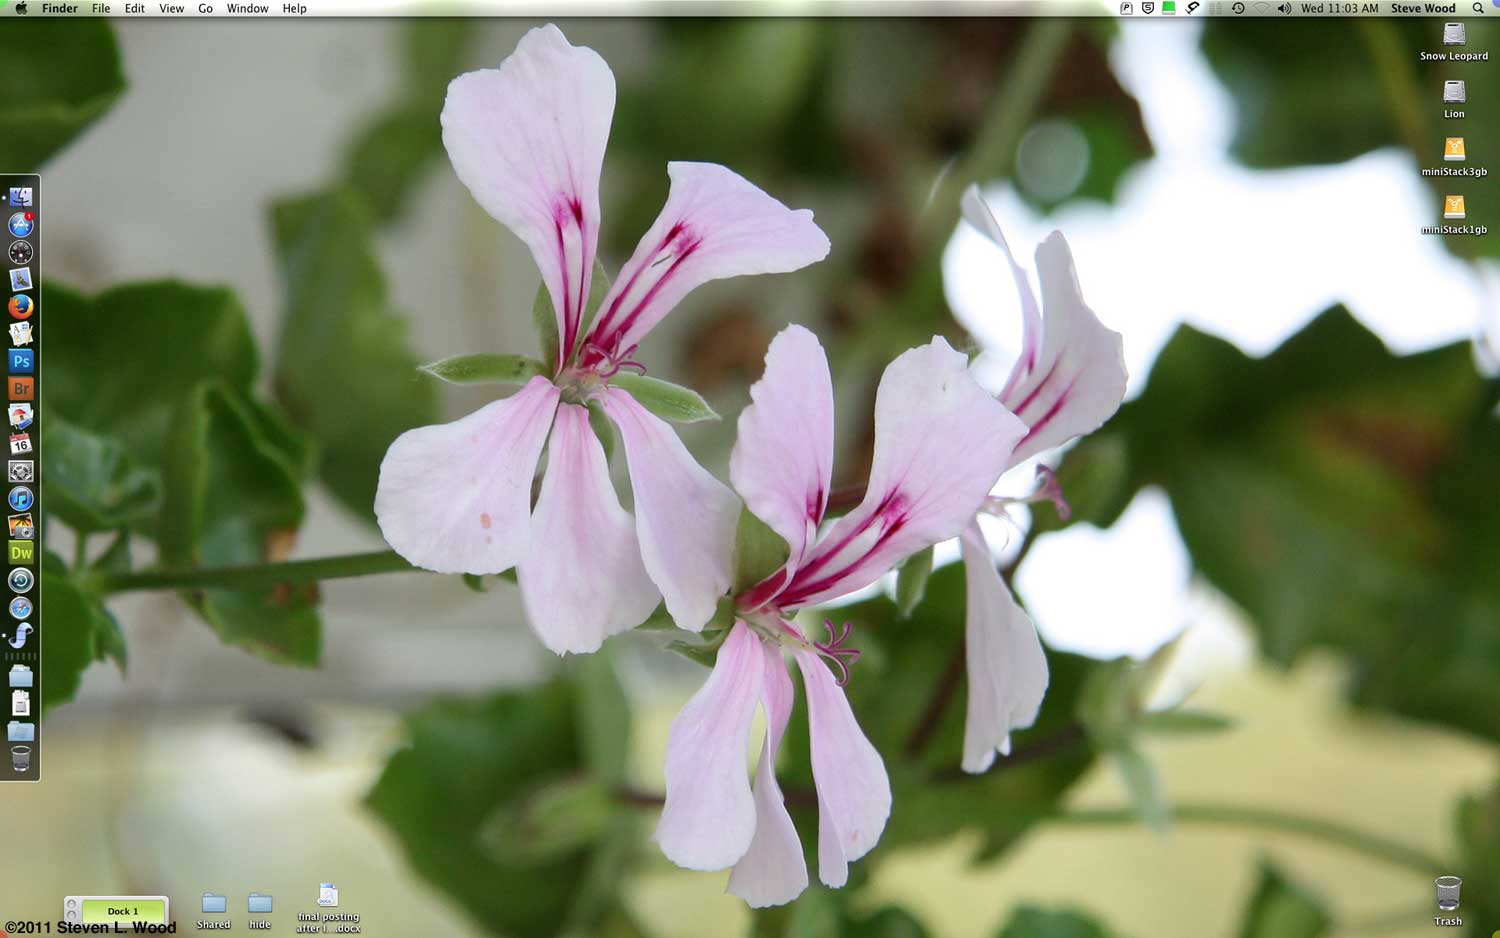
While I worked at other things, the computer rotated through three more of my favorite desktops: a somewhat fuzzy shot of a couple of Earliest Red Sweet peppers; a blue sky with clouds; and some ivy leaf geranium blooms. I'm glad I recorded the trailing geranium, as neither the plant nor the cuttings I took from it survived! The pea and geranium photos are available for download from our Desktop Photos page. I've fooled around long enough with this early posting for things to warm up a bit outside. I think I'll try transplanting onions and direct seeding carrots. Later - Planting Onions and Carrots
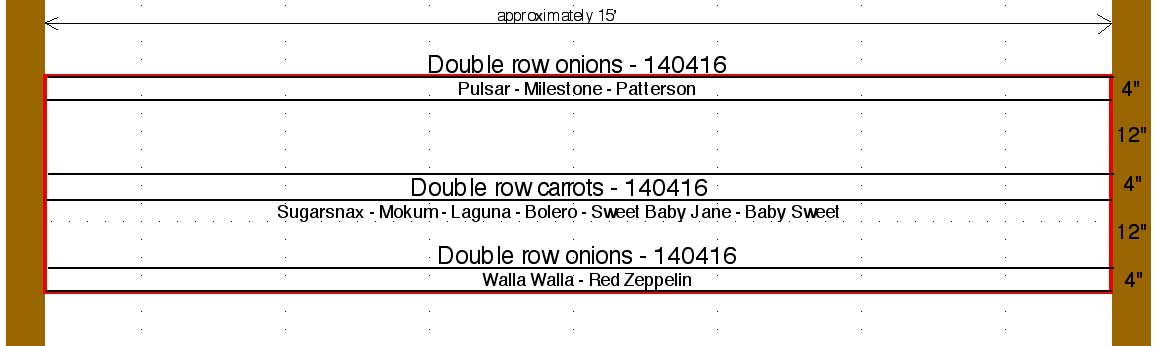
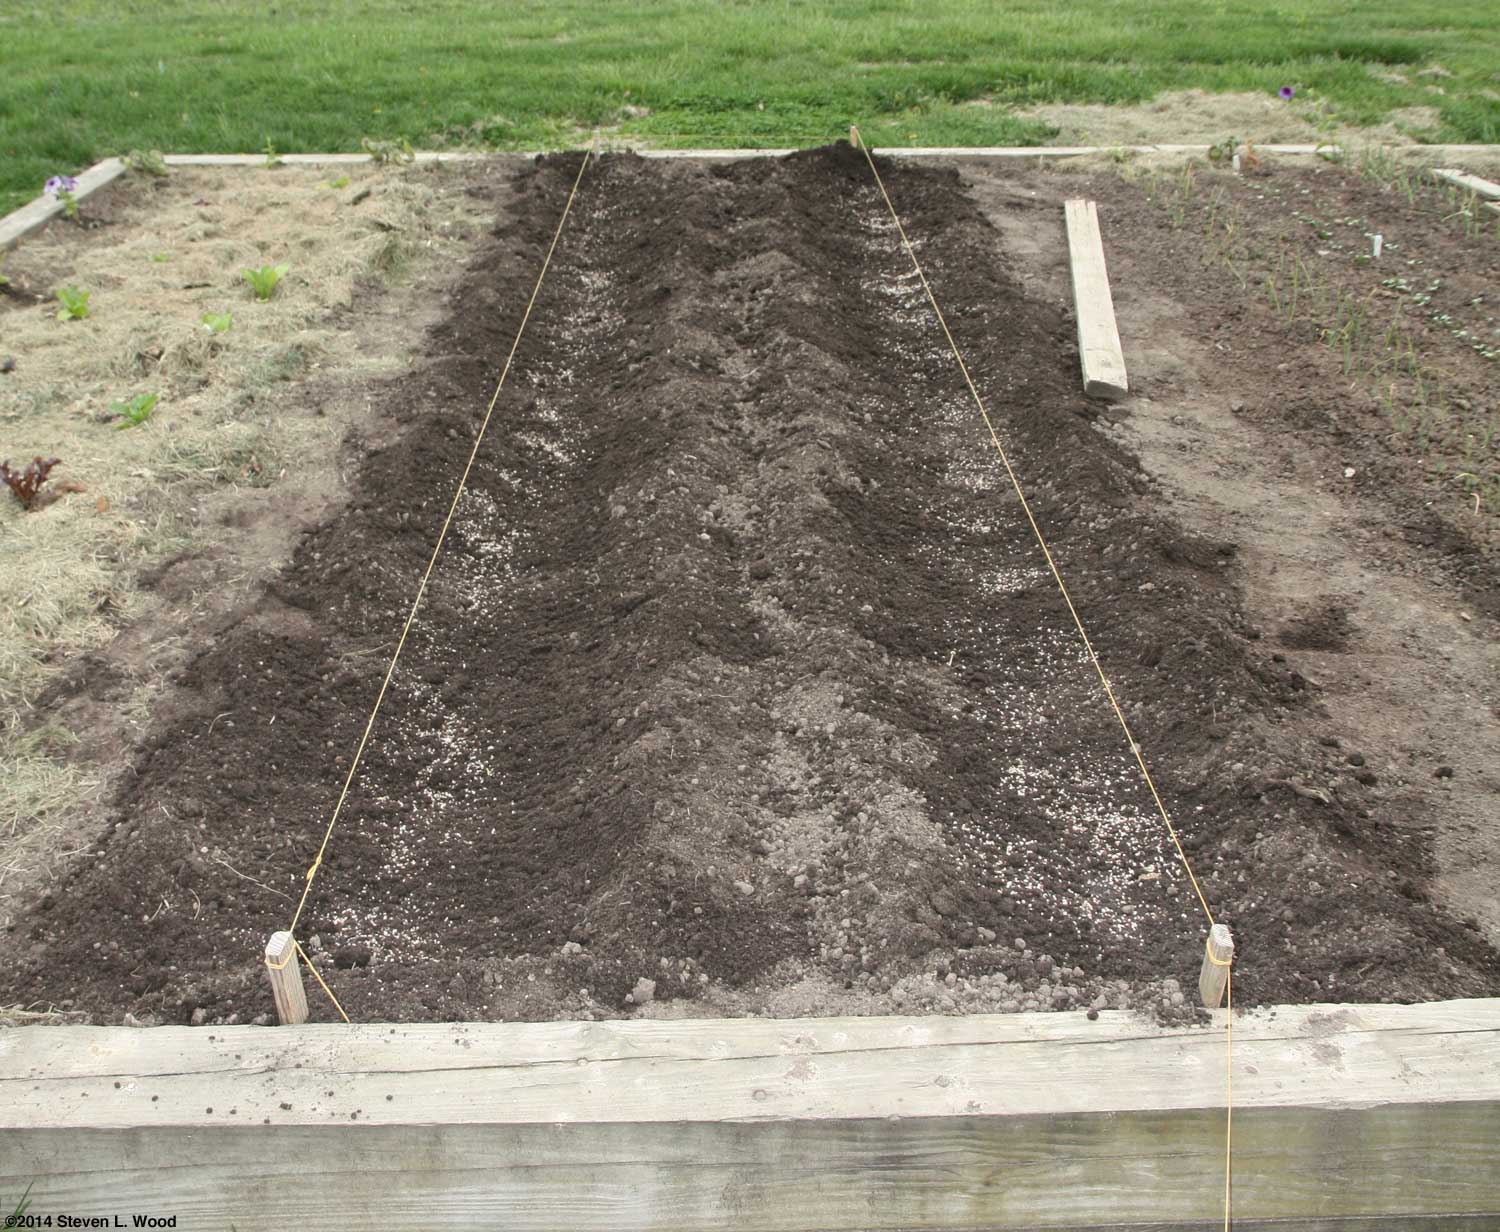
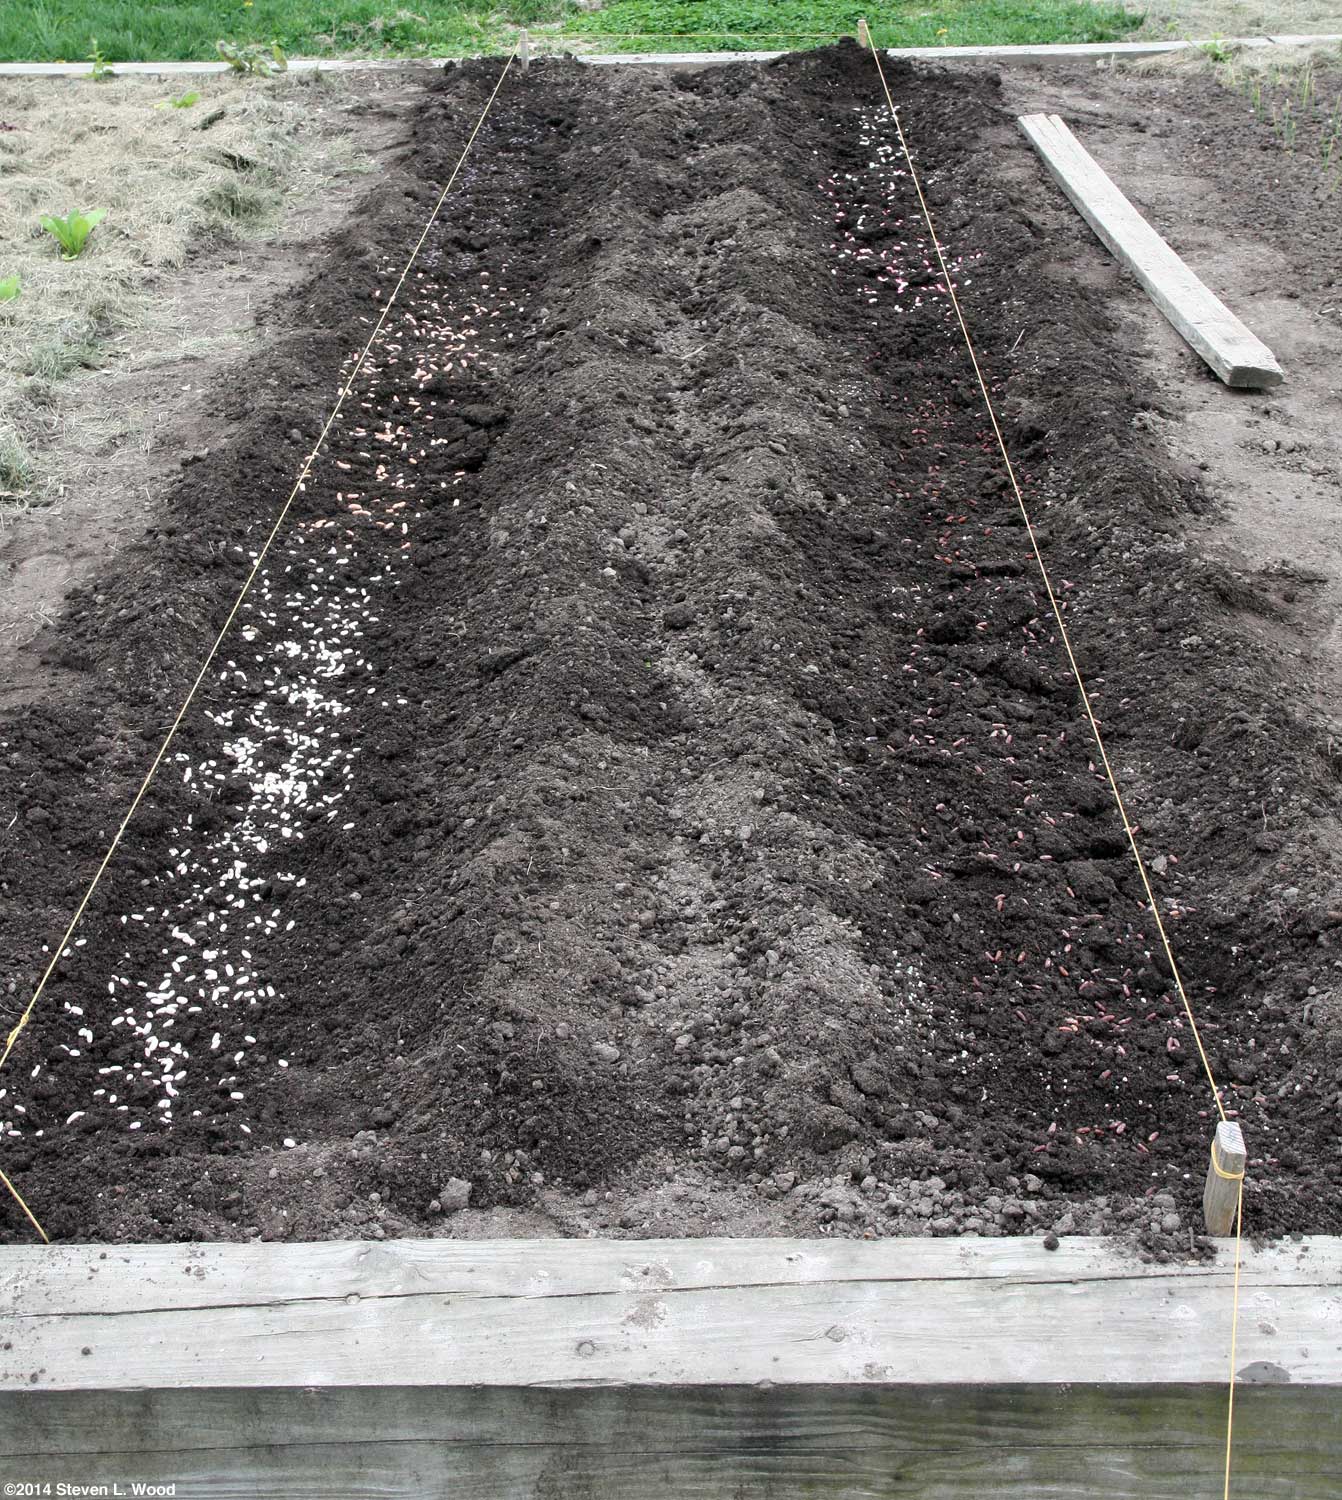
I plant our onions and carrots together each year in an intensive planting. Usually, they go at one end or the other of our large raised bed or in a narrow raised bed. Because of crop rotations, they had to go in the middle of our large raised bed today. I put in two double rows of onions with a double row of carrots in between. I allow just four inches between the doubled rows and a foot between each set of double rows, making a 36" wide bed that can be easily accessed from either side (using walking boards). Once I've marked my planting rows with stakes and string, I spread a little 10-20-20 fertilizer between the carrot and onion rows and work it into the soil with a hoe. I then level the planting area for the carrots with a garden rake and use a 1" thick board to make very shallow (1/2 inch or less) planting rows for the carrots. I start with the carrots in the middle, so I don't have to worry about messing up the onions which will lie outside the carrot rows.
Carrots should be seeded a half to an inch apart. With the tiny seed that sticks to ones fingers, it's tough to do that. So I do the best I can seeding them and then get to thin them a good bit when they come up. Before covering the carrot seed with soil, I also thinly seed radish seed in the row to help break the soil and mark the row until the carrots emerge. Jim Crockett in Crockett's Victory Garden I seeded about a foot each (double row, though, so it counts as two feet) of Baby Sweet, Sweet Baby Jane, Bolero, and Laguna. The first two are obviously baby carrot varieties for which new seed is no longer available. Bolero is a storage carrot we're trying this year. If this planting does well, I'll plant a lot more of them with our fall carrot crop. And I only planted a little of the Laguna, a very good variety for us, because I only had a little seed for it. I somehow missed ordering more last winter. The bulk of the carrot rows were seeded to Mokum and Sugarsnax. Mokum is another variety that has done really well in our garden. Sugarsnax is a highly rated new-to-us variety. And having mentioned a fall carrot crop, we never grew fall carrots until last year. Last spring, our dogs dug up half of our spring carrots and the rest were damaged by standing water. So we grew our first fall crop of carrots that did quite well.
For this transplanting of onions, I pretty much stayed with some favorite varieties: Pulsar; Milestone; Red Zeppelin; and Walla Walla. I did transplant a few Pattersons, a new hybrid storage onion we hope will replace the apparently discontinued Pulsar variety. Pulsar and Milestone are both excellent yellow storage onions. Red Zeppelin is the best storing red onion I've ever grown. And Walla Wallas are a dependable sweet onion. (Note: One seed vendor still has Pulsar seed. We just don't do business with them.) I have a full flat of new-to-us onion varieties still to transplant, but need to decide just where to put them. I really overdid ordering and starting onions this year. When I was done transplanting, I replaced our row marker stakes with flowers as row markers (great unless they die) and then watered the onions with a bit of dilute starter fertilizer. I'll begin watering the carrot rows with the hose tomorrow and every other day if we don't have rain until they emerge. Friday, April 18, 2014 - Good Friday
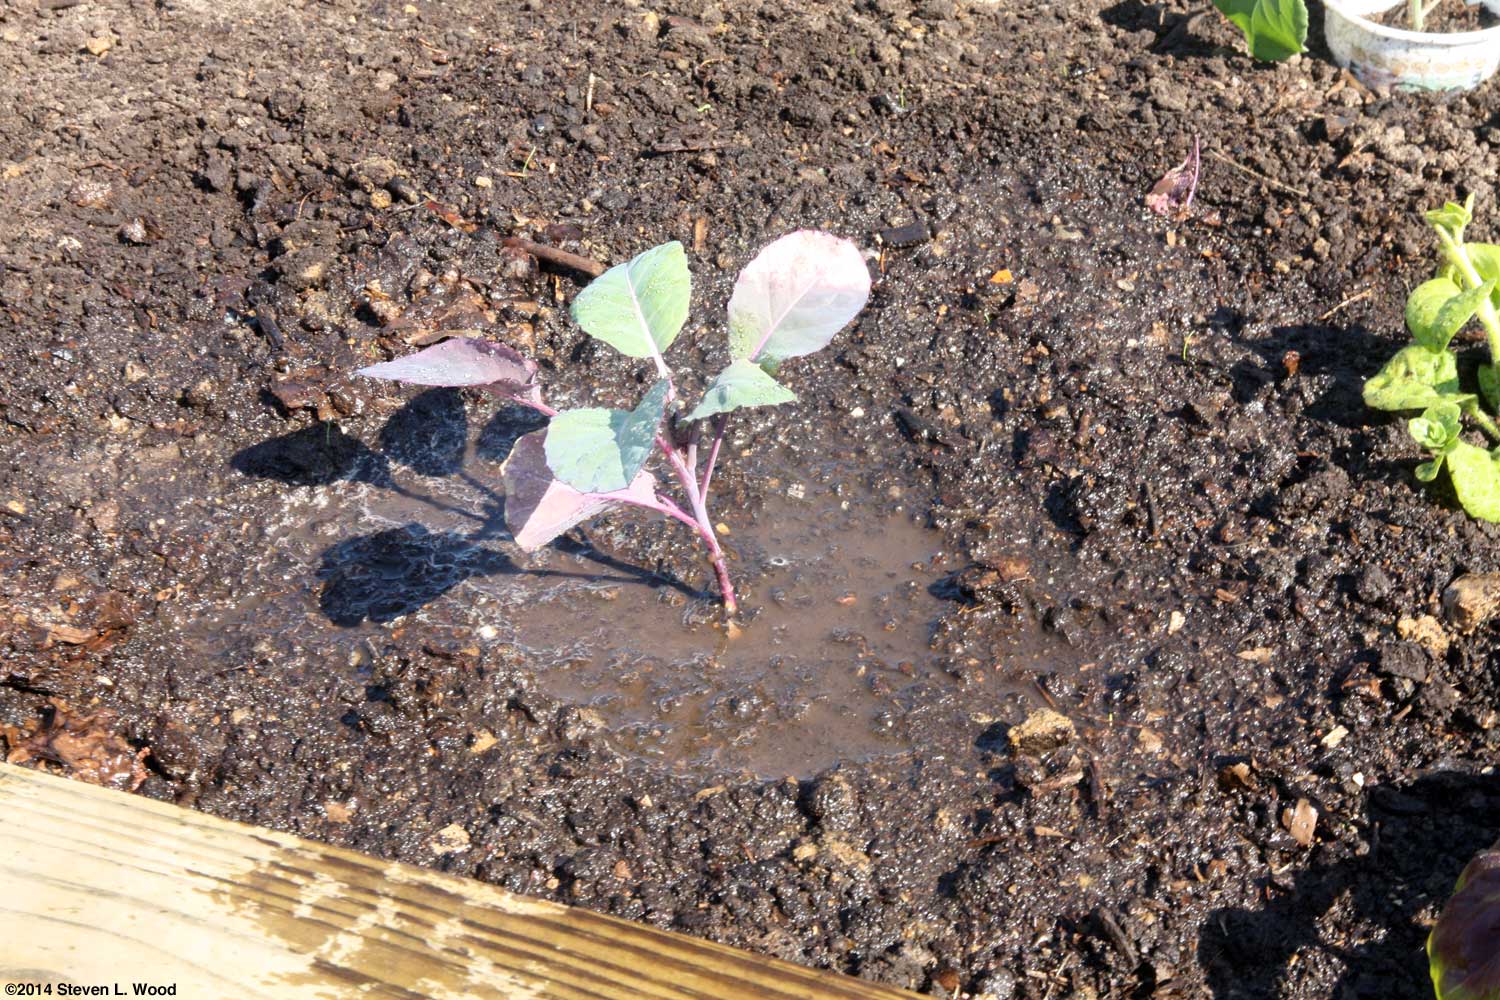
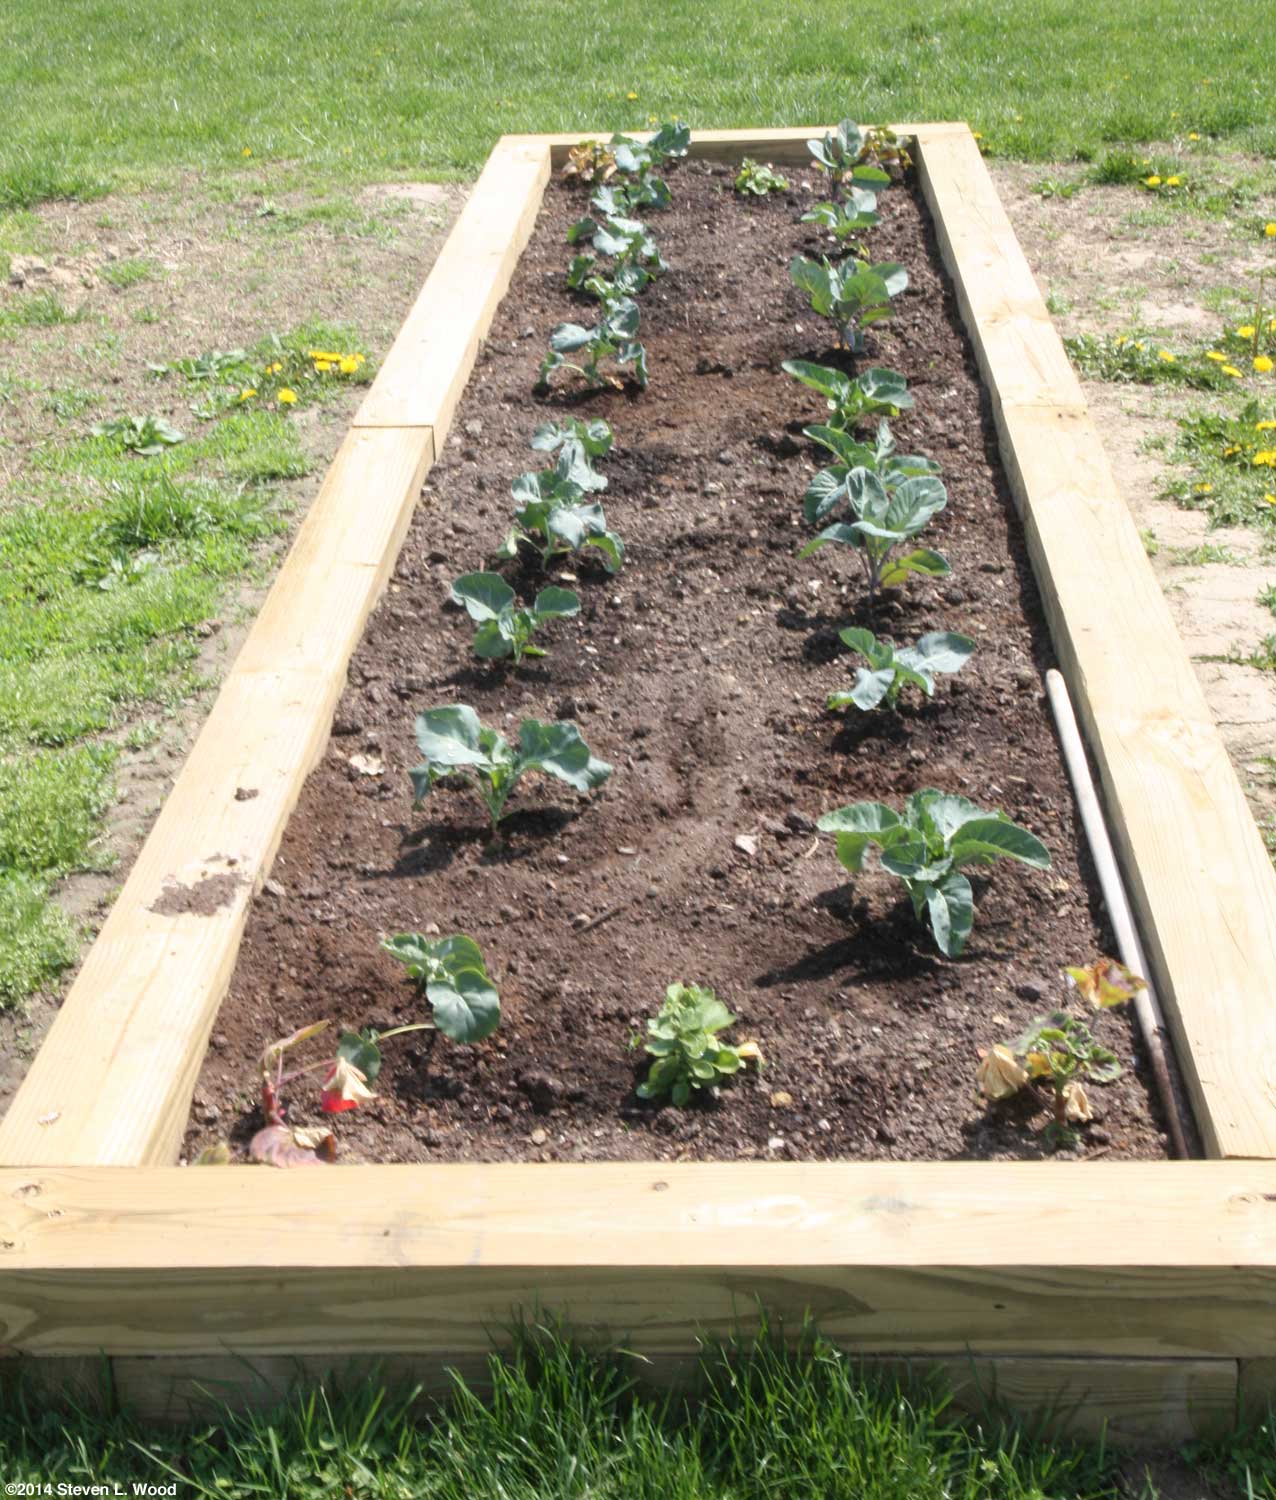
This morning's garden chore was removing the cutworm collars from our broccoli and cauliflower plants. In the ten days since I transplanted the brassicas, their stems should have firmed up enough to be unattractive to cutworms. And it's important to get the paper cup cutworm collars off the plants as soon as possible to promote better lateral root growth. I had a bright, warm, sunny morning to do the job. In fact, it was so sunny that when I got done, I thought to check the current UV index. Weather Underground uses a sorta weird sixteen point scale, but it was 14.7 out of 16, so I cut my gardening off at that point. Removing the cutworm collars gently is important, as one could undo any rooting the plants have already done by just yanking on the whole collar. (Yep, been there, done that!) I use a quality pair of kitchen shears
This is one of those jobs best done early or late in the day, as it can be as big a shock to your brassica plants as transplanting was. I should add that after pulling the cutworm collars but before watering them, I took the opportunity to make a quick pass over the bed with my scuffle hoe Frost Damage
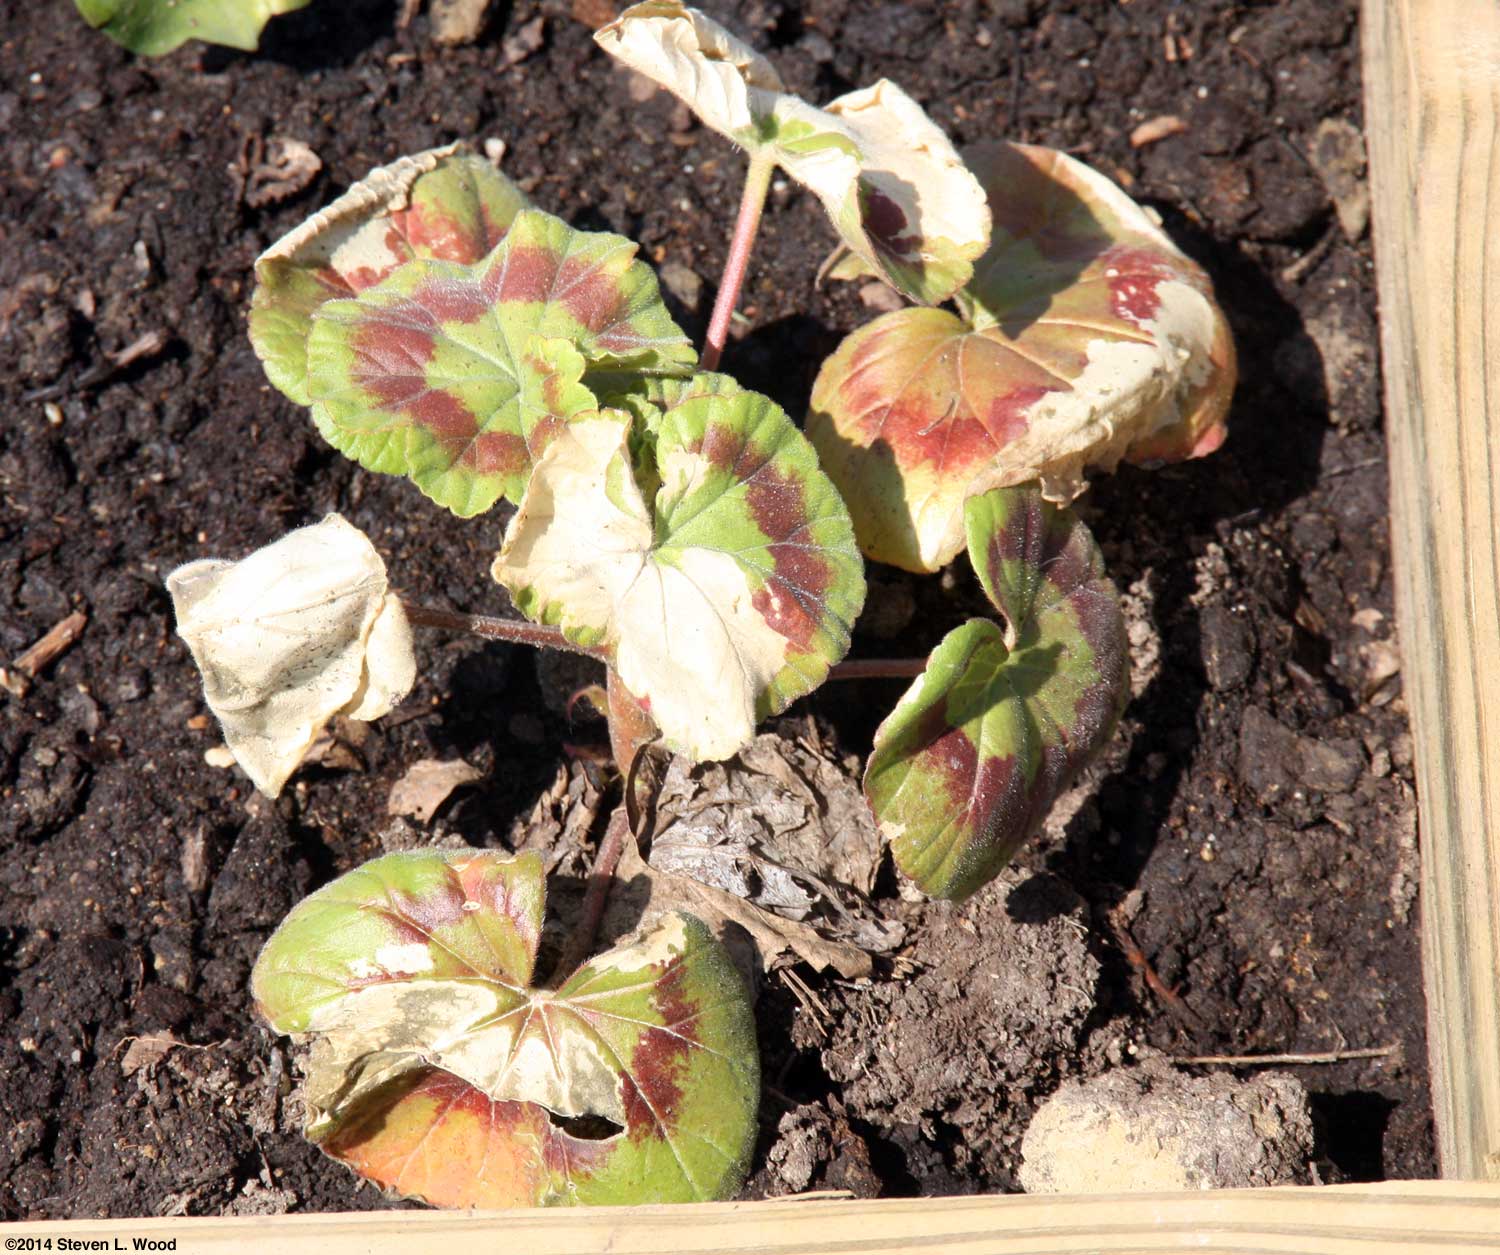
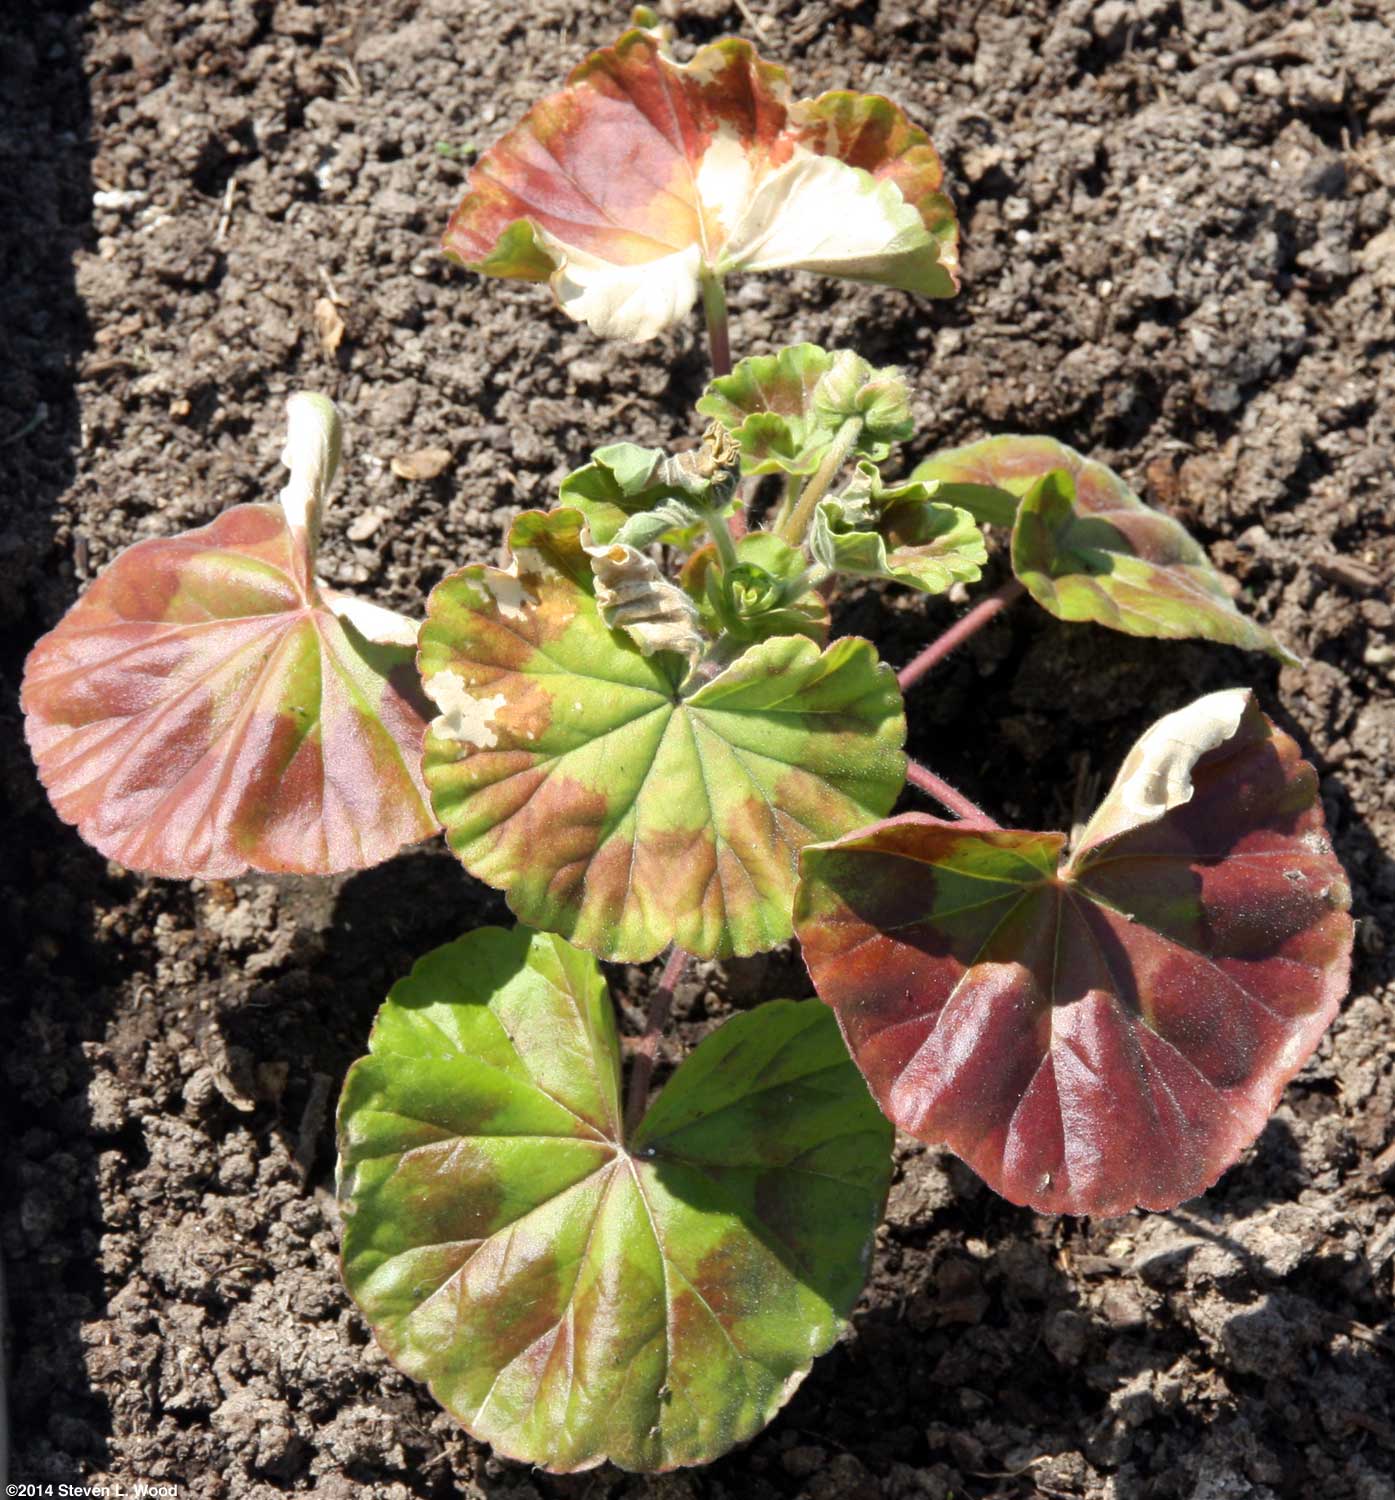
I mentioned Wednesday that I thought we'd gotten through our two nights of freezing temperatures "with little or no damage to our plants." It turned out that some of our geraniums did indeed get a bit burnt by the freeze. Interestingly, the worst frost damage was to the geraniums under a floating row cover, while the ones around our garlic bed that were covered with individual hotkaps We may end up having to replace one of the geraniums, but I knew it was a risk when I transplanted them. Since we have lots of geranium transplants this year, we should still have some outstandingly colorful corner plants for our raised beds.
Our plants under our new cold frame came through the frosty night just fine. The petunias there are putting on quite a display of blooms. I really should pinch them back, as I'll want them to work on roots and growth when I transplant them. But it is nice to see something in bloom.
Petra is the dog my lovely wife drove many miles to adopt from a shelter. Petra was due to be euthanized, and a friend who works at the shelter prevailed on Annie to adopt the dog. With so many strays who have adopted us, we certainly didn't need another dog, but Petra is loving and great with the grandkids. She also is completely housetrained, as she does like to come inside on cold nights. Funny thing...all of our strays seemed at least somewhat housetrained when they came to us. We had a few "five dog nights" during the coldest nights this winter. Why folks dump good dogs in the country is still beyond me.
Saturday, April 19, 2014 - More Onions I decided today that I could squeeze in double rows of onions on either side of our planned row of bell peppers. We already have enough onions planted to meet our needs, but in January, I'd started a flat of onion varieties we'd previously not grown. So I wedged them in today using the same planting technique I used on Wednesday.
I planted about two dozen plants each of Copra, Jaune Paille des Vertus, Red Creole, Rossa di Milano, Southport Red Globe, Stuttgarter, Tropeana Tonda, and Yellow of Parma. Copra was the only hybrid in the bunch. This is obviously an evaluation planting. I wanted to try some new onion varieties, mainly open pollinated ones, to get away from being caught short when favorite hybrids are discontinued. So in other words, these rows of onions are just for the fun of it. But then, isn't most of my gardening just that?
Sunday, April 20, 2014 - Easter
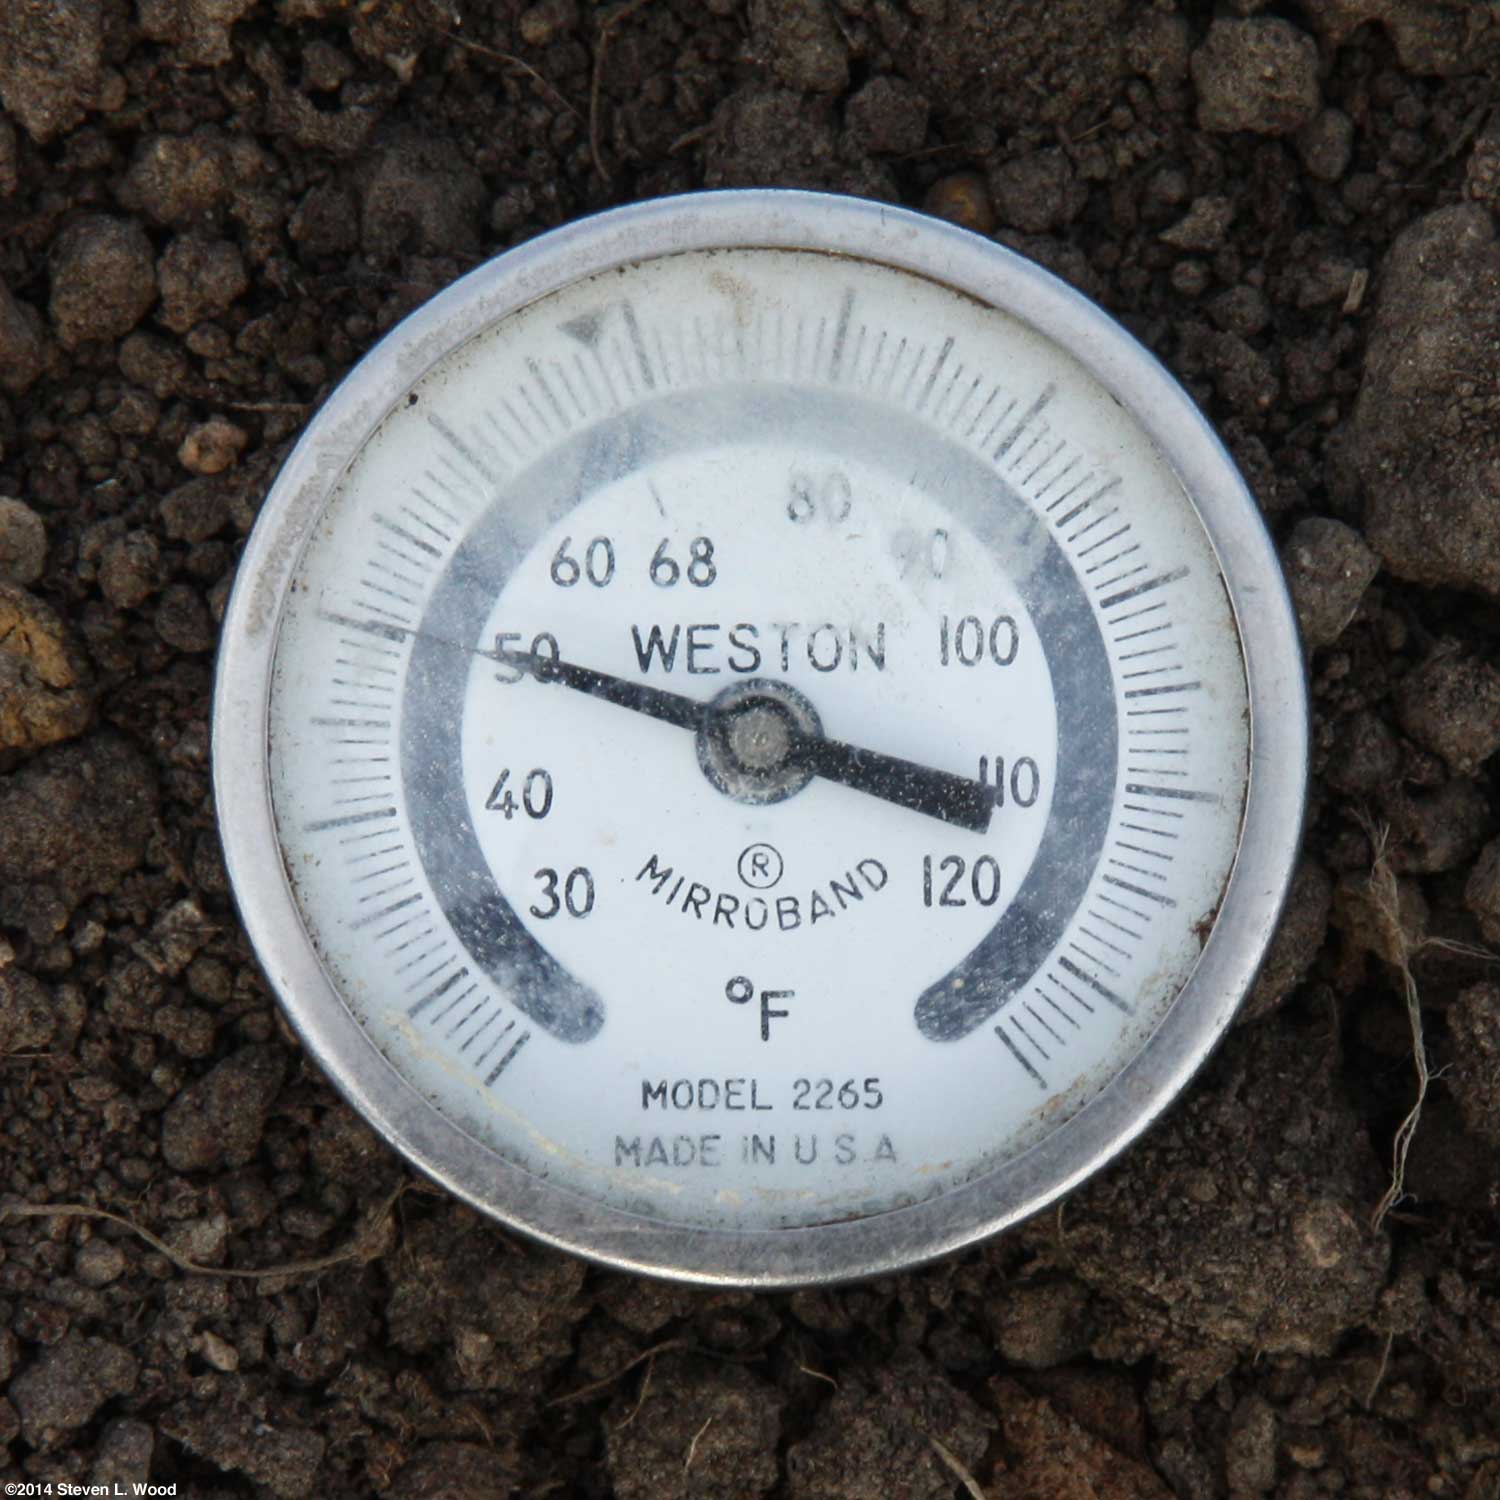
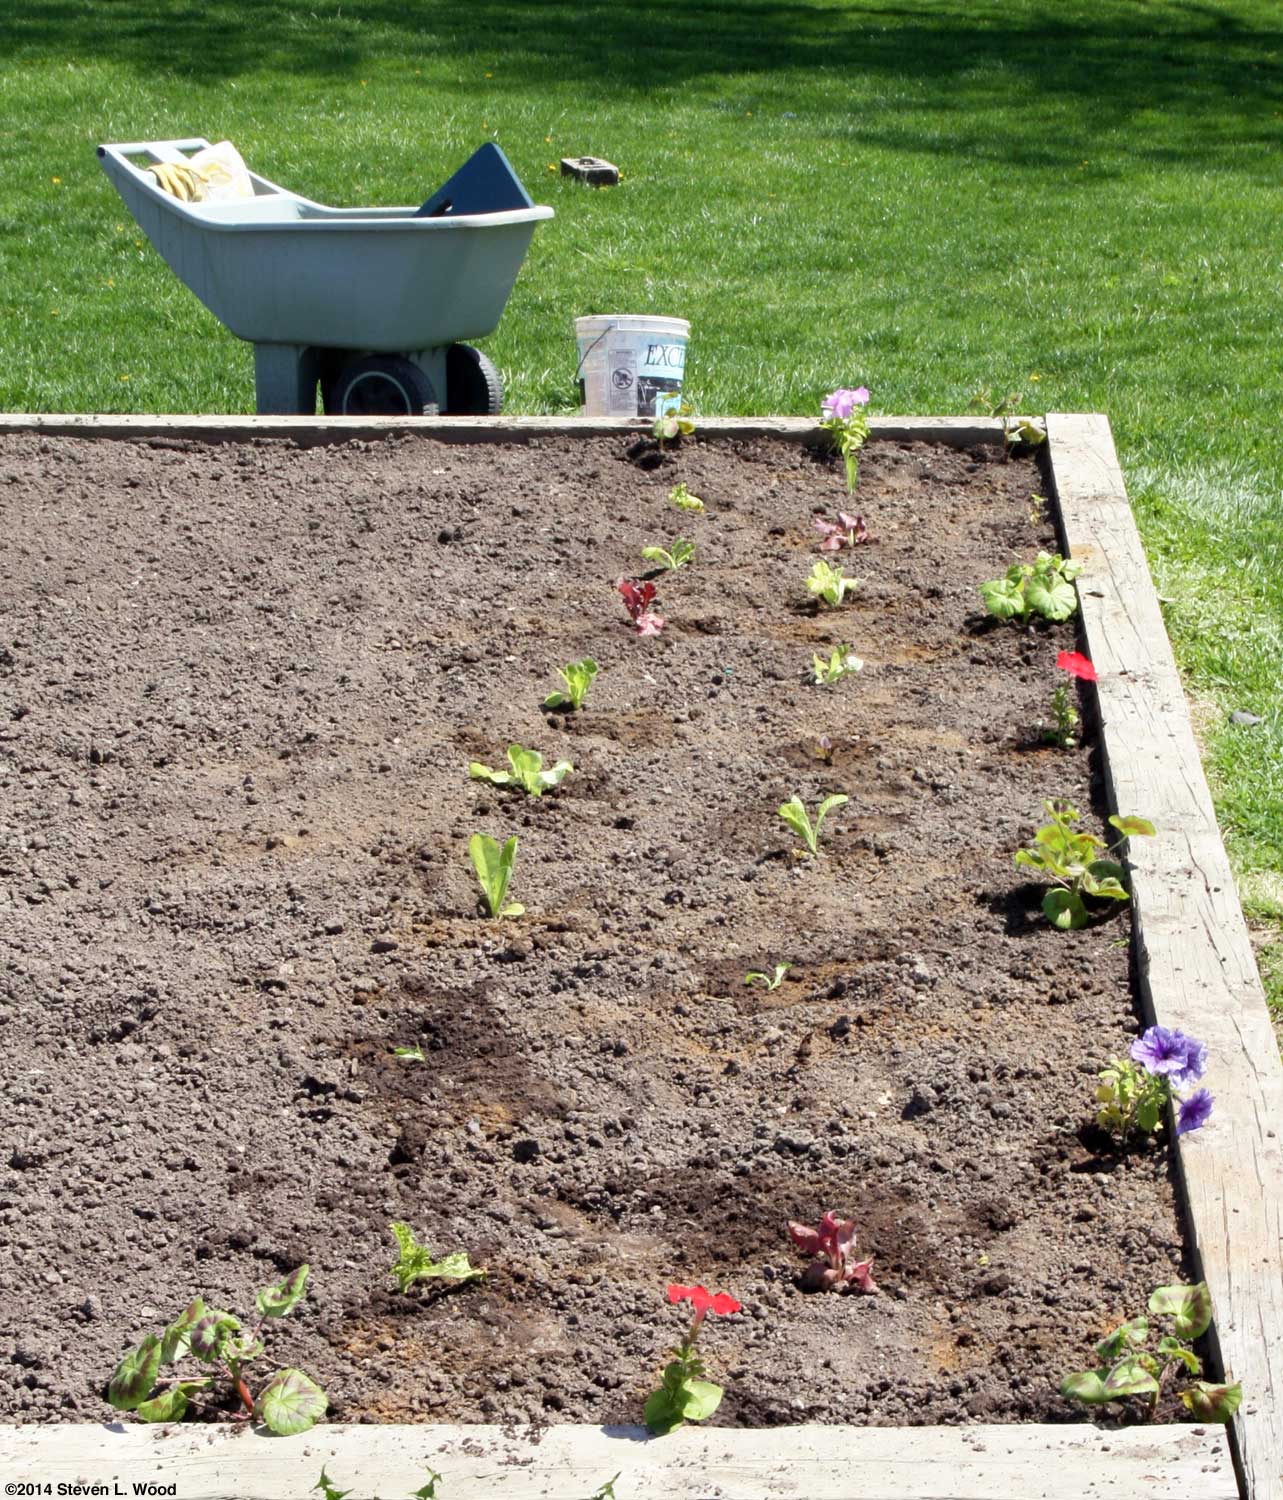
For some vegetables, though, we're still on hold, waiting for the soil to warm up a bit. Tomato and pepper plants and green bean seed all need a soil temperature of at least 60o F to do well. Some sources recommend 65o F for peppers. Our soil temperature this morning in our raised beds, courtesy of my forty-year-old Weston darkroom thermometer What could be planted today turned out to be a row of spinach and a bunch of lettuce and flower transplants. I put in a 15' row of spinach along the edge of our lettuce area, seeding 5' each of America, Melody For lettuce, I put in one of each variety we had started before doubling up on a few to round out the two rows of lettuce. The varieties transplanted include Barbados, Nevada, Sun Devil, Crispino, Nancy, Indiana Amish, Skyphos M.I., Defender, Green Forest, Ridgeline, Coastal Star, Winter Density, Pandero, and Red Salad Bowl.
Because of differing varieties and even one later seeding, the lettuce shouldn't all ripen at the same time. And one of the nice things about lettuce is that you can harvest it at almost any point in its growth before maturity. Since we have a lot of geranium and petunia transplants available this year, I liberally edged the planting with them. While the spinach and lettuce will mature and come out of the garden rather quickly, the flowers should be there for us to enjoy all summer.
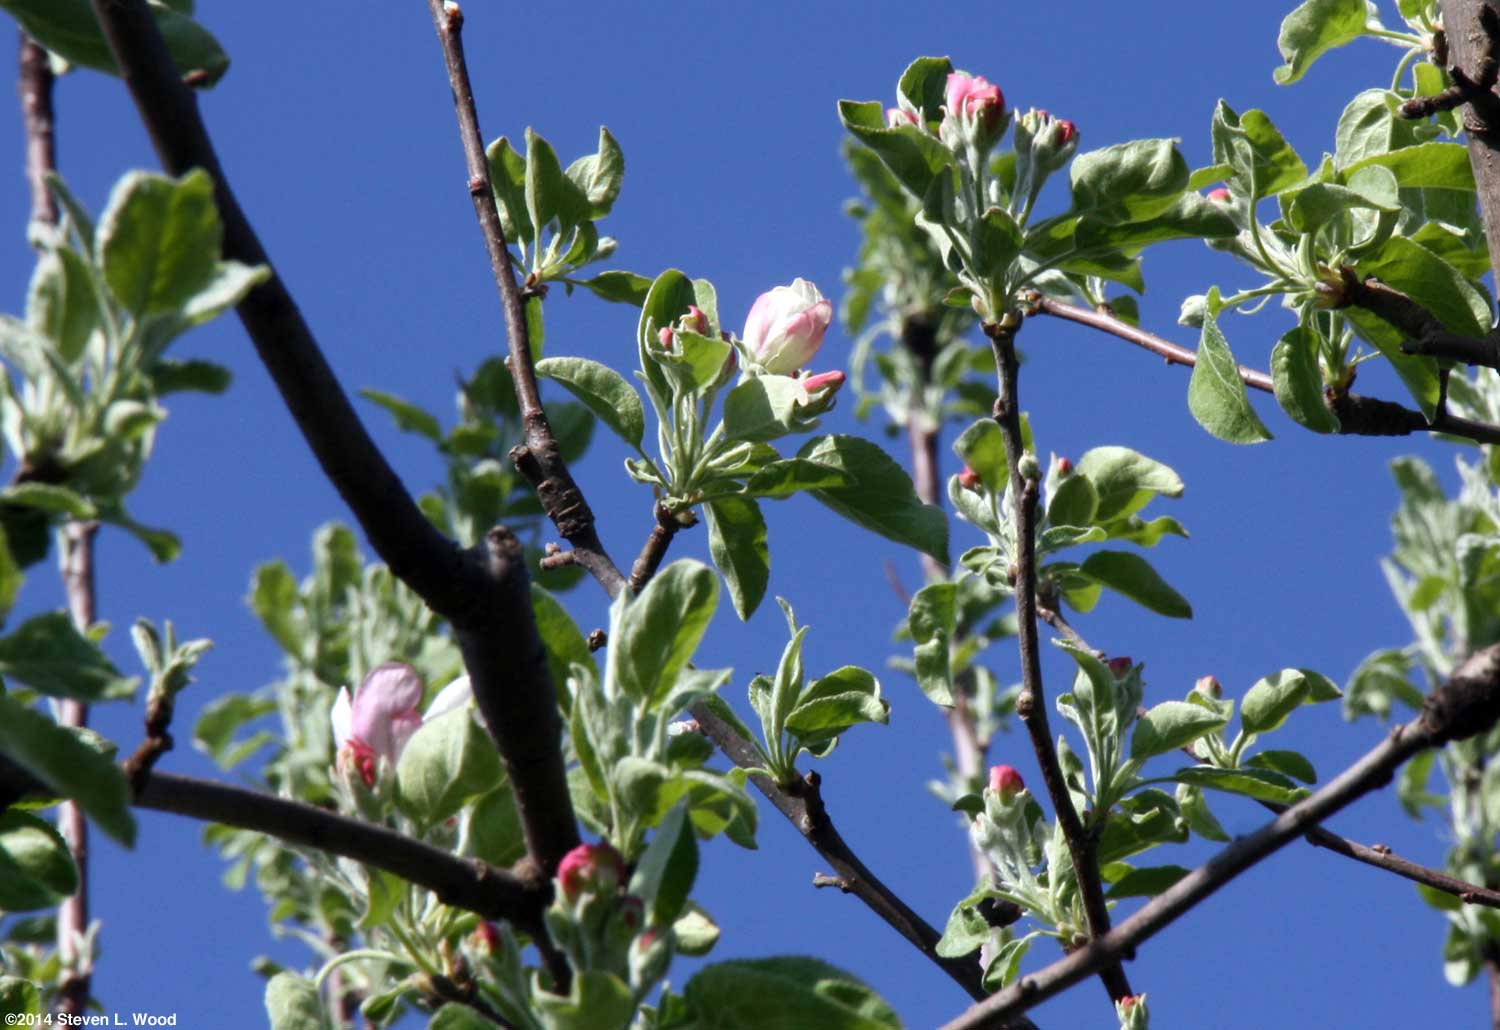
Besides mowing and taking time to admire the apple blossoms just beginning to open, I also rototilled our East Garden for the first time this spring. The soil was just barely dry enough to till, but I went ahead with it because I want to get the part of it rotated out this year seeded to alfalfa before it rains again. Our current forecast suggests our next rain may come this weekend.
And in case you couldn't tell from the images, we're enjoying some incredible spring weather! If you missed Muscle Shoals on PBS's Independent Lens last night, it's worth checking the listings to see when it will show again (if you're a music fan).
I had enough grass clippings to also mulch our lettuce and up to one row of onions. Eventually, the entire bed will be mulched and remain that way all summer. Oh, yeah, I also popped in some geraniums at the corners of the pea bed and some snapdragons along the trellis. In our East Garden, I got the portion we're resting this year seeded to alfalfa. The seeding was easy, but setting the tiller to just fluff the top of the soil (and the seed) was a challenge. I also tilled in some sulfur Thursday, April 24, 2014 - Planting Potatoes
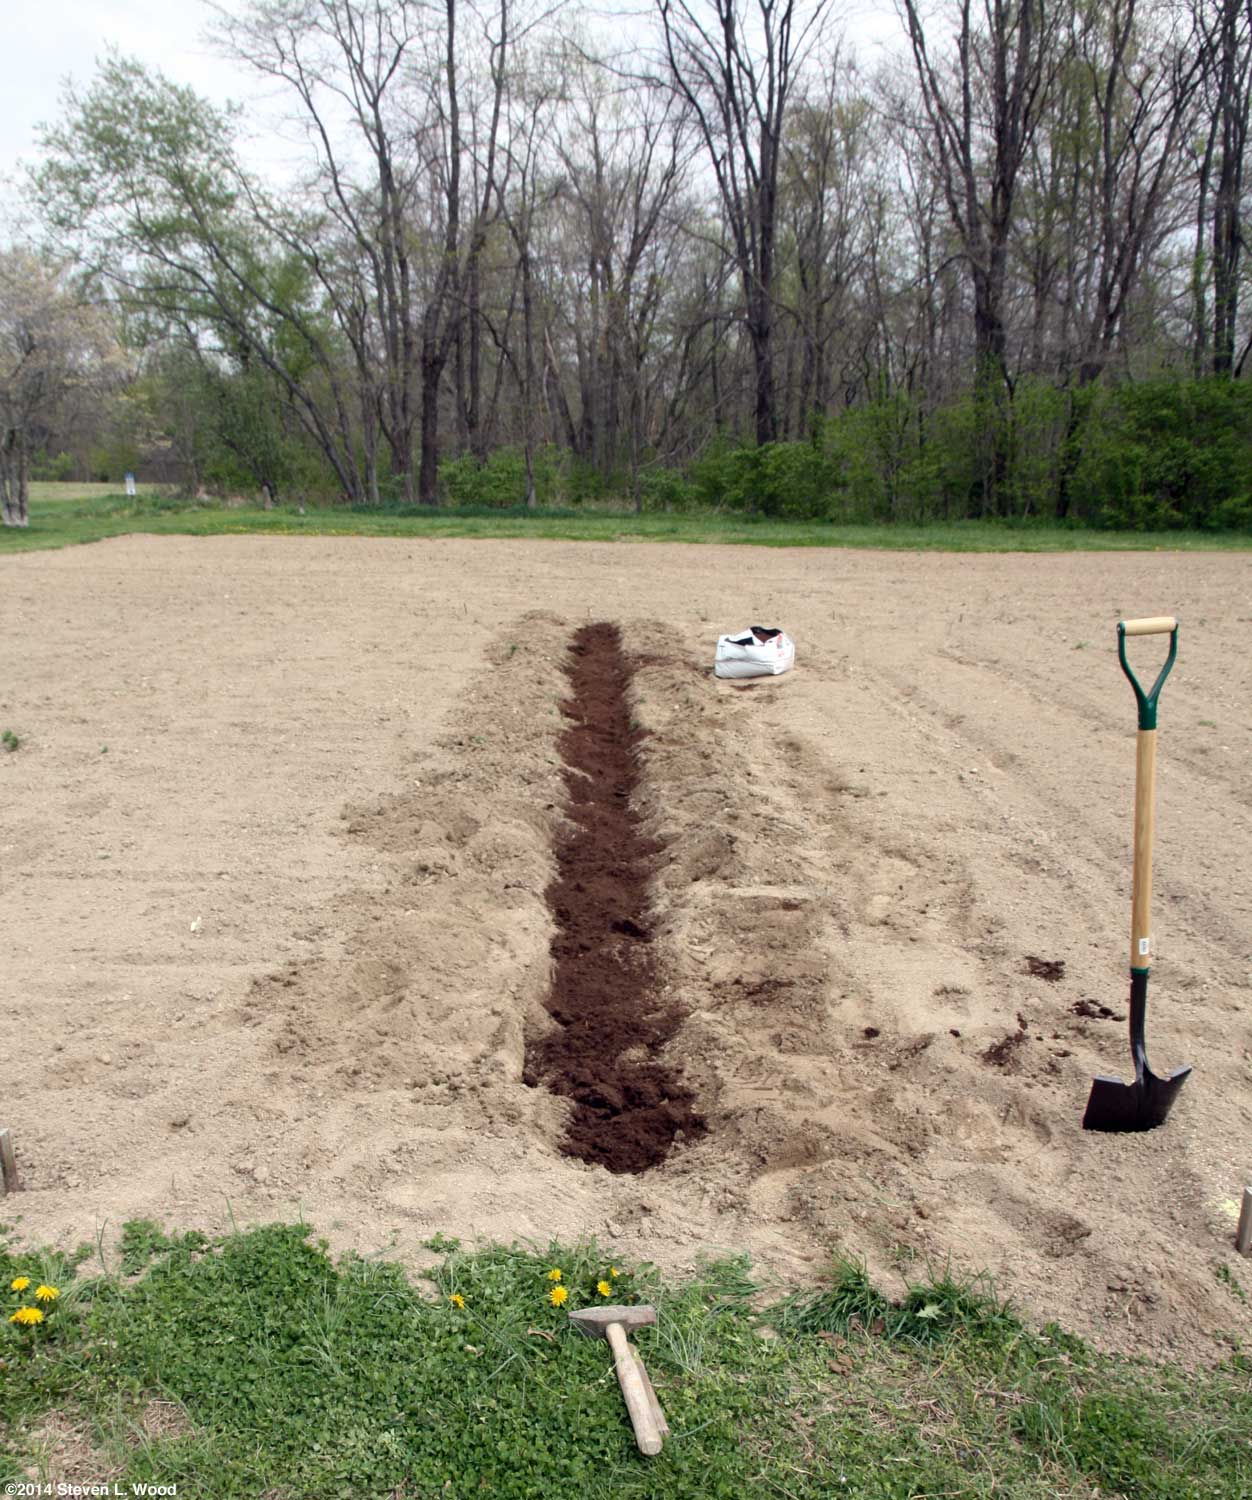
I'd worked sulfur into the planned potato area of our East Garden yesterday and staked the rows. I started today by digging out a trench about six inches deep and a foot wide. I sprinkled commercial fertilizer (10-20-20) into the trench and backfilled it with peat moss. Then I ran our tiller up and down the trench before digging out a narrow furrow for the potatoes. The peat moss helps loosen the soil and also acidifies it some. Since I'd bought about twice as many seed potatoes as I needed, I didn't have to cut and cure potato sets this year. I just planted whole potatoes spaced 12-18" apart in the row before dragging about three inches of soil over them with a rake. I ended up planting two 40 foot rows of potatoes. One row was planted to Kennebecs and the other to Red Pontiacs. Both are dependable, favorite potato varieties.
I had stakes in the ground for rows of sweet potatoes, brassicas, and kidney beans. Our sweet potato plants haven't arrived yet, and I was just too tired to seed beans or transplant the brassicas. I didn't even replace the planting stakes for the potato rows with flowers as I usually do, but will do so when I get the other stuff planted. I've found that I like a flower marking the end of a row much more than a wooden stake!
Friday, April 25, 2014 - Transplanting More Brassicas
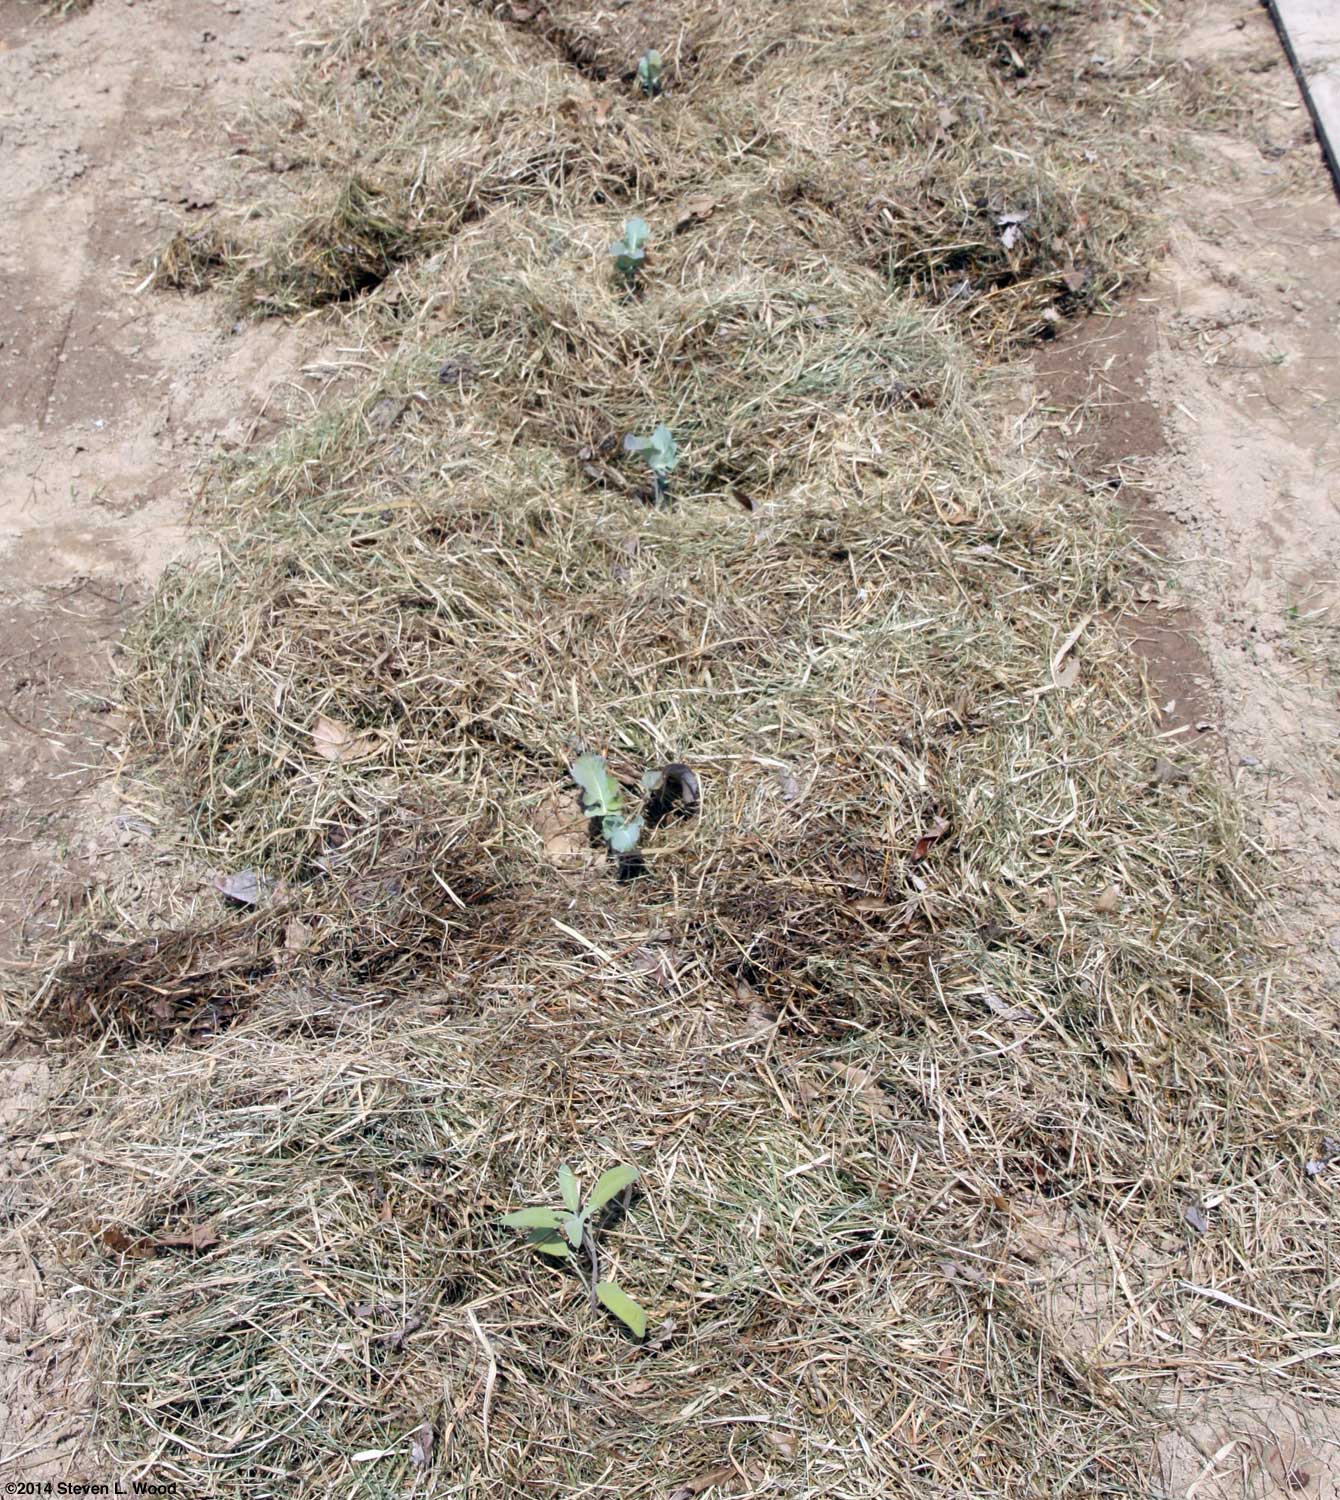
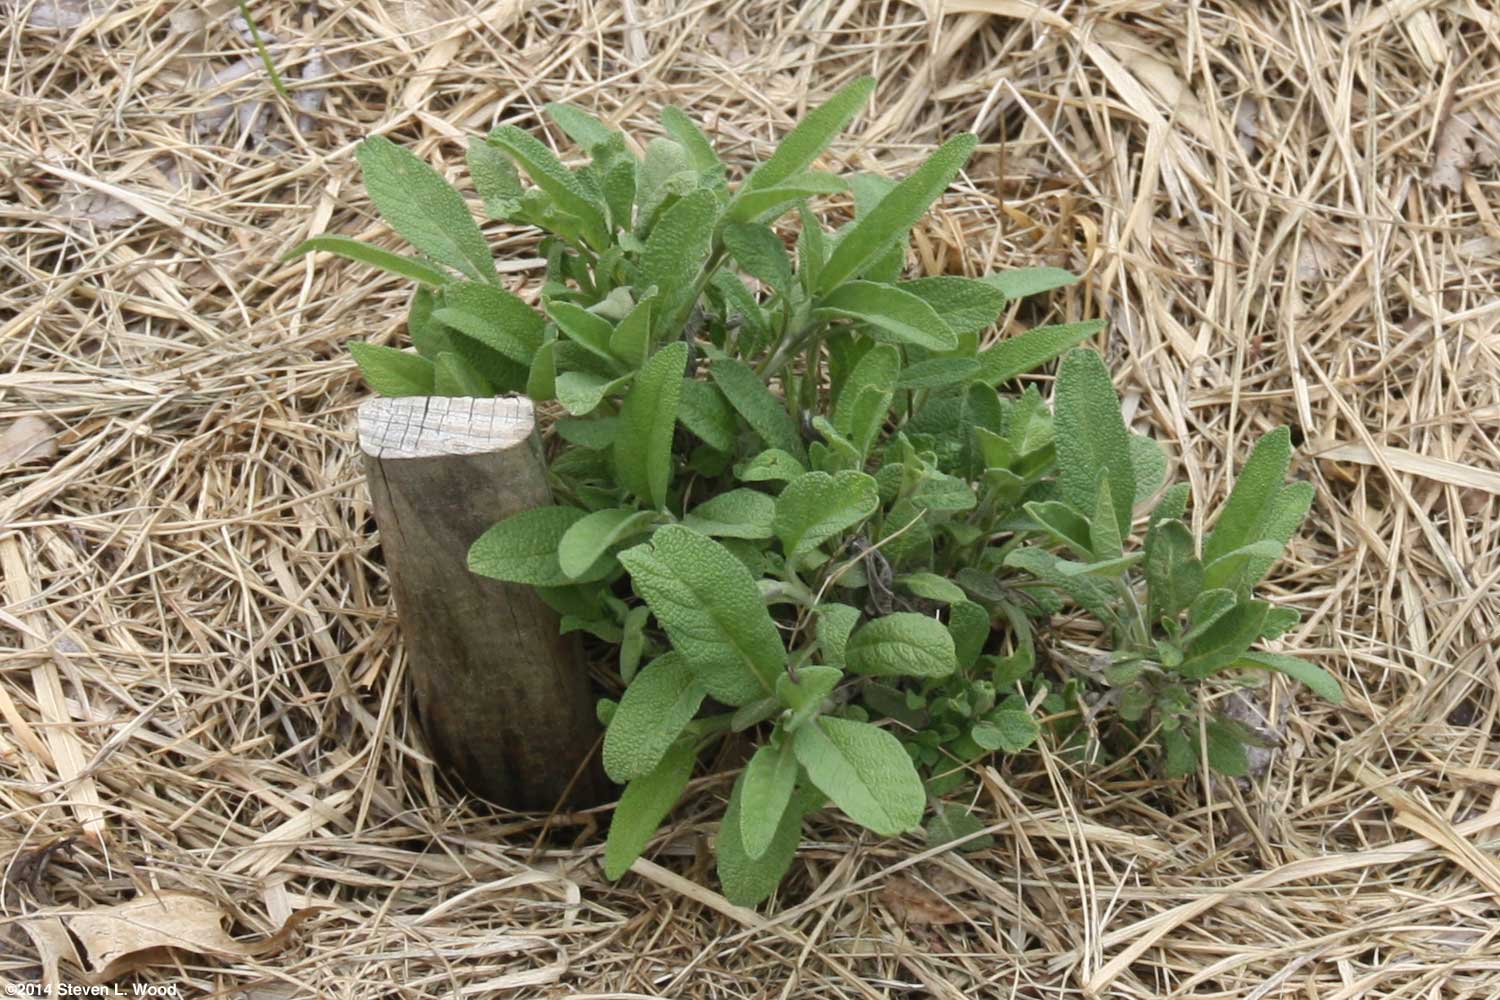
By 10 A.M., the weather had cleared enough that I headed out to our East Garden to transplant a row of brassicas. Our first planting of broccoli and cauliflower went into our new raised bed earlier this month. Today's planting was of plants leftover from the first planting. I usually seed far more brassicas than can go into our fertile raised beds, knowing that I'll have space for the extras in the East Garden. The soil there isn't nearly as rich as in our raised beds, but we still get some nice, albeit smaller, heads of broccoli and cauliflower. I mudded in 6 Premium Crop and 7 Goliath broccoli, 4 Amazing and 3 Fremont cauliflower, 2 Churchill brussels sprouts, and one each of Alcosa, Super Red 80, and Tendersweet cabbage. While I watered the planting holes with dilute starter fertilizer, it might not have been necessary as wet as the ground was. I spent a lot of time wiping mud off my fingers that was as sticky as bread dough. I didn't mess with cutworm collars for this planting, as we don't have much trouble with them in the East Garden. Of more danger to the young transplants are passing deer. I'll need to spray the transplants this evening with something that tastes nasty to the deer. I also put in a sage plant at either end of the forty foot row, as deer are said to not like the scent of sage.
I began the day watching a lone, male hummingbird, our first this year, visit the feeder outside our kitchen window. Unfortunately, he wasn't willing to pose when I had the camera ready. But I did notice that the hanging basket plants that surround the feeder needed watering. Hanging in the strong, steady winds we've had this spring, the hanging baskets dry out very quickly. I keep a couple of large pans on the back porch to bottom water the hanging baskets. Top watering never seems to get the soil completely damp, so the baskets go into the pans of water for an hour or so to soak up water. One pan is a cheap dog food pan, while the other is the top to an old steam canner. The canner lid leaked until I patched a hole in it with a couple of solid washers and some marine epoxy cement
While doing my watering chores, I mixed a watering can full of dilute Thuricide and doused our first planting of broccoli and cauliflower with it. Thuricide, or BT as it's often called (Bacillus Thuringiensis), is a biological that gives cabbage moths severe cramps. If I regularly spray our brassicas with BT, I usually don't have to resort to any pesticides to keep them free of the nasty worms the moths cause. Of course, the rain today may have washed off most of the BT, but it's cheap, and I really wanted to get that first dose on the brassicas. The brassicas I transplanted into our East Garden on Friday got drenched with BT at planting. But they needed to be mulched, so I used some grass clippings that had been sitting in a pile for a week or so. The clippings came from the field where the East Garden is. Since the field is full of weeds, I don't use clippings from it in our main garden, but do use them in the East Garden. Using old grass clippings allowed me to get the mulch right up to the stems of the plants in the row. Fresh, wet, green grass clippings give off a tremendous amount of heat as they begin to decompose and can burn plants near them. That's useful for killing weeds under the clippings, but isn't very helpful for crops such as this one. I'll continue to widen the row of mulch as it becomes available, then using fresh grass clippings to hold down any emerging weeds. Grass clipping mulch isn't a hundred percent effective in preventing weeds. I'll have to go back and pull a few strong weeds that germinate under the mulch and push up through it. I'll also need to refresh the mulch from time to time as it breaks down. But using grass clippings saves a lot of weeding, and the mulch is pretty much free, other than my mowing and raking time. (Notice how I conveniently left out the cost of the lawn sweeper and mower fuel.)
When the water had soaked in a bit, I pushed five seeds into the mud. Then I pulled grass clippings, which I'd dumped there a week ago for this purpose, around the planting. The Main Event - Planting Green Beans After taking a lengthy break to rest up and replenish fluids with a couple of Harps, I had to decide whether to plant green beans (which I love to do) or to mow and rake (which I usually like, but wasn't terribly wild about today). Storms were obviously moving into our area, so I opted to plant the green beans. Getting our beans planted as soon as possible was a priority for me this year. The farm ground around us will be planted to soybeans this year. By getting our beans in early, we'll avoid most of the insect problems we've encountered in the past with late bean plantings beside a field of soybeans full of Japanese Beetles. The beetles seem to like green beans even better than they like soybeans! When I did our initial planning and mapping for this year's garden last November, I had to push and shove stuff around a bit to make room for the early bean planting. That helped drive our construction of a new raised bed this year for our first planting of brassicas (which our late beans often follow in a succession planting).
I then rather heavily seeded the rows, using six different bean varieties. While I often plant different varieties in alphabetical order just to keep track of things, I planted our Strike and Maxibel beans this year at the east end of the rows. Both varieties produce thin, straight pods that are great for steaming when picked early. Putting them at the ends of the rows will remind me to do an early picking for a delicious treat of steamed gourmet green beans. The rest of the rows were filled out with Burpee Stringless Green Pod (Annie's favorite), Bush Blue Lake, Contender, and Provider. In most of the plantings, I was using up a bit of old seed and covering it with new seed as well. Most of the Strike planting was from seed I'd saved in 2009. The Bush Blue Lake seeding looked like Good & Plenty Since we had rain on the way, I pulled just an inch or so of soil over the bean seed and firmed it with a hoe. If conditions were drier, I'd put my seed an inch or two lower in the ground. By the time I finished, there was lightning to the south and west of us. I had just enough time to pop in some geranium and petunia row markers (to replace the planting stakes) and get my gardening tools put away before the rain began. Most of our new bean seed came from Fedco this year. This is our first order with them, so we'll be watching the germination of their seed closely. Note that Fedco is often a good bit cheaper than other seed houses, at least for the half pound bags of beans we buy. And so far, we've had good luck with some other seed from them that we started indoors. So the mowing didn't get done yesterday. I may hate myself later for not doing it over the weekend, but planting beans really is lots of fun for me. And direct seeding something just before it rains saves a lot of watering (or wishing for rain). Of course, the rain will pop up lots of seedling weeds, so I'll need to scuffle hoe and mulch as soon as things dry out. But as I'm finishing this posting in the wee hours of Monday morning, it's raining again outside, and we have a fair chance of more rain several days this week.
Wednesday, April 30, 2014 - April Wrap-Up
April turned out to be a wet month, with most of the precipitation coming early and late in the month. The drier middle weeks allowed us to get a lot done in our garden plots. Our raised garden beds are completely planted, with a row of sweet bell pepper plants yesterday filling the last open space in our main raised garden bed. Other than the garlic planted in November and our early peas seeded last month, all the rest of our raised beds got planted this month. While our raised bed of cauliflower and broccoli went in on April 8, most of this month's planting happened in the last half of the month. Carrots and onions, more onions, spinach and lettuce, grape tomatoes, and green beans quickly filled all available space in our main garden. When the weather turned dry mid-month, I was able to till our large East Garden plot and seed the northern half of it to an alfalfa cover crop. Two, forty foot rows of potatoes went in much earlier than usual. And even after the rains returned, I was able to mud in a row of our leftover brassica transplants. Just beyond our East Garden, our butternut squash got direct seeded in an area of the field where they can vine as far as they will.
Sage is a hardy perennial, and I like they way they look in full bloom. With enough of the plants, we may be able to offend the local deer population's noses, as they are said to not like the scent of sage. And if the plants take, keeping the East Garden's dimensions from creeping will be a lot easier.
Our two beds of asparagus produced their first picking around April 11. Until the weather got several cold periods out of its system, the asparagus production was irregular. Now that things have warmed up a bit, we're almost overwhelmed with the tasty shoots. With our initial spring craving for the vegetable sated, we've begun sharing the asparagus with Annie's coworkers and even freezing a bit of it. Along with the garden work, we managed to avoid any frost damage to our transplants that were hardening off under the cold frame and on our back porch. That required bringing all the porch plants inside for a few nights and tightly sealing our new cold frame each evening with mud pushed up around the base. Our basement plant rack is down to one shelf and two shoplights in use, considerably cutting our electric use, as transplants moved first outside to harden off and eventually into the garden. At one point, we had so many transplants waiting to go under the cold frame that I had all three shelves of the plant rack filled and six more flats of transplants on the bookshelves in our sunroom. Of course, our cold frame and back porch remain a traffic jam of seed flats of plants waiting to go into the ground and extras we didn't need but that I don't have the heart as yet to pitch on the compost pile. All in all, our 2014 gardening season is off to a very good start. Contact Steve Wood, the at Senior Gardening |
|||||||||||||||||||||||||||||||||||||||||||||||||||||||||||||||||||||||||||||||||||||||||||||||||||||||||||||||||||||||||||||||||||||||||||||||||||||||


| Affiliated Advertisers |
©2014 Senior-Gardening.com