One of the Joys of Maturity |
|
| Affiliated Advertisers |
Clicking through one of our banner ads or some of our text links and making a purchase will produce a small commission for us from the sale. The Old Guy's Garden Record
Because James Underwood Crockett was such an all-around plant expert, I often find items covered that I haven't tried before and am encouraged to experiment with them. Over the years, I've tried growing cyclamen, kohlrabi, parsnips, asters, seed geraniums, and many other flowers and vegetables after reading about them in Crockett's Victory Garden. Although all are long out of print, Crockett's Victory Garden More Onions My backordered Walla Walla sweet onion seed came in yesterday from Twilley Seeds, so I got busy and started another flat of onions today. I planted two rows each of Walla Walla sweets and Red Zeppelin, a large red onion that may store better than most reds.
I water the soil in the flat with hot water from a teapot before seeding and then let it cool a bit. The teapot routine is because our bypass for the water softener is the kitchen cold tap.
I'd hoped to get some annuals started today as well, but the onion flat took all of my sterilized starting mix. I have another batch of it sterilizing in the oven at around 400o F. I generally "cook" the mix in an old stainless steel pot for an hour before turning the oven off. I leave the covered pot in the oven as it cools.
If you've never sterilized potting mix in the oven before, do be aware that the heated mix will give off an odor when hot. Depending on what you have in the mix, you may find the odor offensive. Today's batch smelled only of clean soil, although my wife finds even that odor a bit too much. If you add compost to your starting mix to be sterilized, you might want to consider doing it over a charcoal grill outside! I've also poured boiling water over starting mix to sterilize it, but I think that doesn't do quite as good a job as the oven does in destroying damping off fungus. We ate the last of our sugar snap peas this week. Our sweet peas have been gone since Christmas. As we use up the bounty from last year's garden, it helps us plan for what we want to grow more or less of in the next garden. Of course, for us, we never seem to have enough peas. We also rather quickly exhausted our supply of canned green beans. We still have several packages of frozen green beans, but we seem to like them better canned. I chose to freeze the first few light pickings, as I rationalized at the time that there weren't enough beans to justify getting the pressure canner out and cleaned up. We still have a few quarts of Portuguese Kale Soup left in the downstairs pantry. We tend to save it for extremely cold winter days. We put up around 18-20 quarts of the hearty soup last year. Starting Petunias
So it's probably not a surprise that when I start petunias, I try to grow a lot of varieties. Since I keep my extra seed frozen from year to year, I'm able to plant, as I did today, seven varieties of petunias (without going broke).
I used sixpacks in the flat, which yields 72 planting cells. I filled the cells with sterilized potting mix, pressed it in, and then topped it with vermiculite. Since petunias require light for germination, I just dropped the seed on the vermiculite, bottom watered the flat, and then used a spray bottle to mist the soil surface. I added a loose fitting humidome to the flat and placed it on my soil heating mat under our grow lights. Most of the seed I used today was of the pelletized type. It makes seeding petunias a lot easier, as I can control getting just one seed per cell. The Color Parade, Fantasy, and Prism Sunshine varieties weren't pelletized. With the tiny petunia seed, I may have empty cells and others with up to ten seeds in them, so I'll probably have some transplanting to do later on. And while wooden stakes are a bit more durable, I find flowers to make really great row markers at the ends of my planting rows. I generally just pop in a flower transplant at the ends of each row when I pull my planting stakes.
February 12, 2009 - Pruning Apple Trees and Sooty Mold
The old adage is that you can throw a basketball through the crown of a well-pruned apple tree in winter without hitting anything. I didn't do that good a job of pruning, but I did open up the tree a good bit. I wrote a bit last October about our problems with having sooty mold on the tree. Pruning the tree opens it up for better air circulation and sun penetration which should help discourage the mold. Sooty mold is the common name for several species of fungi that grow on honeydew secreted by insects feeding on tree sap (aphids, etc.). Full control of the fungi will have to be archived this spring and summer through pest management. Beyond the pruning, washing the existing sooty mold from the branches was one of my goals for this week. To do so, I used a mixture of Spic and Span When the wind finally died down a bit at sunset today, I applied a lime sulfur Gloxinia Update Our gloxinias from an August sowing are coming along nicely. Three of them that are currently in bloom are sharing kitchen counter space with all the other items there. From left to right are an Empress, a Double Brocade, and a speckled blooming gloxinia from saved (and crossed) seed.
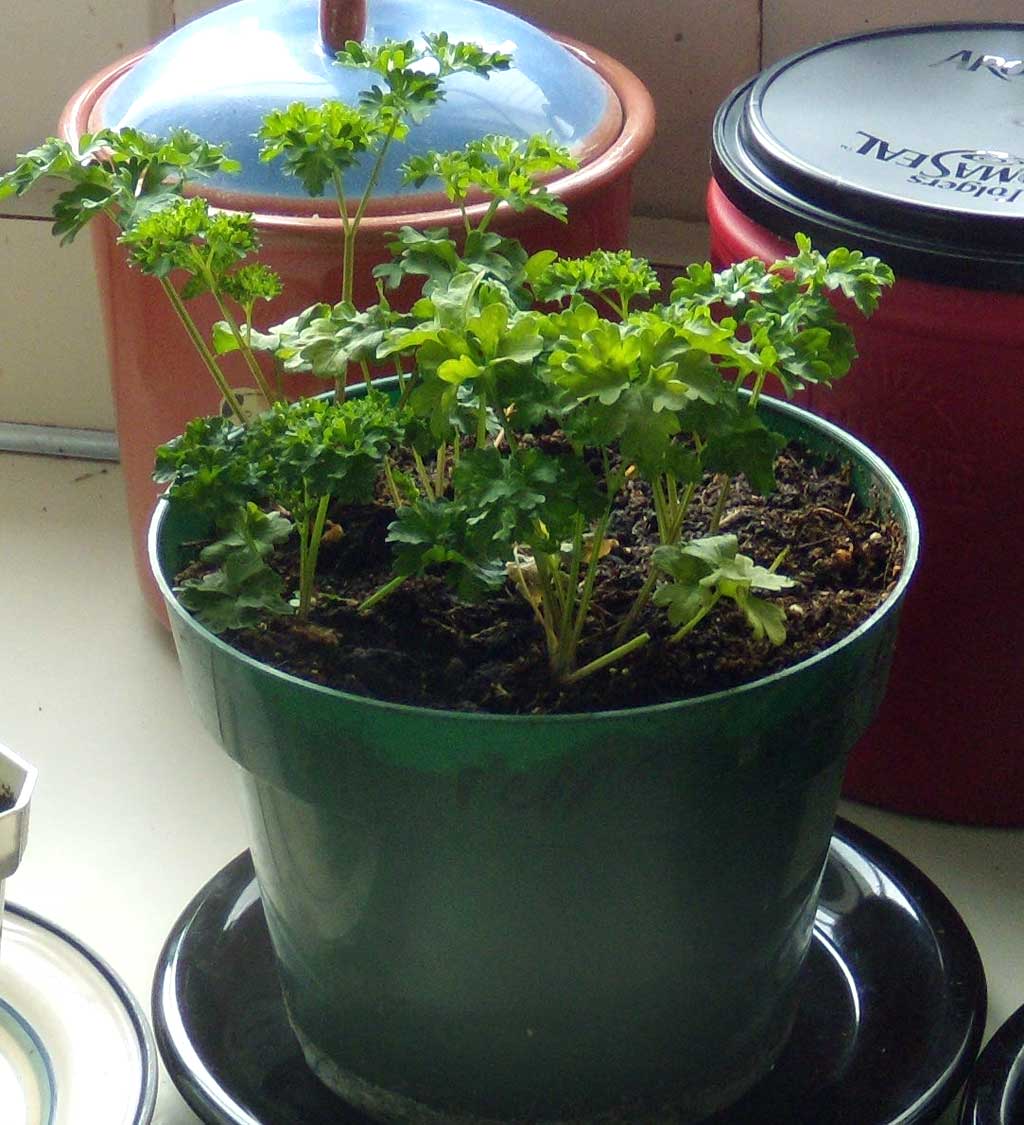
It appears the gloxinias are putting up one or two early blooms before returning to growing leaves and adding to their corm. One of our pots of parsley and a hanging planter of wandering jew (tradescantia pallida) also share the west kitchen window. When the sun fades, the gloxinias are moved onto the stove (when clear) under a fluorescent light.
Plant Rack Traffic Jam
Tomorrow, I'm going shopping for two more shop lights to go above the bottom shelf of the plant rack. I haven't used that shelf for years, and the light fixtures for it have long ago been used for other purposes.
SSE Yearbook And if I wasn't into full gardening mode yet, my copy of the Seed Savers 2009 Yearbook came in today's mail. It's filled with open pollinated plant varieties preserved and offered by Seed Savers Exchange members. February 14, 2009 - Happy Valentine's Day
While I was at the hardware store, I picked up a case (10) of 6500K fluorescent tubes, as I can use the extras in our garage. I try to use one daylight bulb and one warmer bulb (3500K to 4100K) in each fixture to give some light color balance. I also succumbed to the temptation to try one of those plant light tubes specifically labeled for aquariums and plants. Now having more space under the lights for varieties that require light for germination, I seeded two full flats to alyssum. I used Navy Blue, Snow Crown, Carpet of Snow, and Rosie O'Day. I hope to use the alyssum with dusty miller and impatiens in our shady flower beds at the front (north) of our house. I have a lot more seeding to do, but currently am waiting on potting soil sterilizing in the oven. I'm also on hold for varieties that need light and bottom heat to germinate, as I only have one soil heating mat. It currently is under the petunias I started a week ago. The February list of things to get started is a bit long. I need to get most of my annuals going, including impatiens, dianthus, dusty miller, vinca, and snapdragons. I also can start my spring brassicas (broccoli, cauliflower, cabbage, and maybe a kohlrabi or two) and some beets. I may also try starting some celery and celeriac this year. (Gosh, I'm glad the spellchecker knows how to spell "celeriac!" Late, late last night, I was uploading some pictures to Pics4Learning. I'd run across the site from a listserve posting about teachers needing free, stock photos. I like the site, so I uploaded several pictures. Seeing that they lacked any photos of gloxinias, I uploaded the one below. It's a shot taken in the classroom when I was still teaching. I did Photoshop it a little, removing the old background of a white sheet that looked rather gray and replaced it with solid white. The Double Brocade gloxinia shown is part of why I love growing that variety of flowers so much.
February 16, 2009 - President's Day Now I feel like I'm really gardening. Yesterday, I seeded a whole flat of brassicas (broccoli, cauliflower, cabbage, and kohlrabi). Broccoli and cauliflower are often the first things I transplant into the garden. I shoot for transplanting in late March or early May, although last year, ours went in a little later than I'd like, April 22. Heavy rains and the raised bed/terracing project for the garden delayed transplanting. I'd experimented with one new variety of broccoli last year, Imperial, and wasn't happy with it. So this year I stayed with Premium Crop, Goliath, and Green Goliath. Amazing is the only variety of cauliflower I seeded. We have great sucsess with it, as the leaves protect the crowns from yellowing quite well. For cabbage I used a savoy variety, Alcosa, and a red hybrid, Super Red. Both came from Johnny's selected seeds. The kohlrabi, Grand Duke, came from an unopened packet of 2007 seed that I'd kept frozen. We'll have to wait and see on germination from the old seed. Since brassicas don't require either light or bottom heat to germinate, I just seeded a flat with fourpacks in it, lightly covering the seed. I topped the seed flat with a clear humidome and put it under the plant lights, but not on the soil heating mat (currently occupied by a flat of petunias). The petunias I seeded on February 7 were a little spotty on germination, so I went back this morning and added seed to some of the cells. Interestingly, the pelletized seed didn't germinate as well as the non-pelletized. Of course, with the non-pelletized seed, one ends up getting far more seed into each cell than with the pelletized. (And my three year old granddaughter was helping me place the seed.) The best germinating varieties of petunias turned out to be from two old seed packets of Fantasy (2007, Stokes Seeds) and Prism Sunshine (2008, Stokes Seeds). I obviously will need to split the plants up into separate cells soon!
I recently had several late seed orders come in, all with excellent turnaround times. I've listed my full list of recommended seed suppliers elsewhere, but will add a plug here for the Seeds Trust, the Seed Savers Exchange, and Henry Fields Seed and Nursery And while one supplier may acceptably meet my needs, your results may vary. Dave's Garden Garden Watchdog has reviews and customer ratings for over 3,000 plant and seed companies. I find the reviewers there to be pretty tough on companies, but it certainly is a great source of information. And while I'm on the topic of advertising, if you appreciate the content on Senior Gardening, why not come back and click through one of our ads the next time you plan to buy something online. Our full list of Senior Gardening/Educators' News advertisers is here. I wrote about seeding a couple of flats of alyssum on Saturday. My granddaughter, Katherine, "helped" me scatter the tiny seeds in the flats. Boy, are we going to have a lot of alyssum!
When I start most of my seed, I usually cover the seed flat with one of the many commercially available humidomes. But when doing cuttings or other things where a humidome isn't large enough, there still is a really easy way to hold in plant moisture without spending a lot of money on it. You may notice a couple of pots covered with plastic in the image at right of my plant rack. When I need something a whole lot taller than even the Tall Propagation Dome
Getting back to tent construction, I push the clothes hanger all the way to the bottom of the flower pot, here a 6" round plastic one, before covering it with a plastic bag. In this case, I also added a plastic ice cream carton to catch extra moisture from the pot.
Total cost: $0! Oh yeah, I did use a twist tie to close up the mini greenhouse. While I'm at it, let me add my own ode of praise to those fantastic, and now rather expensive, plastic flat covers. I'm not sure what I'd do without them. I vaguely remember putting trash bags and clear cleaners bags around seed flats years and years ago. I think I may have even tried the clothes hanger trick above with some of them.
This covered flat holds the brassicas I seeded on Monday. They're already emerging with the help of the moisture held in by the humidome.
Although it was bright and sunny much of the day today, there also was a cold wind that kept me indoors most of the day. My one indoor gardening chore today was to get the humidomes off our alyssum and brassica starts and move the plant lights down over them. A fourpack of cauliflower (Amazing) is shown at right. Both plantings are obviously doing extremely well. The two flats of alyssum are shown below.
I moved the plants to a several different sizes of flower pots. The largest went into four inch square pots, but they take a lot of room under the plant lights. The rest went into a variety of saved commercial pots from previous years.
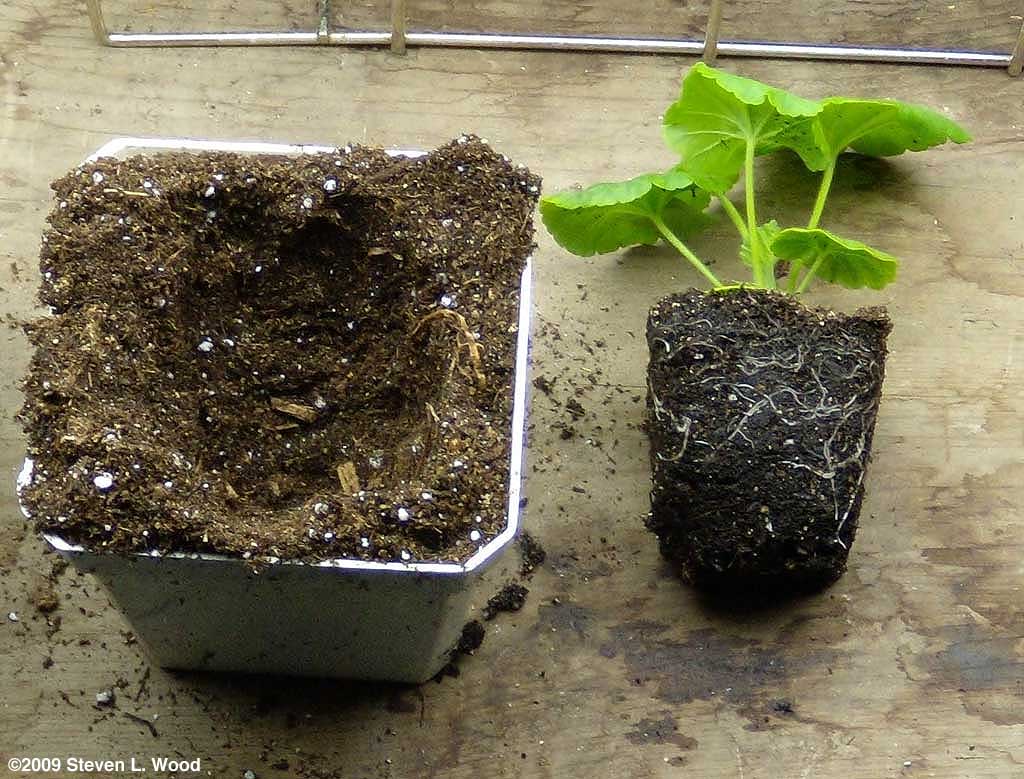
When I pop a plant out of its cell in the fourpack, I generally break off the potting mix on the sides and bottom until I just begin to see roots. I want the plant to be able to spread immediately into the new potting mix, but also don't want to excessively shock it by getting too far into the roots. For some of the smaller plants, that meant breaking off most of the soil from the fourpack, while for the larger ones, just breaking off a bit of soil at the bottom. Once repotted, the plants go into a doubled seed tray (the top one with holes and the bottom without holes) and under the plant lights. I bottom water with warm water, as the peat moss in the mix won't readily absorb cold water. Since I use a potting mix light on soil, I'll need to begin fertilizing these plants in a few weeks with a balanced liquid fertilizer. The plants will remain in these pots as they go out to the cold frame until they're transplanted into the garden, hanging baskets, or a planter.
From the
at Senior Gardening |


 Before the stainless steel pot was taken out of kitchen use (for burning sauces and soups on the bottom), I used an old water bath canner to sterilize potting soil. It eventually developed a few pinholes in it, so I guess I'm glad the current pot flunked its kitchen use.


| Affiliated Advertisers |
©2009 Senior-Gardening.com