![]()
One of the Joys of Maturity
One of the Joys of Maturity |
|
| Affiliated Advertisers |
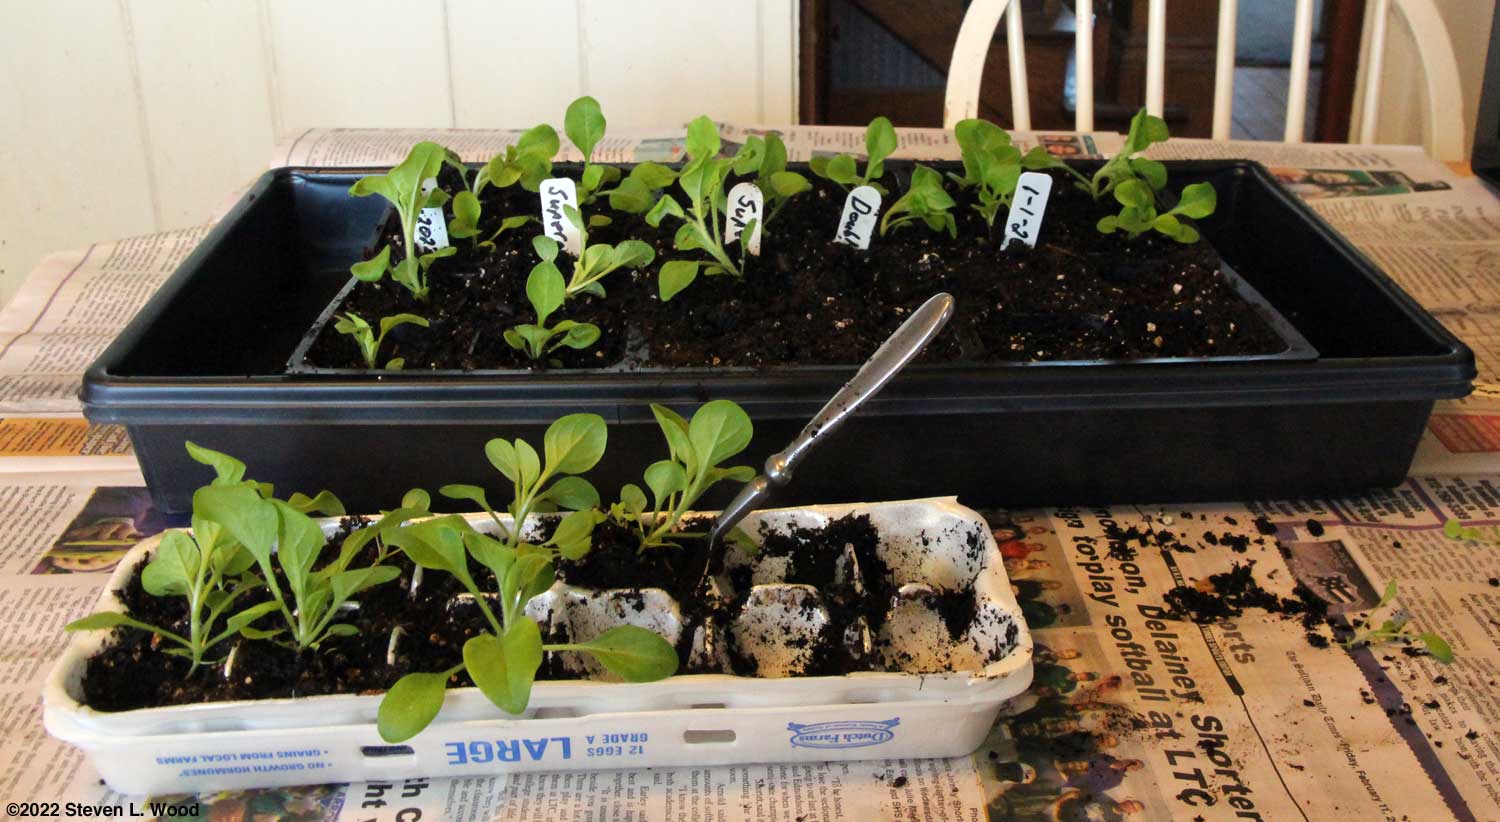
Clicking through one of our banner ads or some of our text links and making a purchase will produce a small commission for us from the sale. Egg Carton Petunias My mother used to start seedlings in egg cartons on the kitchen windowsill. In a bit of a nostalgic mood, I tried starting petunias in egg cartons about ten years ago. The experiment turned out well, although the petunias quickly outgrew their egg carton cells. But the baby petunias add some nice color to a kitchen windowsill in the winter.
The first petunias I start each January are somewhat trailing varieties for hanging baskets. Other than one terrible mistake, I plant pelletized (pelleted) Supercascade and Double Cascade seed from Twilley Seeds for the first planting. Petunia seed is tiny, so the pelletized version makes planting much easier. Twilley packages most, if not all of its seed now in foil packets. The pelleted petunia seed ships in a reusable plastic vial...in a foil packet. That may seem like overkill in packaging to some, but we appreciate it, as we freeze leftover seed for use in later seasons. Preparing the Egg Cartons While I'm not a fan of Styrofoam coffee cups, Styrofoam egg cartons are perfect for this kind of planting. Obviously, cardboard egg cartons wouldn't hold up. I first cut off and discard the narrow flap on the egg carton before splitting the egg cell section from the top. One of the advantages of Styrofoam cartons over cardboard is that the top can go under the egg cell section as a watertight drip pan. Before putting the halves together, I punch a drainage hole in the bottom of each egg cell with a sharp pencil.
Planting The cells of the egg cartons get filled with sterilized starting mix. We make our own from potting soil and peat moss, heating it in the oven for an hour or so at 400° F to kill off any damping off fungus that might be (and often is) present in potting soil. I've also tried using peat pellets in egg cartons but didn't have much luck with the pellets in egg cartons or otherwise.
Before seeding, I water the starting mix thoroughly with warm water. Our petunia seed comes as pelletized seed, so planting is just a matter of getting one seed in the center of each cell, something harder to do than it sounds. A few extra seeds do provide insurance in case not all of the centered seeds germinate. Petunia seed needs light to germinate, so I don't cover the seed. To help the pellet dissolve and release the seed on the soil surface, I go back and drip several drops of warm water on each seed with an eyedropper or an old syringe.
Once germinated, I keep the petunias on the heat mat for a day or two more before removing the clear cover and shutting off the heat. They acclimate a bit under our plant lights in the basement before being moved to our kitchen windowsill. The petunias have to be watered every other day once they get started, due to the small size of the egg cells. The egg carton tops used as drip pans make bottom watering pretty easy. Back Under Lights At this point, I seed two more egg cartons of petunias. For the second planting, I use varieties that do well in our garden plots. That's often the Celebrity variety, along with whatever I might have picked up off a plant rack. The petunias for hanging baskets eventually outgrow their fourpack cells. At that point, they get moved to their final pot. That's often a large (10-12") hanging basket with three petunia plants per pot. Occasionally, I put single petunia plants in eight inch hanging basket pots. There's usually not space for such large pots under our plant lights, so the hanging basket pots in trays go onto bookshelves in our sunroom or on our dining room table by our bay windows. Hardening Off
After about a week of hardening off, I begin hanging the plants from the porch for a few hours each day. I have to be careful with this step, as the strong winds we frequently experience can permanently damage the plants. Sadly, we almost always have a hard freeze late in March, so bringing the petunias back inside on cold nights has become a bit of a ritual at our house. In 2016, we had a 28° F low on April 2-3 that required bringing in not only our hanging basket plants, but everything that was under our cold frame! Starting our petunias as early as we do gives us gorgeous plants by April. A drawback is that the plants begin to require a good bit of pruning and fertilization by July or August. It sometimes seems that the plants just wear themselves out. But with a little care, some of the plants make it, and we have blooms well into fall. A bonus with our hanging basket plants is looking out our kitchen window in the summer and seeing lots of hummingbirds flitting around the plants and visiting our feeders.
|
|||||||||||||||||||||||
| Contact Steve Wood, the at Senior Gardening |
| Affiliated Advertisers |
©2022 Senior-gardening.com