One of the Joys of Maturity |
|
| Affiliated Advertisers |
Clicking through one of our banner ads or some of our text links and making a purchase will produce a small commission for us from the sale. The Old Guy's Garden Record
Wednesday, September 2, 2009 - Portuguese Kale Soup
We've totally run out of quart canning jars, so I canned the soup last night and this morning in pint jars. We pressure can pints of the soup for 75 minutes and quarts for 90 minutes, as the soup has both chicken and sausage in it. Portuguese Kale Soup also freezes well, but our freezer is small and filling up quickly. More Yellow Squash?
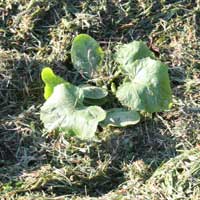
I'd started a couple of pots of yellow squash seed several weeks ago, so with the corn ground open and tilled, I decided to transplant the squash last evening. I dug a large hole for each pot about sixteen inches deep, sprinkled lime and 12-12-12 fertilizer on the soil, and then filled the hole with a bucket of water. I then drew the soil and a bit more back into the hole to make a hill for each pot. The plants went into the hill and received a good watering with a bit of starter fertilizer mixed in.
Transplanting a 48 day squash variety on September 1 in this area is really a shot in the dark. But I had the seed and the space and just hope we'll harvest some yellow squash before frost sets in. A Seedless Watermelon When I brought in two watermelon last Wednesday, I cut the larger of the two, a Moon & Stars melon. The other melon, which looked to be a small Crimson Sweet just sat on the back porch since then. As the last of the melon I'd cut almost a week ago was heading toward watermelon wine, I pitched it today and brought in the other melon. When I cut the melon, I knew it wasn't a Crimson Sweet, as it was almost totally without seeds. It was a Twilley Supersweet Brand Variety #5244. I thought our one hill of seedless watermelon had been overgrown by the more vigorous seeded varieties. I was pleasantly surprised by the rich color of the flesh and that it was ripe almost to the rind with no hollow areas in the middle.
Thursday, September 3, 2009 - Freezing Peppers
When I began writing this posting, I did a search on "freezing peppers," as I had some concern about the safety of freezing peppers without first blanching them. It's worked well for us for years, but... Freezing Sweet or Bell and Hot Peppers from the University of Nebraska - Lincoln extension office gave me some "official" relief that blanching wasn't really necessary for this process. Things to Do with Chile Peppers - Freezing from Mike's Pepper Garden also confirmed my method of freezing peppers, along with a lot of cool information on peppers.
I also carefully separated out any extraneous matter from the seeds, put them on a paper towel, and am drying them. We'll try some of the saved seed next year and see if they grow out true to variety. Our Paprika Supreme plant is not isolated from our other pepper varieties and could have cross-pollinated. More Green Beans
I'm also finding that the crops in our main raised bed really need a good rain despite being mulched fairly heavily with grass clippings. I've resorted to watering in that area by the bucketful from our granddaughter's wading pool! It usually needs to be cleaned out each week, and the water goes to good use in our garden. New Header Photo
I also grabbed a sky shot of some clouds I hoped (in vain) would produce a good rain.
If you're looking into the Canon Digital Rebel Friday, September 11, 2009 - Gloxinia Seed We had a heavy fog on Wednesday morning that lasted until about 11 o'clock, making it a good morning for working inside. I'd noticed the day before that one of our gloxinia plants was bearing seed, so I pulled out the heavy duty camera gear and got started on an update to our Gloxinias feature.
If the pollination takes, the petals of the bloom will wither, the the stem of the bloom will not wither, staying large as it feeds the maturing seeds.
As long as your gloxinia is in an area where it won't get bumped (and shed and lose seed), you can leave it alone until it opens up a bit.
I let the seed sit and dry out a day or so before storing it. I use some leftover, clear seed vials for my gloxinia seed now, but also have used homemade aluminum foil pouches with good success in the past. Photography Reality Check Recording the pollinating and seed shedding processes was a good news-bad news sorta deal. As I took photos and got them on my computer to see them at full size, I was disappointed a bit that I couldn't get a really, really sharp image of the seeds in the ovary. I pretty well maxed out the macro capabilities of my lenses and realized I'd need either a true macro lens or some close-up filters. With true macro lenses weighing in between $400-700, I opted for a set of macro close-up filters
My thirty-plus-year-old Vivitar tripod that once supported a Mamiya RB-67 has its legs duct tapped open with my Brinno GardenWatchCam
I started with around eight paprika peppers. Halved, they filled just over one dehydrator tray. I'm trying them at 115-120o F. I found that temperature recommendation on Mike's Pepper Garden.
More Potatoes
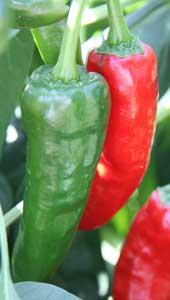
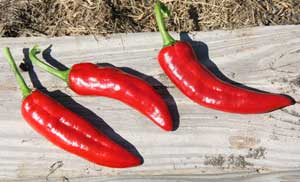
The potato digging was prompted by the vines dying down and a plan to make another round of kale soup from some turkey broth I'd frozen last winter. The soup never made it as I opted for turkey and noodles instead. We've not had much luck in the past growing potatoes in the Senior Garden. When I planted them in trenches, heavy rains would rot the seed potatoes. In years where we got our potatoes started, bugs often decimated our vines. With plenty of space in our East Garden, I decided to try again this year. The soil in that garden patch is heavy clay with little organic matter. When I planted the potatoes, I didn't use a trench as I had in the past, but just tilled the ground, added sulfur to make sure it was acid enough for potatoes (pH 6.0), and added a bunch of 5-10-5 fertilizer. After tilling, I just used a garden trowel to plant the seed potatoes. Since I had more than enough seed potatoes for the area available, I planted most of them whole, rather than cutting them. I've hilled the potatoes just a bit with loose soil and grass clipping mulch through the growing season, but really haven't truly hilled the potatoes as most folks do. So, with the absence of good soil and very, very minimal care, we've lucked out into a very nice potato crop. Our Kennebec potato vines are still green and actively growing, so while digging the reds, I used a bit of soil to hill them up and hold back weeds a bit. Sunday, September 13, 2009 - Paprika! Our experiment with growing, drying, and grinding paprika has at long last yielded some ground paprika for storage. I'd started several Paprika Supreme seeds last winter, only to be frustrated by poor germination. By the time I was ready to transplant peppers in the spring, only one paprika pepper plant was in good enough shape to transplant. Despite the slow start, our one plant has begun producing some lovely, red, paprika peppers. I washed, cored, and seeded several of them last week and put them in a food dehydrator for...well, it seemed like forever. The actual drying time was within the dehydrator manual's recommendation of 5-12 hours.
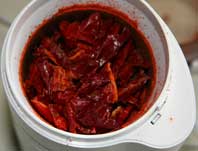
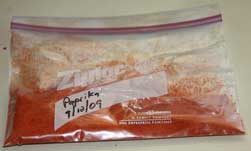
When most of the peppers snapped somewhat easily, I broke them into an extra coffee grinder. I'd cleaned it with a damp paper towel, followed by a cleansing grinding of some Cheerios, and another damp towel cleaning. Our ground paprika's orange color surprised me a bit, as did its pungent scent. The finished paprika powder went into a Ziploc bag for storage in the freezer. I plan to store our next round of paprika in a glass jar, as both dry storage and freezing are recommended storage methods for the spice. Of the paprika pepper halves I'd attempted to sundry, two molded and had to be discarded. The other two still weren't dry enough to grind after 5 days of drying. I popped them into the dehydrator with the other peppers towards the end of the drying process to finish them up. Thursday, September 17, 2009 - Flowerbeds
Until this year, these north-facing flowerbeds have been in the shade most of each day. We had an old maple tree just east of the beds cut down, and that has allowed a good deal more sunlight on the beds. It hasn't seemed to bother the shadeloving varieties.
Seed Catalogs In this day and age of online access to nearly everything, seed catalogs are a pleasant anachronism. While I often place my seed orders online, I always want to have the physical catalog to peruse as I contemplate new varieties for the garden. If you haven't ordered your seed catalogs for next year's garden, now is a good time to get on seed supplier's mailing lists. If you've placed an order in the last year or so, they'll obviously send you a catalog without any action on your part. We order over half of our seed from just two suppliers:
Most of the rest of our seed orders are spread across a variety of old and trusted suppliers:
We're going to try ordering a few things next year from Harris Seeds. We used to order a lot of stuff from them before the family owned business was sold to a large corporation in 1979. I noticed just this week that the company is now run by some "long time Harris employees," according to their About page. We did business with Harris Seeds for several years. I had a question about triploid watermelon seeds that drew an arrogant response from one of their employees. I guess I'm way too dumb to be trusted to hold an 85-90o F temperature to germinate their precious seed. Today, I questioned their president, Dick Chamberlin, about the tardiness of their seed catalogs for 2012. Chamberlin arrogantly informed me that I was out of line for such a request and my catalog would come when they were ready to send it. I don't often post nasty, negative posts about suppliers, but beware of Harris Seeds. If your order goes through okay and the seeds are good, no problem. But if you have to write them about something slightly unusual that might cause them to do something slightly extra to satisfy a customer, prepare to be disappointed. Harris Seeds is a definite no-go! We're always trying new suppliers, so if you know of one we should consider, . Do note that we have really trimmed our list of trusted suppliers from last January's list, as we had a tough spring with some really inferior seed we received from several suppliers. We also dropped several others for poor communication with customers! Birds Our hummingbirds have pretty well left us for their long migration south. We still see some transients at our feeder, but just one or two at a time. At the height of the summer, we'd often see four to six birds competing for a spot at each of our feeders.
I'm very slowly learning how to use the new camera's many features. The shot of the heron above was taken on aperture preferred mode with a setting of f/16. I also used spot focusing, as using manual focus on the viewfinder in bright light just doesn't work for me and standard auto-focusing is a disaster for such shots. Note that I did employ manual focusing on the viewfinder for the gloxinia shots I ran last Friday. It allows you to focus on the viewfinder and even zoom in just on the viewfinder to pinpoint your manual focus. And to complete my day with the birds, I heard a familiar call, actually a scolding cry, from our apple trees when I came in from our East Garden. When I looked, there were the male and female red-bellied woodpeckers that had helped themselves to dogfood on our front porch and in our back yard a good bit of the summer. Maybe they were just saying goodbye before leaving for the south. Wednesday, September 30, 2009 - Back Online Senior Gardening was offline for over a week due to server problems. Our apologies if you visited and found a blank page. We've switched web hosts to get back online as quickly as possible and also to insure we don't have another similar failure in the future. I'm uploading the site today just as quickly as possible. Please bear with us as we get set up once again. In the meantime, you might want to check out the October newsletter from Johnny's Selected Seeds. They have some good fall gardening tips.
From the
at Senior Gardening |
| Affiliated Advertisers |
©2009 Senior-Gardening.com


