One of the Joys of Maturity |
|
| Affiliated Advertisers |
Clicking through one of our banner ads or some of our text links and making a purchase will produce a small commission for us from the sale. The Old Guy's Garden Record
Wednesday, September 1, 2010 - Compost
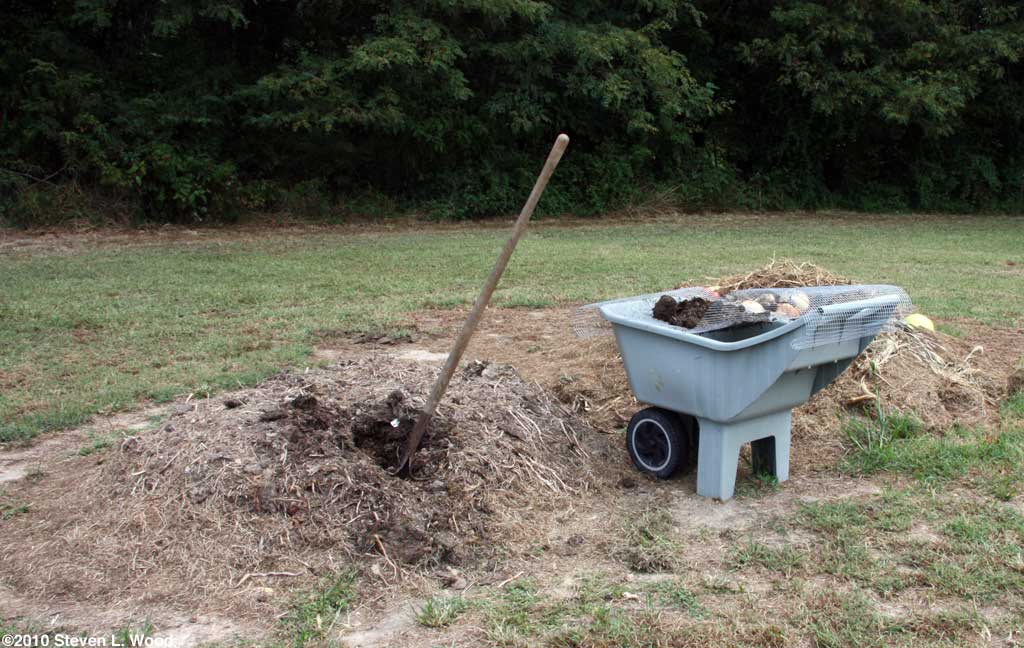
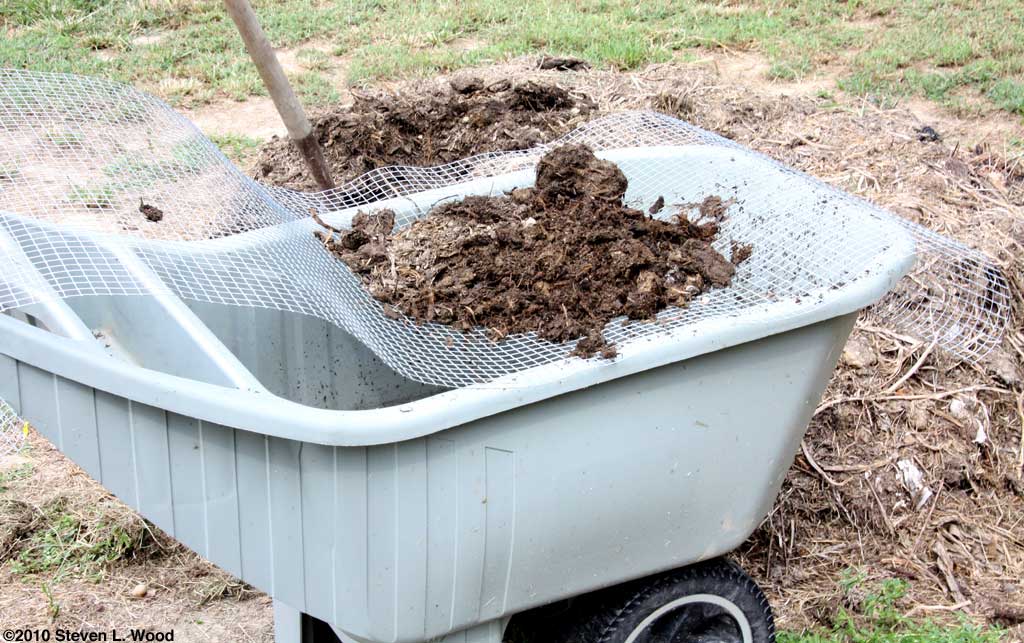
I usually just shovel up the finished compost and apply it wherever I want. But I'd added some evergreen trimmings and some other hard to digest material to the pile early this summer. Not wanting to spread the undigested stuff, I decided to screen the compost using some half inch hardware cloth I'd picked up at the hardware store just for that purpose. I remember seeing Jim Crockett on Crockett's Victory Garden using something similar, only his tool had a nice frame around it.
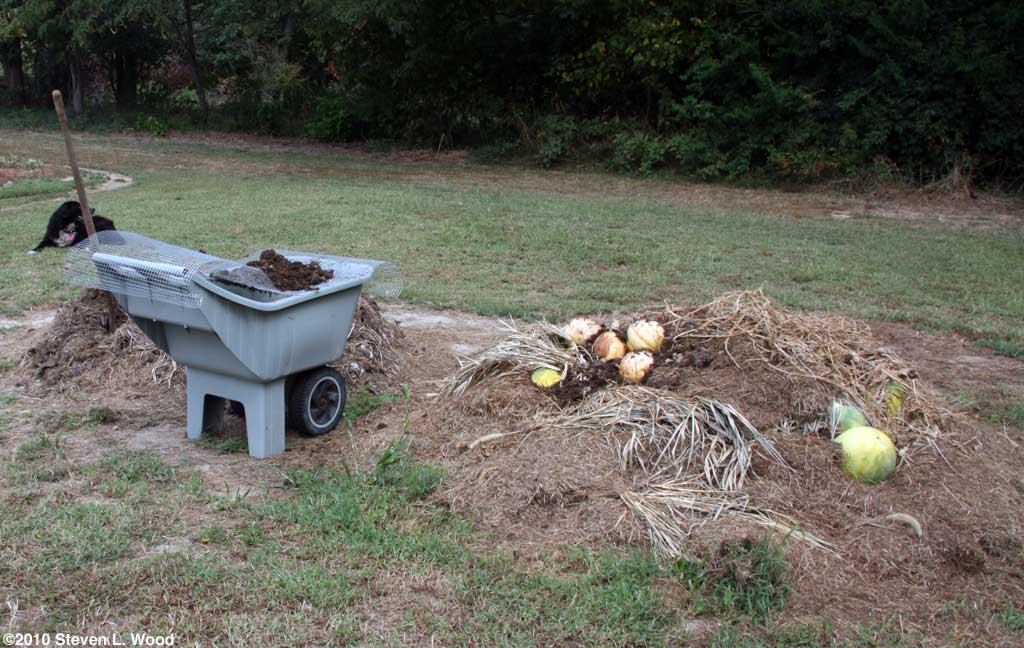
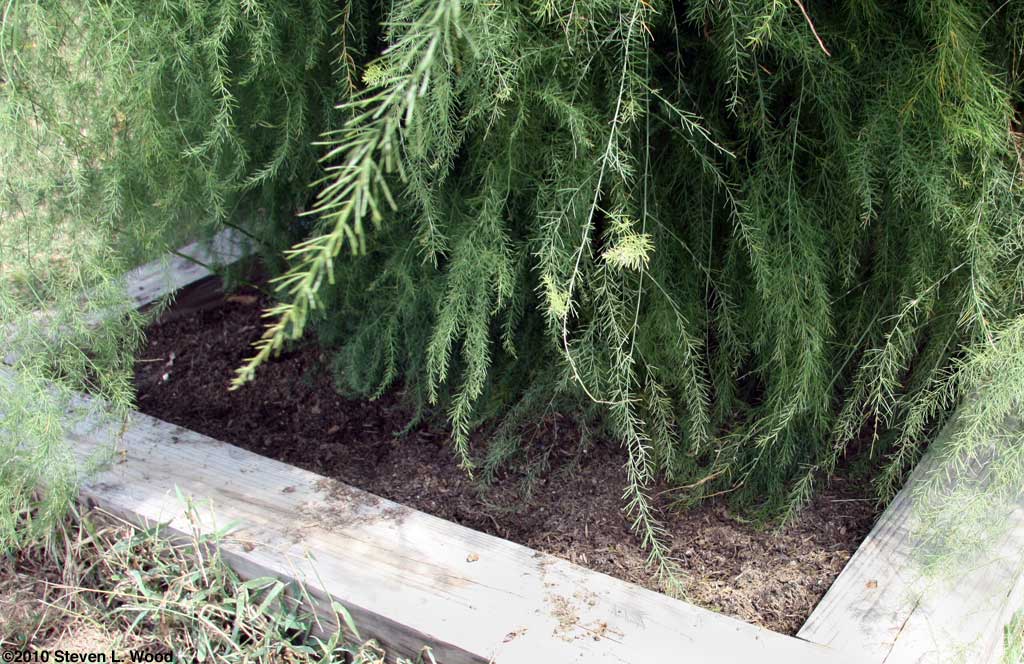
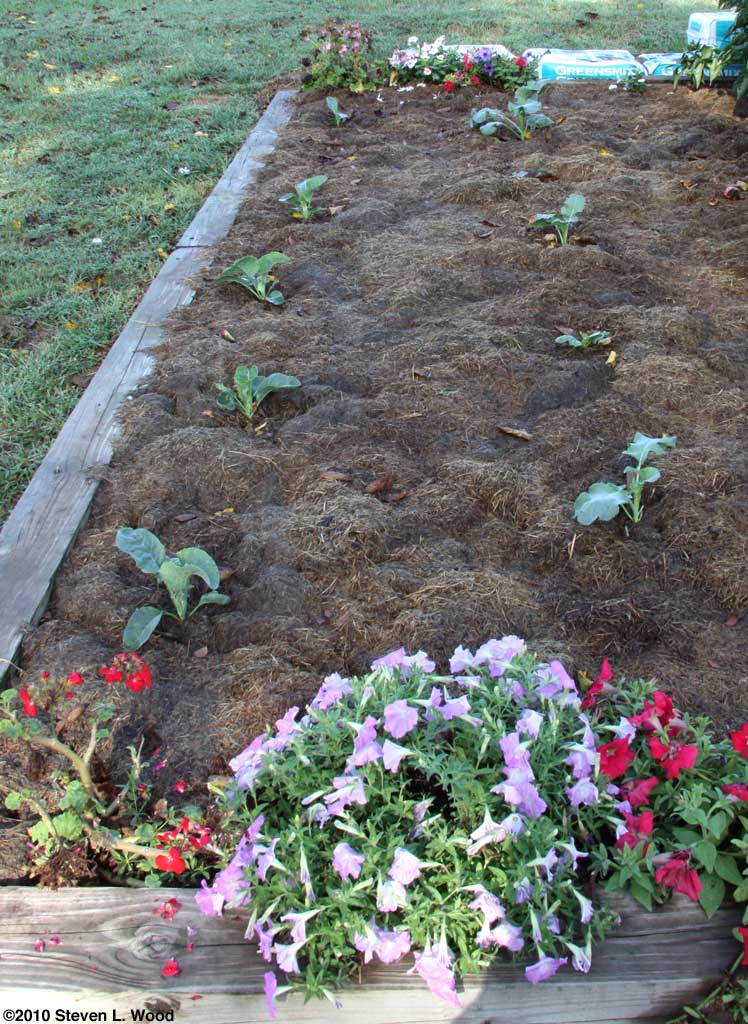
We put lots of stuff into our compost pile. Weeds and spent garden plants add a lot of volume to it. All of our corn stalks get chopped and put into the pile, even though they'll take a long time to break down. When we can spare grass clippings, they help add nitrogen and heat up the pile if mixed in. I often topdress with grass clippings to hide the somewhat unsightly pile! We don't put any meat or dairy products into our compost piles, as that is sure to get our dogs or some wild critters interested in it. We do put moldy bread, kitchen vegetable trimmings and peelings, and during melon season, a seemingly unending supply of melon rinds. If I have a knife or something sharp with me, cull melons from the field get cut and go into the pile. If not, they go in whole. They'll break down pretty quickly. We also add commercial fertilizer and lime to the pile. The fertilizer feeds the microbes that break down the plants. The lime helps neutralize what is an acid producing process. I also use one of the many variants of a Jerry Baker Compost Tonic. The one I use to get the pile cooking includes a 12 ounce Coke (regular, not diet), one cup of household ammonia, and a quarter cup of dish detergent. I mix about a cup of that mixture into a two gallon watering can and sprinkle it on the pile. Getting back to the project at hand, I'd originally planned to use the compost from this pile for our fall lettuce area. I decided today that our asparagus patch could use both the nutritional boost the compost gives, plus the organic matter. And...there was still a good bit of the pile left. I won't be able to work in a layer of it for the lettuce, but there will be enough to sidedress the plants.
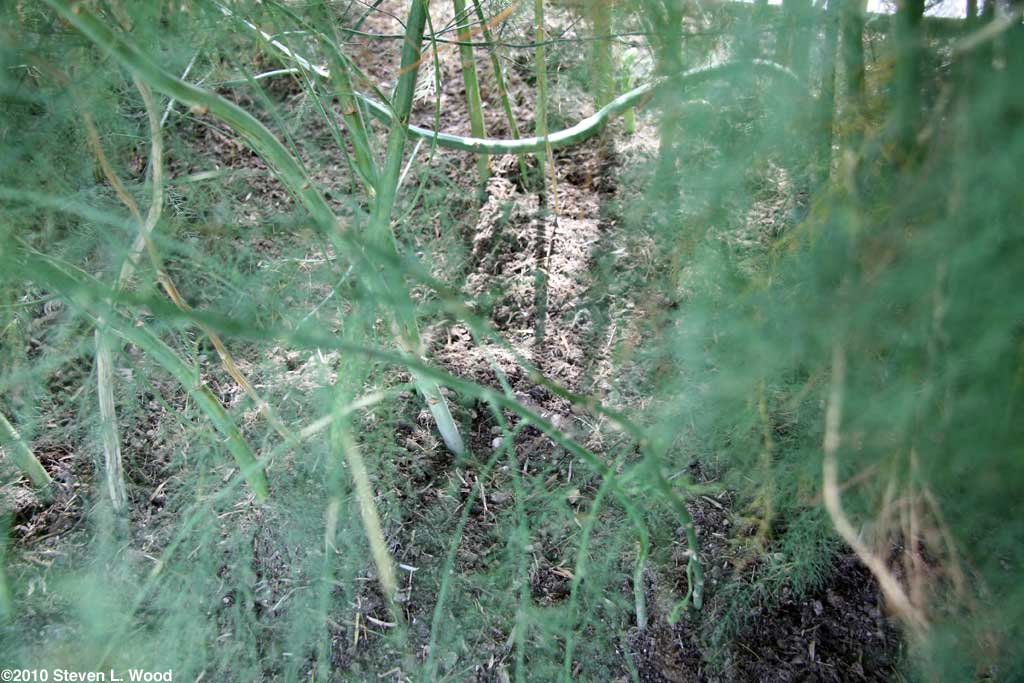
I ended up adding one to four inches of compost to the asparagus raised bed. Some areas of the bed had settled more than others. Since our asparagus is pretty dense, I had to sneak shovelfuls in between stalks, throw it through the stalks, and sometimes just put it at the edge and get down under the foliage and push it in by hand.
I also brought in our Waltham Butternut Squash today, added the vines to the new compost heap, and tilled the area where the squash had grown. Our plants got zapped early on by something, probably squash bugs. But by the time I got to that chore, I was hot and had already put away the camera. My hard work was rewarded this evening, as we had a brief shower. We only got about a quarter of an inch of rain, but even that little amount was welcome.
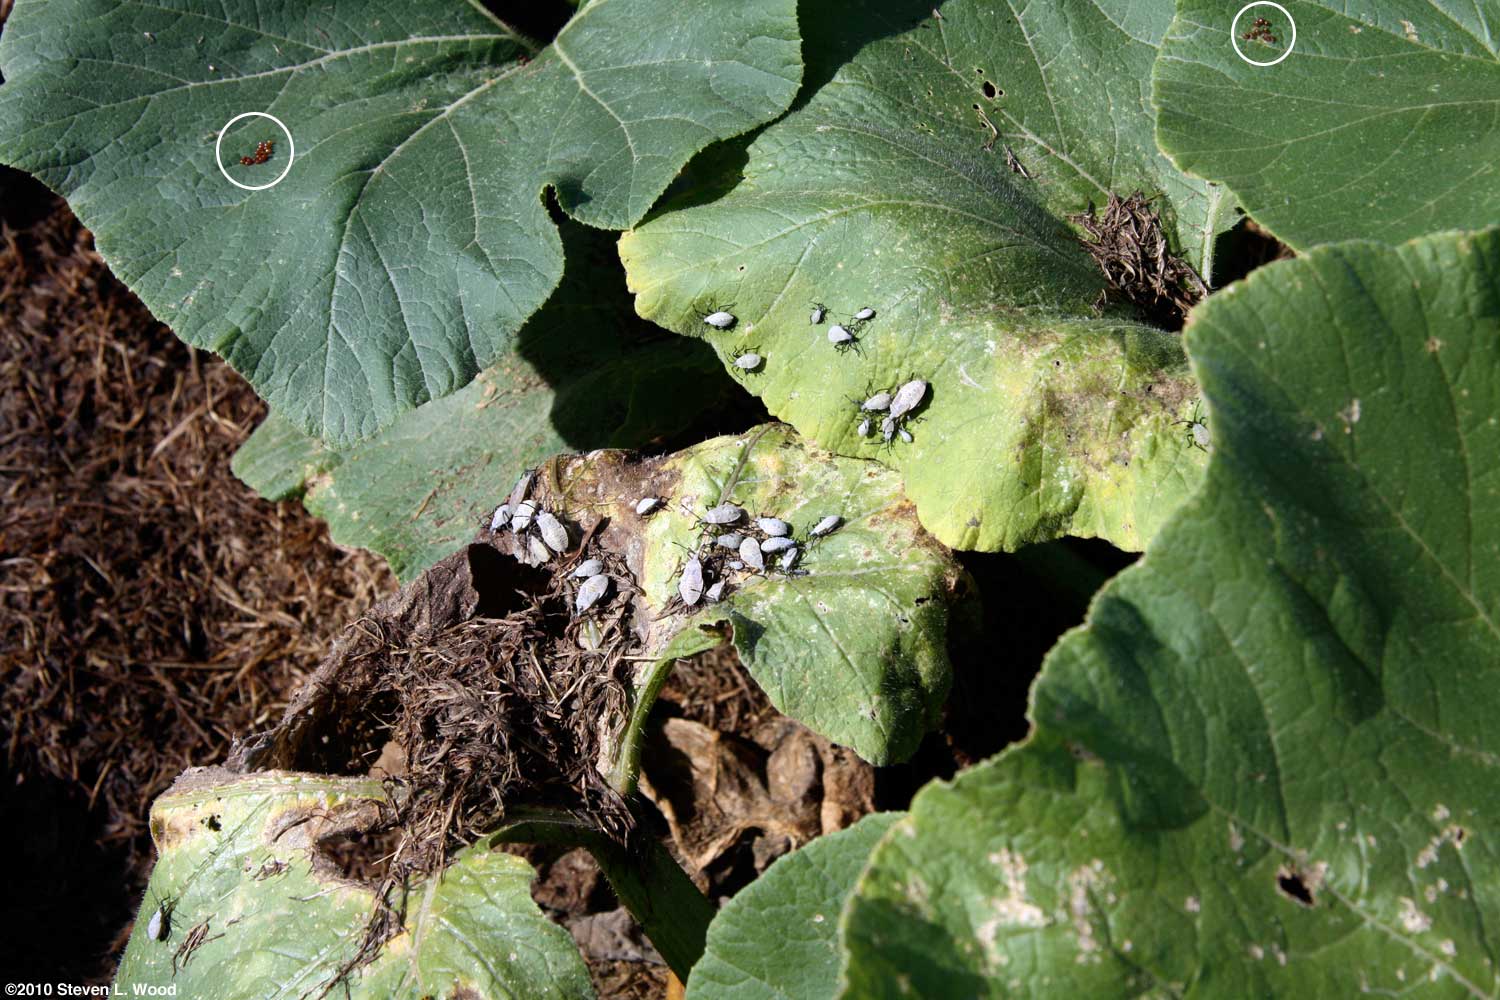
Friday, September 3, 2010 - Squash Bugs
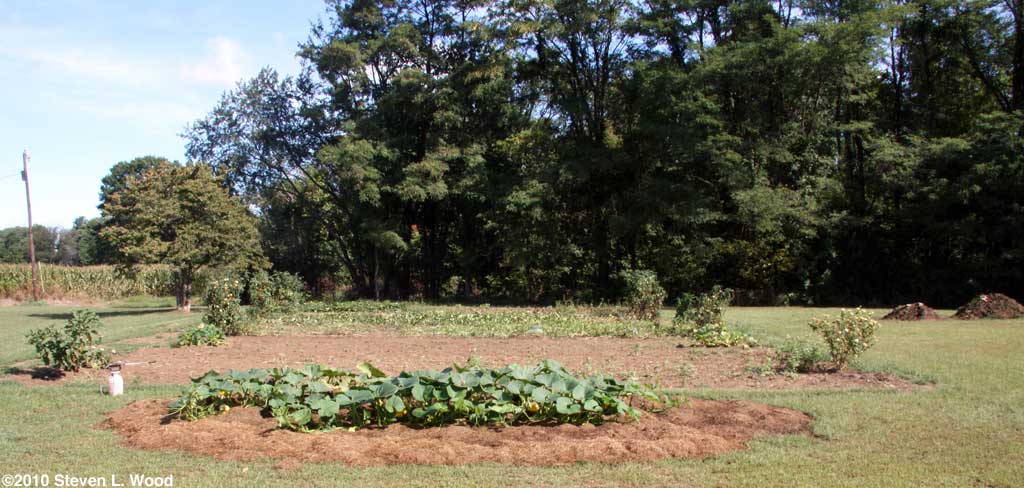
Our pumpkins were an afterthought. I had moved our compost pile to a new location mid-summer, and on a whim, popped a few pumpkins seeds in the ground where the compost pile had previously been. I didn't do any more soil preparation than loosening the soil a bit with a garden trowel, and have been pleasantly surprised that they've grown so well.
I put down a good spray on the entire pumpkin patch and both of our yellow squash plants. When I checked the area later in the day, I hand picked and squashed a few survivors. I'll need to check the plants daily for a while, and if necessary, come back with something even more potent. But for now, it appears the rotenone-pyrethrin and hand picking will save these plants. I really don't need another crop failure in the East Garden! Broccoli On the Way
I was out spraying them this morning with Thuricide The other biological I used this morning was Serenade Random Thoughts
One of the things we've grown this year that has been especially satisfying is our row of zinnias. Zinnias were one of my mother's favorite flowers. I've used them for years at the ends of rows of sweet corn, but this is the first year I've just put in a whole row of them. They've dazzled us over the summer. Wednesday, September 8, 2010 - Seed Catalog Requests
With a day off of sorts, I began updating a list of seed vendors who offer free mail order catalogs. This evening, when I was beginning to get lazy and was thinking about putting the updated list off for another day, an email arrived from Kathy Taylor. She suggested I take a look at Baker Creek Heirloom Seeds. They offer an extensive list of open-pollinated seeds, including our old favorite, the Japanese Long Pickling cucumber. Kathy noted, "Their prices are great and they have quality seeds." I'm always on the hunt for reliable vendors of quality seed, especially those that offer open pollinated varieties. If you know of one we should consider, . Note that the links below, wherever possible, are to the catalog request page of the company, rather than their home page. Most of the companies offer online ordering, but there's a nostalgic charm to seed catalogs I find hard to resist. I also seem to do a better job of planning and comparative shopping with physical catalogs. And there's nothing quite like having old seed catalogs around for reference. Obviously, if you've ordered from a seed house this year, there's no need to request a catalog, as they'll surely get one to a previous customer. But you may find a few new ones listed you'd like to try. We've placed some kind of order this year with all of the following seed vendors and been satisfied with the product and service. I guess that qualifies as a recommendation.
We also ordered seed from GenericSeeds.com, but they're an online only outfit that doesn't have a mail order catalog. Here are a few other outlets you might wish to consider. We didn't use any of them this year, so really can't make an informed recommendation.
Full disclosure: Generic Seeds is a Senior Gardening affiliate advertiser.
Regular readers of this blog may have already noticed a few deletions from out list of suppliers since our listing from January. Mountain Meadow and Pase Seeds both seemed to have seed quality issues. Burpee and Park both have serious communication issues with customers. Bad seed and/or bad customer service/communication are simply unacceptable.
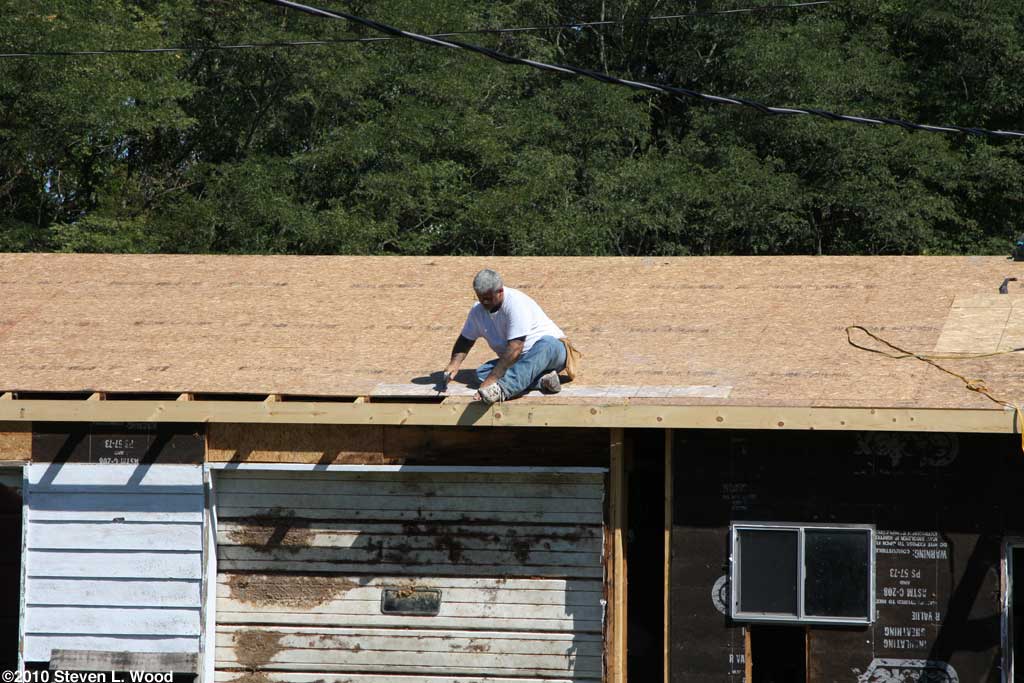
Our soup this year included kale, onions, garlic, carrots, tomatoes, basil, and green beans from our garden. We always hope to use almost all home grown vegetables for it. We did have to use purchased potatoes for it, as our potato crop looks to be a failure this year. I also used a bit of store bought sweet corn in it. And if the photo at right looks familiar, it's because it's an old one from two years ago. I was so busy making and canning soup that I forget to get out the camera! We're into a major rebuild (roofing, siding, and new doors) on our garage, so postings here have been and will be a little less frequent until we get the job done. Tuesday, September 14, 2010 - Another Raised Garden Bed
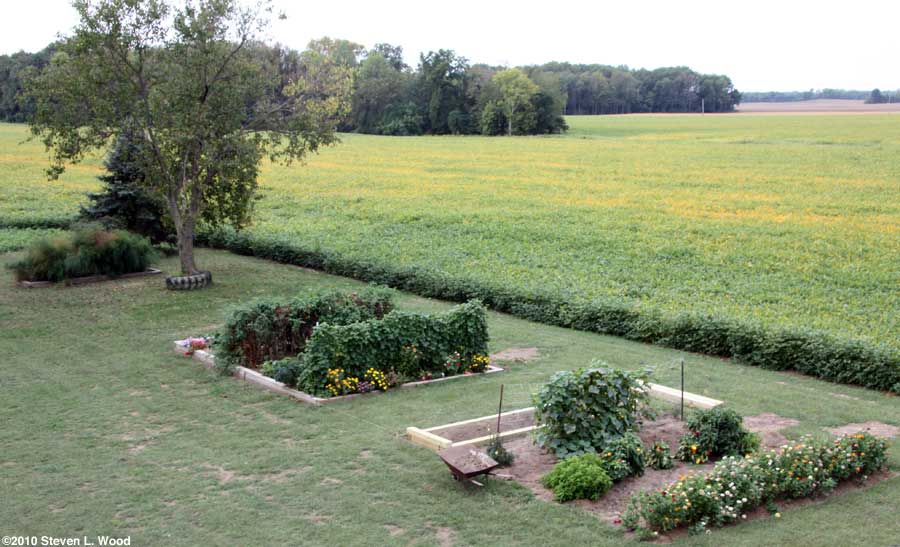
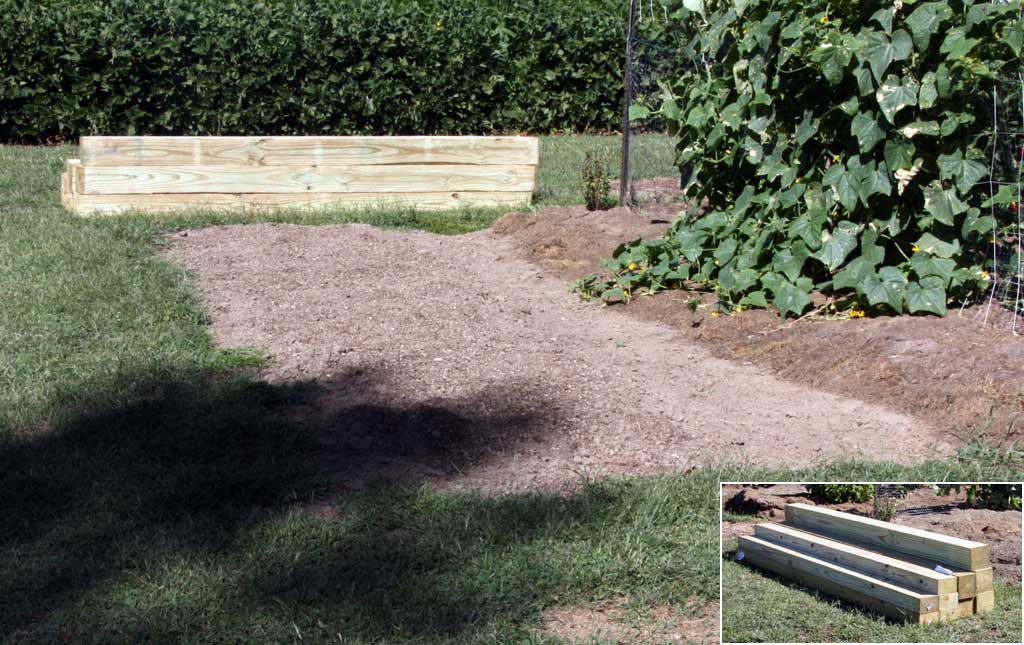
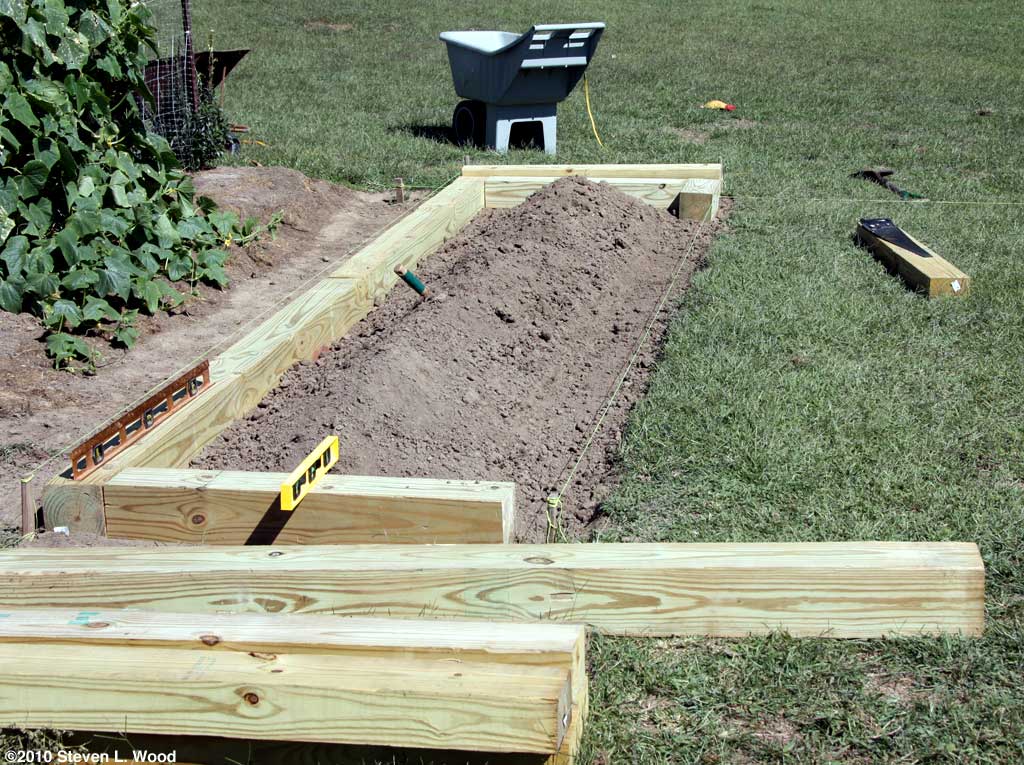
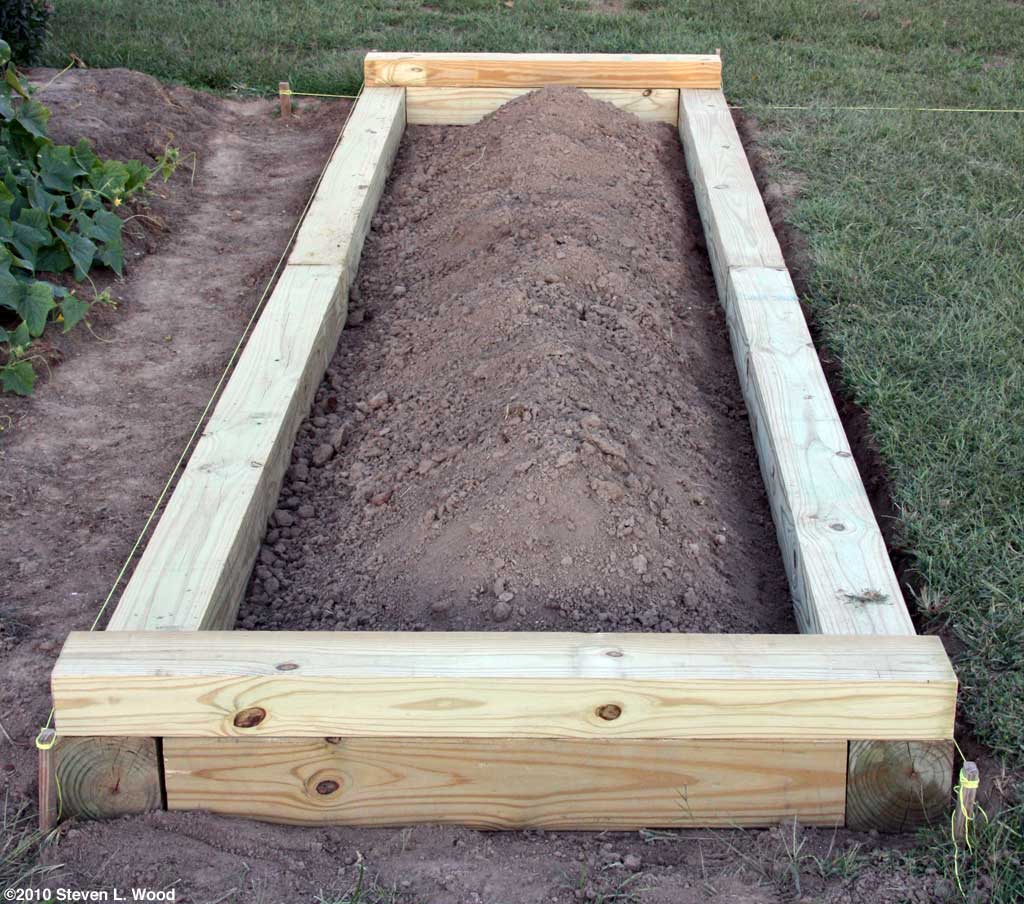
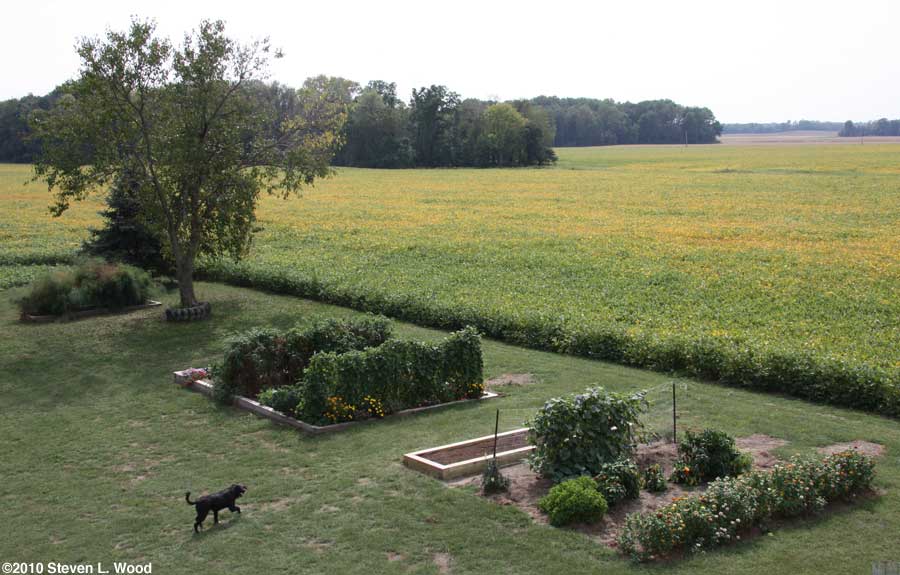
We got started using raised beds several years ago primarily to stop some annoying soil erosion in what is now our main garden bed. Raised beds also have the advantage (other than in bone dry summers like this one) of having better drainage that a standard, non-raised garden plot. Fairly narrow beds like the one I'm currently building and our similar asparagus bed can be easily worked from the sides in damp weather without having to step into the bed (and possibly cause soil compaction). I give some fairly detailed instructions on installing a raised garden bed in our feature story, Building a Raised Garden Bed. Blowing off a lot of jobs that really should have been done this week, I hustled yesterday and today to finish our new raised garden bed. The sense of urgency to get it done was supplied by a prediction of a good rain tomorrow. The soil in the bed was bone dry to start with, and I added several bales of dry peat moss plus a cart of very dry compost to it today. So while the soil looks nice and is very fluffy, it's way too dry right now to grow anything!
Despite my efforts, the bed really isn't done yet. I ran short of rebar, so I still need to do a bit more anchoring of the timbers. I also need to backfill around the edges of the new raised bed. Without the backfill (and possibly even with it), I needed to use a couple of timber scraps to drive our tiller up into the bed this afternoon. If and when we get a good rain, the bed will be ready for our fall lettuce transplants. The bill of materials for this bed is as follows:
I chose to stay with the heavy, treated landscape timbers for this project for consistency in appearance in our gardens. Our first two raised garden beds employed similar heavy timbers. They were a necessity for our first raised bed that is in a sloping area that used to be prone to soil erosion. Obviously, 6"x6" and 4"x6" timbers are quite expensive. If you're gardening on level ground and not trying to stop soil and wind erosion (our land has a good bit of slope and a very large, windy, open farm field to the west of it), lighter materials such as those employed by Paul Calback in his community garden plots in Toronto, Ontario, might be a more economical and satisfactory solution. Paul uses 2" lumber with what appears to be 2"x2" reinforcement stakes in the corners.
I also couldn't help but stop, lean on the rake or tiller a bit and enjoy our line of flowers at the north end of our large, raised bed. The flower bed is really an example of my bad planning, as it first was overshadowed by pea vines on the trellis behind it and now has pole beans there. But the flowers have gotten just enough sun to survive and bloom, and they sure are pretty. If you're interested in trying a raised garden bed, but don't want to mess with construction, Amazon Friday, September 17, 2010 - Gloxinias
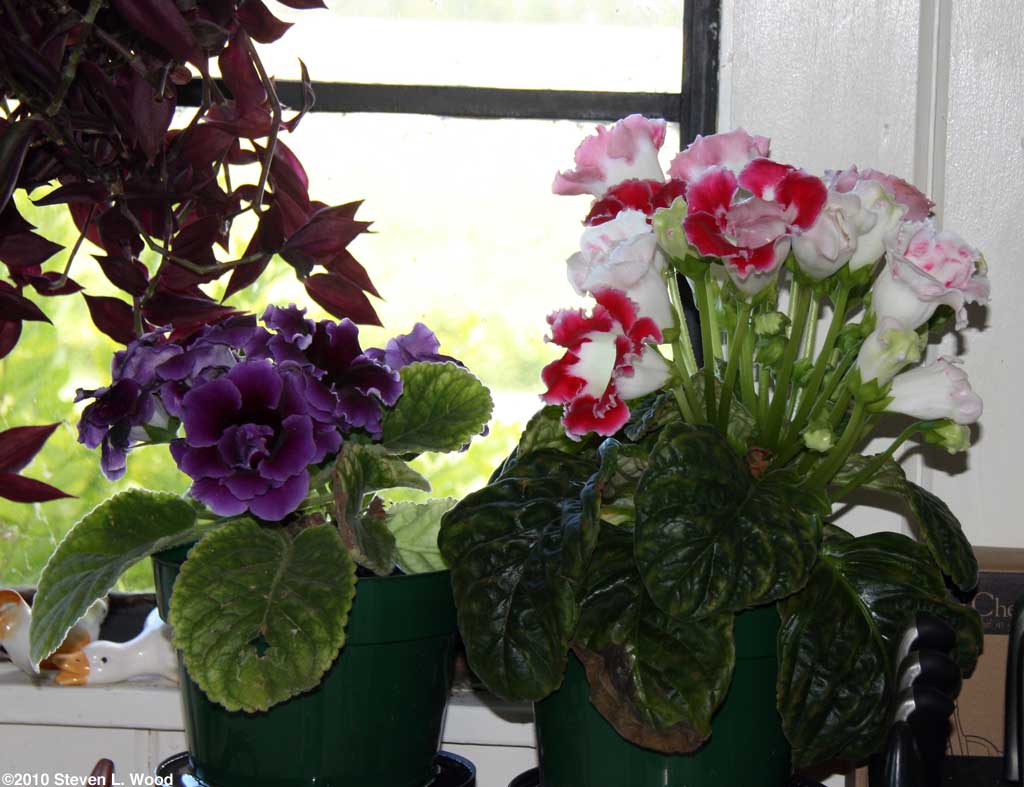
The open pollinated plant is coming into its first blooming cycle after emerging from dormancy several months ago. When I looked closely at it, I was amazed at the number of blooms it was putting on. As gloxinias get older and successfully go through their required period of dormancy, their corms become bigger and stronger, usually producing far more blooms than seedling gloxinias.
Our gloxinia collection still has some seedling plants that are blooming, along with several plants that have emerged from their first period of dormancy. A tray in a dark corner of our basement holds several pots with gloxinia corms that are currently dormant.
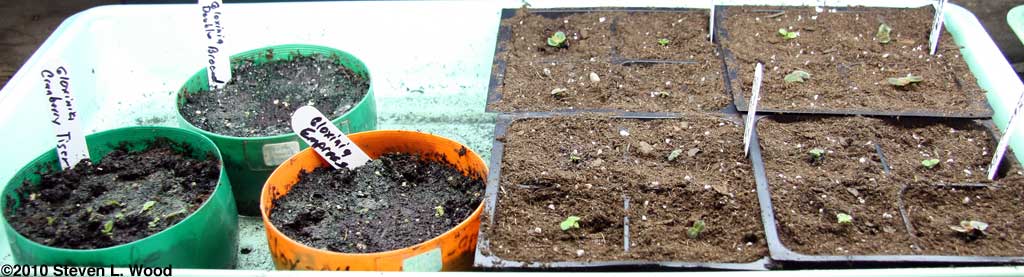
We also have new seedings of gloxinias that I started in August. I began transplanting the first of the tiny, tiny seedlings today. In addition to our usual seedings of Double Brocade and Empress, there are some Cranberry Tiger gloxinia seedlings that came from a seed swap with reader John Rizzo. Interestingly, in what has been a fairly controlled test, the Cranberry Tigers are showing more early seedling vigor than the commercial seed! Thanks, John!
Other Stuff
I updated our Building a Raised Garden Bed feature today to include the raised bed I put in this week. And as I mentioned a few days ago, our weekend gardening has to be worked around the rebuild my son-in-law, Hutch, is doing on our garage. He's putting in some long hours on the weekends. My role is mostly holding the other end of the board, which is probably a good thing. That way the rebuilt garage won't fall down in a heavy wind, and I probably won't hurt myself.
From the
at Senior Gardening |


©2010 Senior-Gardening.com