![]()
One of the Joys of Maturity
One of the Joys of Maturity |
|
| Affiliated Advertisers |
Clicking through one of our banner ads or some of our text links and making a purchase will produce a small commission for us from the sale. Gloxinias
Gloxinias are relatively easy to grow from seed, but the plants take five to seven months from seed to begin to bloom. The really great news is that once you have a mature gloxinia plant, it can live for years and will produce more flowers in succeeding years. As a rule of thumb, if you can successfully grow African violets, you can probably grow gloxinias. They both are members of the Gesneriaceae family. The care of the two species is quite similar, other than the gloxinia's required periods of dormancy.
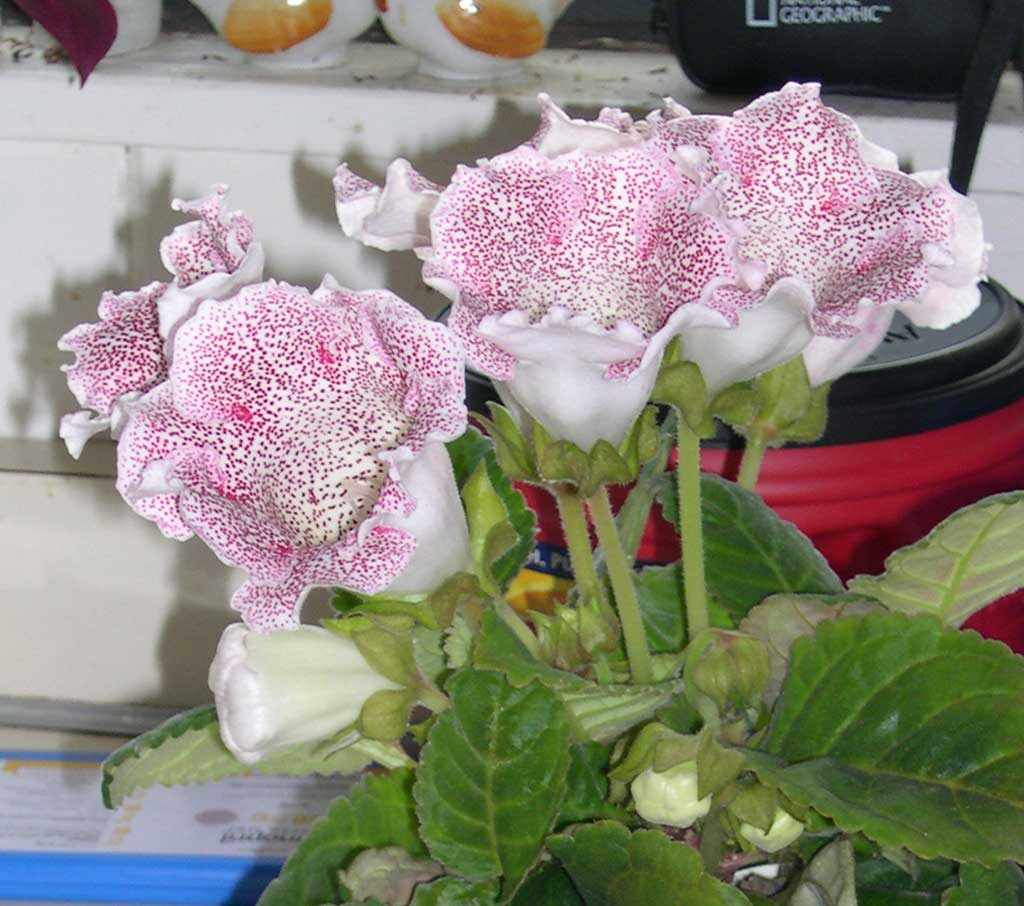
Above is a composite of the gloxinias in my classroom that shows some of the variety in bloom colors and single and double blooms.
For the most part, gloxinias are houseplants or greenhouse plants, but there are exceptions.
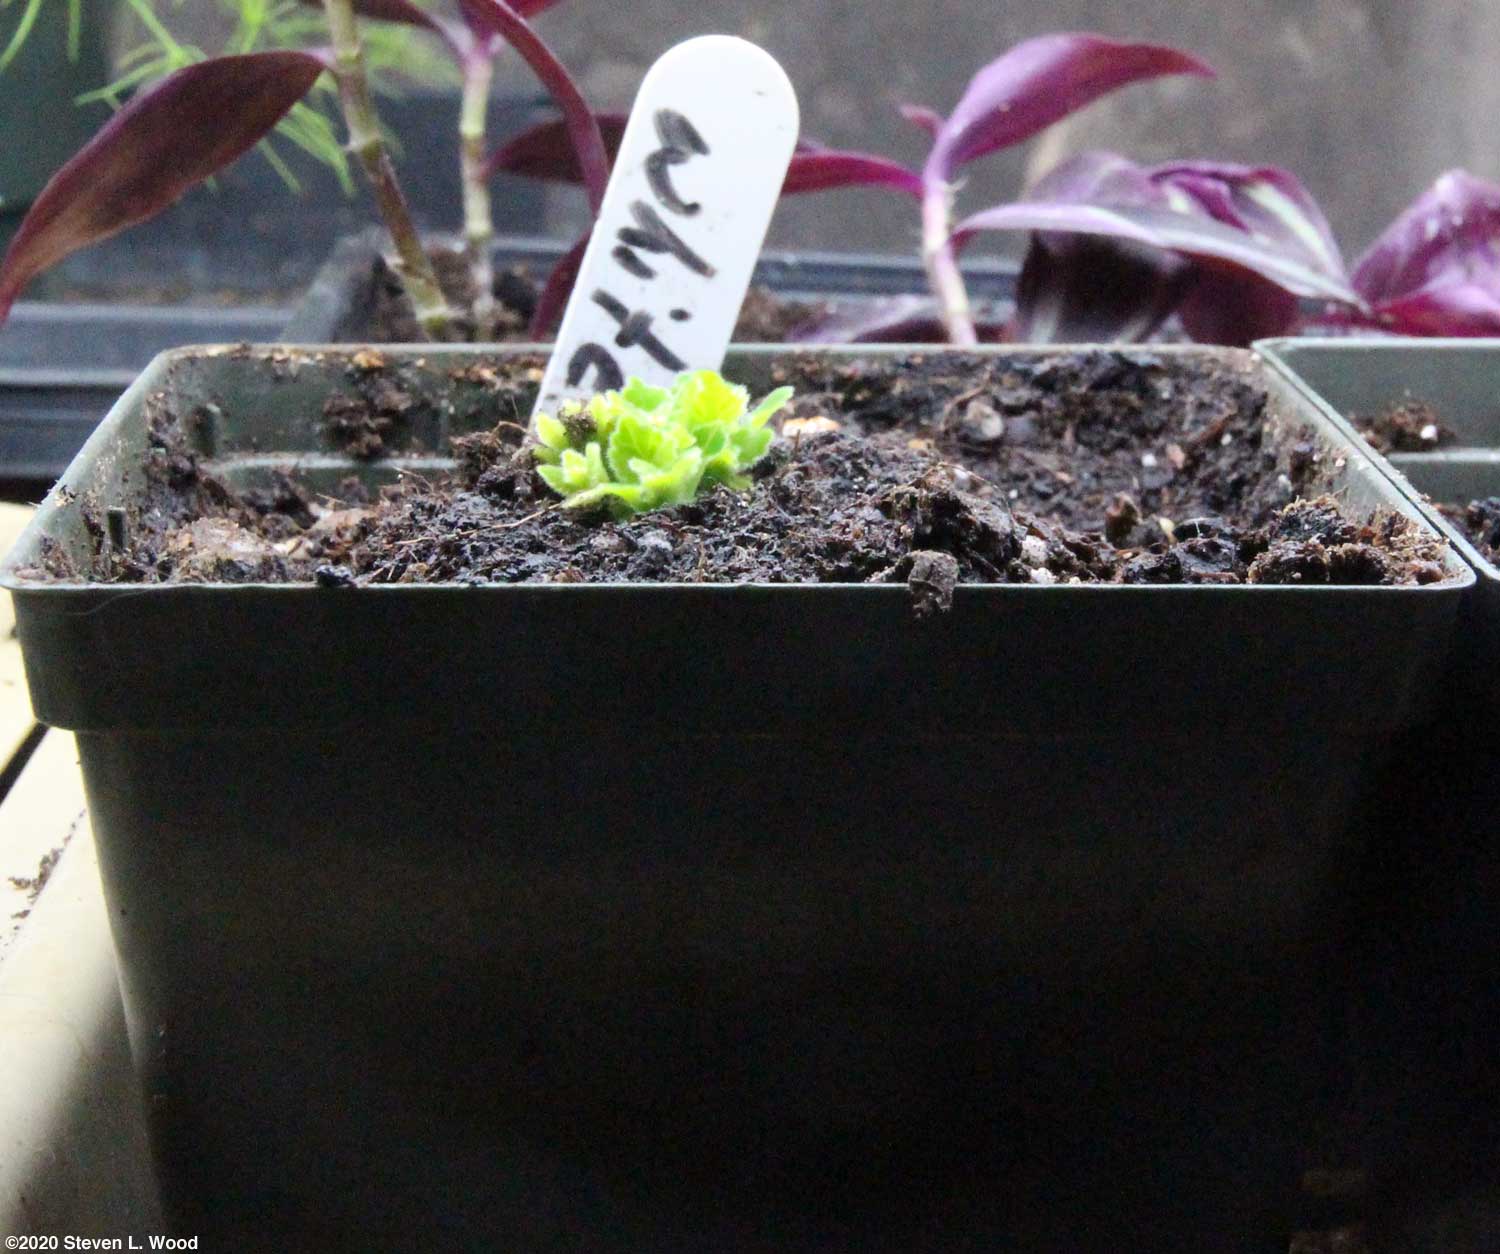
For this feature I used a packet each of Empress Mix and Double Brocade Mix. I also started a pot of some very old saved seed that probably is a cross of Empress and Double Brocade. The seeds are tiny. I've not come across a really good way to distribute the small seed other than just carefully tapping the seed packet or glassine envelope they often come in as I move my hand across the pot. There's no need to try to firm the seed into the soil, as it might stick to ones fingers and be lost. Just bottom water the pots. Gloxinia seed does need light to germinate, so I set my the pots under my plant lights. The seed will germinate at room temperature or just a bit below in about a week to ten days. In the shot below, the germinating gloxinias share a flat with some fall lettuce.
The plants will appear as tiny specs of green against the potting soil when they germinate. I wait until they show their first true leaves before moving them into four packs.
Before getting into transplanting, I need to take a quick sidetrip here. Gloxinias form a bulblike structure at the base of the plant called a corm. "Corms are stems that are internally structured with solid tissues, which distinguishes them from bulbs, which are mostly made up of layered fleshy scales that are modified leaves." (credit: Wikipedia) As long as you don't try to split the corm, the distinction really isn't all that critical. But, you obviously don't want to break off or harm the corm.
To transplant, I use a small knife or plastic plant marker to tease the tiny plants and their fledgling corm and root system out of the soil. I do try to bring along the surrounding soil if possible. I make a small hole in the receiving cell of the four pack and drop the plant into it and gently firm the area around it. The transplanting process usually has to be repeated a number of times, as the gloxinias seem to germinate unevenly so they aren't all ready to transplant at once.
Then the freshly transplanted gloxinias go back into the flats under the plant lights. Let me emphasize here that you want to only bottom water your gloxinias. If you top water, you risk starting leaf rot, and at the very least, will have discolored areas on the leaves. Also, I got my lights too low and bleached out some of this planting! I was trying to get the lights about an inch above the top leaves but now have backed them off to three to four inches above the plants.
I'm sure I lost some plants, but I also know some will rebound now that my plant lights are a bit higher. In the photo above, the healthy looking green plant near the top left extended beyond the close plant light and remained healthy from another, higher plant light. After about 4-6 weeks in four packs, some of the plants are ready to move to their final pot. Since the germination of the original plants is somewhat irregular at times, transplanting is also staggered a bit.
I generally use four inch square pots for seedling gloxinias, although I also use six inch round pots for corms in their second, third, and succeeding seasons. I'm still working my way through a couple of cases of pots I bought years ago when Mellengers was still in business, but some of the pots are becoming a bit brittle. (If you know of a good bulk supplier, let me know.) I'm still pretty picky about the potting soil I use. Although damping off fungus is no longer a worry, I still use my sterilized soil mix of commercial potting soil, peat moss, a dusting of lime, and sometimes a bit of Captan. The Captan is to hold back any moss that may have gotten transplanted with the plant to its final pot.
When I took the two shots of the gloxinia in its four inch pot, I was surprised to see through the camera's viewfinder an early bloom starting! I'd really planned to talk about pinching off blooms a bit later, but...
Once done, it's back under the plant lights for the various sized plants. I transplanted the last of the gloxinias out of the starter "pots" today and also moved most of the ones in four packs into 4" pots. I knew I had to get this work done, as I have around 50 geranium seeds germinating over the heating pad that will need to go into four packs next week. (See: Growing Geraniums from Seed.)
Despite my efforts to discourage it by pinching off blooms, one of the gloxinias is now blooming. I got busy and didn't check the plants as regularly as I should have this month, only checking their moisture level. The blooms will be a pretty addition when I move the plant upstairs, but obviously, the plant's energy is now split between growing foliage and blooming, where I'd rather it just be growing right now.
|
||||||||||
|
I'll probably try to start another round of gloxinias sometime this spring for late fall potted plants. That's a very busy time in the garden and under my plant lights. But it's also just the right time to start gloxinias for September and October blooms. So, I'm going to make an effort to find the time and space for them under the plant lights. Note that I rarely put gloxinias outside in the summer. They just don't seem to do as well as they do under the plant light. But when space gets tight... You might wonder why I'd consider starting more plants in the spring when I currently have ten healthy gloxinias. Over the years I've found that friends and visitors to our home (and in the past, to my classroom) generally oohed and aahed over the plants. When given one, they were absolutely delighted. I expect our gloxinia population to begin to dwindle as the plants come into bloom, and they are adopted out to good homes. As the rest of the plants come into bloom, I'll begin hand pollinating the blooms, tagging the pollinated blooms (usually with just a loosely attached twist tie), and collecting seed once they dry out. Our one blooming gloxinia finished its early bloom cycle and went back downstairs under the plant lights this week. Hopefully, it will now add foliage and build its corm before blooming again. When I was uploading some video to YouTube to illustrate the Brinno GardenWatchCam I really wasn't thrilled with the gloxinia offerings on eBay, but I succumbed to the temptation last week and ordered several packets of gloxinia seed. The seed was packaged in small plastic bags, which made it very difficult to seed. The dustlike seed clung to the the sides of the bags, so I had to cut them open and wash the seed off the plastic into the planting pot.
So, even though I already have nine or ten healthy gloxinia plants under my grow lights, there are 30 seeds in the pot shown above.
It appears the gloxinias are putting up one or two early blooms before returning to growing leaves and adding to their corm. As they finish this early blooming cycle, I return them to the plant rack in the basement under our plant lights. I noticed the leaves on the gloxinias in the basement were yellowing a bit. I began top watering with some dilute fertilizer that contains extra iron, but also switched one bulb per fixture to a new 6500K (daylight) fluorescent tube. The remaining old fluorescent tubes are 4100K, which probably was the problem. I've noticed immediate improvement.
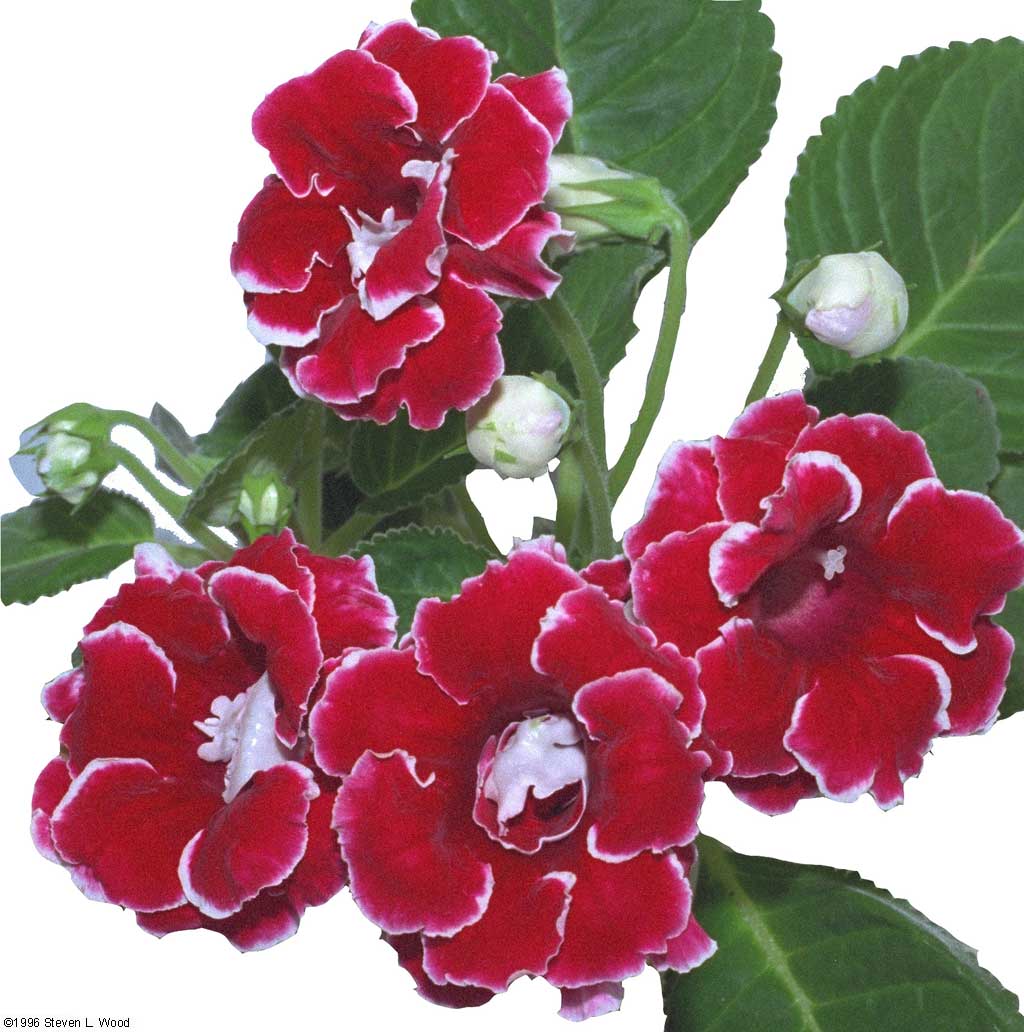
At this point, you might wonder why I go to all the trouble of growing gloxinias. It does take a long time from seed. Below is a photo taken in my classroom in 1996 of a Double Brocade gloxinia. I think the picture easily answers the possible question above.
April 14, 2009
I've moved each of the gloxinias into four inch plastic pots when they're ready, although many have required a move to a six inch square pot later. The frequent moves have also helped me get away from a dreadful potting mix I used early on.
Here are the four inch square pot bunch. As you can see, I'm having some yellowing that repotting and/or fertilizing, plus watching moisture levels seems to correct.
Some of the gloxinias above have been moved to six inch round pots. The Empress variety almost always produces a larger plant and requires the larger pot. Notice the two gloxinias in the white, four inch square pots will need a larger pot soon. A couple of the plants that have already bloomed once are putting on multiple buds and should be free flowering soon. If you're keeping score, it appears that the first bunch will be in full bloom about eight and a half months after seeding. It's been eight to nine months from seed, but we finally have our first gloxinia in full bloom. We've been tantalized over the last few months with plants with one, two, or three blooms, before they stop blooming and begin building foliage and corm again. The gloxinia pictured below has six open blooms with at least seven or eight more showing. I'm sorta proud of it, as it's one of our gloxinias from saved seed, rather than from seed I purchased.
It's probably time for me to get some more gloxinia seed started for full blooms next December or January. Of course, I'll still have my current plants (if I don't give them all away as I'm prone to do at times), but I'd like to get back to glorious displays such as the one pictured at the top of this feature.
Still to Come: Pinching, Dormancy, Leaf Cuttings, and Saving Seed I've been taking things pretty much in chronological order in this feature. Some readers may be way ahead of me and have questions about pinching off plants, how to treat gloxinias as they enter and emerge from dormancy, how to replicate plants via leaf cuttings, and/or how to pollinate and save seed from them. I'll get to each of these issues as we get there. And, I've purposely avoided talking about pinching off plants to make them bush out better, as I'm really not very good at it. If you have questions before I get to this stuff, write. September 11, 2009 - Saving Seed from Gloxinias
I wasn't happy with the sharpness of some of the images of the seed in the flower ovaries (at left), so I'm waiting on some close-up filters I ordered before redoing the photography for the update.
I finally got some better images of pollinating gloxinias. The task took a digital SLR with manual focusing capabilities, a better lens than the "kit lens" supplied with the camera, a set of macro close-up filters (instead of a far more expensive macro lens), and a good tripod. But at long last, I've put up the seed saving information on a separate page, Saving Gloxinia Seed. Most of my gloxinia plants are headed towards dormancy, so that will probably be the next topic I'll cover here. If I can, I'll also snip a few leaf cuttings for propagation and document that process here as well. March 18, 2010 - Creative Pinching
Years ago, you used to be able to send gloxinia plants from local florists. The plants delivered often had masses of six to ten blooms in the center. It made for a fantastic gift. One of our last gloxinias to come into bloom this blooming period had a number of buds trapped under its leaves. There really was no way to gently guide the buds past some new leaves in the center of the plant, so I just pinched off the leaves, leaving an outer ring of older leaves with the buds and blooms in the center unimpeded in their upward growth. I think the florist gloxinias of old were probably second year plants, but I'm hoping to achieve the same effect with my first year plants with the creative pinching. Update (4/6/2012): Don't be afraid to pinch back the center of young gloxinias from seed once they get several, say four or more, true leaves on them. Pinching out the growth center will slow the young plants down a bit, but will also make them spread out with more stalks...which means more blooms eventually. As I saw the cluster of blooms maturing on the plant I pinched off a few weeks ago, I cut off the existing blooms to allow the plant to put all its energy into a big splash of blooms. My wife was a bit disappointed, as the cut blooms really hadn't begun to wilt all that much. But the result was just what I wanted. In just a few days, the plant put up six new blooms with more on the way.
While this isn't our prettiest gloxinia, it sure is a nice addition to our kitchen window. And, this was from a first year corm. Gloxinias that are in their second or later years can produce really dazzling clusters of blooms, as their corms are much stronger. Saturday, December 24, 2011 - Surprises
I didn't spill any seed on the pots, nor do I reuse potting soil without first composting it and then sterilizing it in the oven. So the seeds didn't come from either of those two possible sources.
The cutting back of ragged and dead foliage made possible my "discoveries." Apparently, the plants had somehow self-pollinated (not too many bees in our basement), and I simply didn't notice. I'd been too busy with other stuff to do much more with the plants than their weekly watering. When I finally did get the plants cleaned up, there were lots of spent blooms to pick off. I never noticed any seed bearing stems, but I was going pretty fast when I cut and pinched off the old growth and blooms. I pinched off a few more leaves today that may be shading the baby gloxinias. It shouldn't hurt the existing, mature gloxinias, as they are pretty well on their way towards their required period of dormancy. When the tiny gloxinias get just a bit larger, I'll transplant them into fourpacks or 3" square pots.
Sadly, some plants never emerge from dormancy. If it's your one prized gloxinia, that's pretty bad. We now have dozens of gloxinia plants in various stages of growth, so losing one or two isn't a tragedy.
Of course, he proceeds to tell the following somewhat humorous story:
Crockett's brief entry (pp 301-303) in Crockett's Indoor Garden is some of the best cultural information I've found on growing gloxinias. If you're willing to watch and shop online a bit, one can often pick up a used copy of one of Crockett's books from Alibris Full disclosure: Alibris
Leaf Cuttings (Updated 4/6/2012) I've certainly taken my own sweet time in getting this last piece of essential gloxinia culture published. The reason for the delay is that I don't reproduce many gloxinias by leaf cuttings. I really prefer the experience and surprises involved with growing them from seed (especially open pollinated seed that may produce all sorts of blooms). But I got busy last November (2011) and took three leaf cuttings from a very pretty gloxinia while taking some cuttings from a couple of our ivy leaf geranium plants. I'm just putting this section up now, as the last two of the three leaf cuttings have finally produced baby gloxinia plants. When reproducing gloxinias from leaf cuttings, it's important to remember that what you're creating is pretty much an exact clone of the plant from which the cuttings are taken. Don't expect to get velvety red blooms from cuttings taken from a purple blooming gloxinia plant. It's not going to happen.
I trimmed a leaf or two off the plant shown here to expose the leaf to be cut. Without doing so, you have to worm your scissors through the plant growth to get to where you want to cut.
Don't get too hung up on leaf size. A little bigger or smaller certainly won't hurt anything. And...I went back and shot new photos of taking the cutting(s) today, as my original shots really stunk! I didn't measure the leaf to be cut, but when I put it down on the tape measure, son of a gun, it was almost exactly four inches long.
If using a powdered rooting hormone, dip the stem of your leaf in water first and then into the powder. If you're using rooting gel, just dip the stem in the gel. Make a slanted hole in your planting medium and insert the stem right up to the base of the leaf. Firm the sand, soil, or whatever medium you use over the stem. Then the whole pot with the cutting should go under something to hold in moisture until some rooting begins. I just pop my cuttings into a plant flat with a clear, humidome cover. Note that when I got pressed for space some weeks ago, I took the last two leaf cuttings out from under their humidome, and they still rooted. But at first, the cuttings will need something, even a clear plastic bag that doesn't touch the leaf, to hold in moisture and allow light in.
Note, if you click on the image at right for the larger image, the temperature shown (86.9o F) is because I bottom watered the tray with warm water. My thermostat was set at 75o F.
All of the above may seem like a lot of trouble, but with gloxinia plants and corms going for over $10 each, replicating plants you like really is a good deal. From cutting to bloom, it's supposed to take about six months, as opposed to from seed to bloom which runs at least seven months. And while they're all still small, the images below are the result of the three leaf cuttings I took in November.
The plants above all came from cuttings from the purple gloxinia shown below. And to demonstrate the use of the rooting gel, I did take a couple of cuttings today from the red gloxinia in the same photo. I fully expect to have some absolutely gorgeous replicas of the the two gloxinias below in just a few months.
Yet Another Update (2/14/2014) Kevin Maciunas recently shared a method of propagating gloxinias from flower stem cuttings. Since we're currently "bloom challenged," I'll just link to the blog posting where I relate, with many quotes from Kevin, how to do the interesting propagation technique. When we get some blooms again, I'll do a better write-up of it and replace this update with a better description. Gloxinia Photos (10/12/2012) I added a page of Gloxinia Photos to the site today. As we progress into plants that have been through several years growth and periods of dormancy, we're getting a lot more plants that produce 10-20 blooms at a time. Gloxinias Outdoors? (1/29/2013)
Silly me! Gloxinias were first discovered and some types grow today in the wild in Central and South America! So when Robyn Wood (no relation) saw our Gloxinias feature story, he sent the email below, launching a new and exciting learning experience for me about gloxinias. He wrote in his first email (edited):
From the beautiful images Robyn shared, it's obvious he certainly isn't "doing everything wrong" in his setting, and probably is doing it just right for his plants and growing conditions. He shared in a subsequent email that they rarely have frost in Sydney and never snow, with winter temperatures generally in the 50s or 60s. His gloxinias grow in the lovely east facing area shown below that gets "filtered morning sun," with rather humid conditions in the spring and summer.
Robyn's comments have made me wonder how many other climatic areas there are that may be ideal for growing gloxinias outside? My thanks to him for writing and sharing his experiences and the great photos of his plants, especially his gorgeous garden shot. It makes me want to pack my bags and visit Sydney! And this experience reminds me once again that learning is a lifelong activity and that sharing gardening information, especially about gloxinias, is always fun. Possibly the best place to find good gloxinia seed was Stokes Seeds. But they went out of the retail flower and vegetable seed business in the U.S. this year (2020) in favor of commercial sales (a pound of beet seed for $400!). Canadian customers can still order seed there. The Empress variety appears when one does a Google search, although I can't attest to the quality of the seed. There are sometimes sellers of Empress seed (and other varieties) on eBay and Amazon The hybrid Double Brocade variety seems to come and go from various seed houses. We've been lucky to produce double blooms from saved seed in our seed saving over the years. I've now moved on to saving seed from the doubles, although I suspect the saved seed will yield plants with various colors and both single and double blooms.
Seed for the Double Brocade variety has been hard to find for years. If you're in the UK, Thompson & Morgan still carries the variety. I recently found that OutsidePride sells the variety via their web site and Amazon. I haven't used their gloxinia seed, but have had good germination with other flower seeds from them. Another source of gloxinia seed is The Gesneriad Society. I've received some good seed via member swaps. Membership runs $25/year and allows one to order from their massive Seed Fund collection. The Society also has a web page of Gesneriad Suppliers, some of which appear to sell corms and plants. Note: I don't sell gloxinia corms or plants. I have, on occasion, traded seed with other growers and give away a lot of seed and plants. One very positive swap was with John Rizzi from California, who sent me a generous sample of Cranberry Tiger gloxinia seed in exchange for some of our open pollinated seed. His seed has produced some really lovely plants. In February, 2020, I listed our saved gloxinia seed for sale on both the Grassroots Seed Network and The Exchange. The seed is a landrace variety bred from the Empress, Double Brocade, and Cranberry Tiger varieties.
As the years went on, our gloxinia collection would increase and decline. But partially from my years as a wedding photographer, keeping film, photo paper, and especially the expensive 500-volt dry cell batteries we used in the freezer to preserve them, freezing seed never seemed like all that much trouble.
The experience was also a sad reminder that one doesn't usually get glorious, florist quality gloxinias with 10-20 center blooms from a first year plant. But those kind of plants do come after dormancy with second, third, and succeeding year plants. And I use the expression "florist quality gloxinias" in a historical sense, as I've not found a florist in recent years that sells and delivers gloxinias! That's sad as I think I "discovered" gloxinias from a plant delivered to the hospital when one of our children was born (over forty years ago). It takes seven months, more or less, for gloxinias grown from seed to flower, but the payoff is well worth the effort. |
|
"Turn out the lights, the party's over" (5/18/2014) Since most readers of this site are likely to be senior citizens, you're probably old enough to remember broadcaster Don Meredith breaking into the song, Turn out the lights, the party's over, on Monday Night Football broadcasts when he thought one team had put the game away. I thought of that song last week as I shut off the lights over our basement plant rack. I didn't need the lights as all of our gloxinias went into a hole in the ground! Normally, we run our plant lights all year for our gloxinias. But we were struck with an ailment about a year ago that began killing off our gloxinias, something I'd not experienced in my thirty-some years of growing them. I futility adjusted lighting and temperature and tried all manner of pesticides, fungicides, systemic insecticides, and mineral and fertilizer brews to correct the problems of the plants wilting near maturity. At one point last summer, I cleared the plant racks and disinfected our basement plant area. After pinching the plants back to their corms, some appeared to recover, only to begin failing again as they produced their first blooms.
My best guess at what went wrong came from a GardenWeb posting by Irina that suggested the INSV virus might be the cause. By the time I found her posting, I'd pretty well eliminated all the other possible causes of such a plant collapse. Sadly, there's no cure for INSV, other than turning out the lights...and starting over. But I've saved lots of gloxinia seed over the years and kept it in frozen storage. The very oldest of the stored seed, produced when I was still teaching, still germinates well and often better than some purchased commercial seed! Hopefully, the open pollinated baby gloxinia plants I moved to the sunroom (and had kept segregated from the sick plants) will be okay. I also started pots of Empress, Cranberry Tiger, and Charles Lawn Hybrid gloxinias. By the time the new plants require plant lights, I should have our plant room thoroughly cleaned, bug bombed, and disinfected. So in time, the gloxinia "party" will begin anew. It's worth the effort.
Although I'd indicated that we'd had to throw away all of our old gloxinias, I found some corms in dormant storage a few months ago. Those that appeared to be alive, I segregated on the back porch. And sure enough, some had the INSV virus or some other issue that caused their leaves to brown and die. They, of course, got pitched immediately. Four or five plants appeared to be healthy, and I let them bloom, even bringing one into the kitchen for us to enjoy. Those plants began showing signs of the virus after their blooming cycle. That's typical of my experience with the disease, as the virus often manifests itself after the first set of blooms on a plant begin to fade. I shared the image below in our regular blog this week, but didn't think to post it here until today.
The top shelf of our plant rack is now filled with gloxinias in bloom. All of the plants are ones grown from our saved seed, the first of them started on February 26. I seeded more gloxinias in May, using a commercial variety and some seed given to me by another gloxinia enthusiast. Those plants, not shown but on the second shelf of the plant rack, are now beginning to put on bloom buds. Some of the second group's growth has been retarded because I've been a little slow at getting the plants moved from fourpacks to four and six inch pots. As we continue our recovery from the INSV virus that took almost all of our mature gloxinias, I'm still sanitizing every pot and seed flat used for the plants. The pots get soaked in bleach water and the flats get rinsed in it. I've taken to leaving a covered five gallon bucket of bleach water at the base of our back porch steps. Pots often sit in the bleach water for days until I need them. A tight fitting cover for the bucket is important so the water won't evaporate and also so our dogs won't drink out of it. It appears from my last posting here that I update this page regularly: once a year! I had total hip replacement surgery in May, 2015. During my recovery, my poor and wonderful wife had to take over all of my duties. Our gloxinias suffered through that time, receiving minimal watering and no pinching back to control errant stems. When I was finally able, I trimmed almost all of our extensive collection of plants nearly to their corms.
We lost a few plants from the tough love I enforced on them, but most rebounded and a few are now coming back into bloom. The pale pink gloxinia in the photo above is a decendant (or sibling) of the plant that produced my current, favorite gloxinia photo. Interestingly, during the time when I was pretty much immobile without a walker, I received quite a few nice emails about this page and gloxinias in general. My thanks to those of you who wrote or have written in the past. It definitely helped lighten my spirits in between frequent rehab sessions! I'm now, some sixteen weeks after surgery, almost totally off my cane. I still keep it with me as a "security blanket" when I'm out and around, but I'm headed towards a successful and full recovery. Our collection of gloxinia plants look absolutely dreadful right now, and that's a good thing. Despite being started months apart, the gloxinias have finished their blooming cycles and somehow are almost all headed for dormancy at the same time. Many of the plants have put out weak, lateral branches. Leaves have waterspots from careless watering, while others are browning out. There are also signs of insect damage, something I corrected by using flea bug bombs in the basement!
To help them along a bit, I cut back the length of time our plant lights are on by a few minutes today. I'll continue cutting it down and have also reduced watering to encourage dormancy. As sad as the gloxinia plants look, a few are still maturing seed from blooms I hand pollinated. Just one mature bloom can produce hundreds of seeds. I let the seed dry on a paper plate for a few weeks before transferring it to a plastic vial that goes into our manual defrost freezer. Thoroughly dried and frozen gloxinia seed stays viable for years. We have a few gloxinia corms that went dormant over a month ago, so we should begin to start the growth and blooming cycle again very soon. The large bunch of plants just now going dormant will probably be in bloom again by next summer. The best way to have gloxinias blooming through the winter is to seed them in June.
I have continued to keep our gloxinias in two different locations this year as a precaution against the return of the deadly INSV virus that took all our plants in 2013. Part of the plants are growing under our plant lights. But about half of them are in our sunroom on a bookshelf along south facing windows. Interestingly, the sunroom plants are coming into bloom much more quickly than the ones under our plant lights. The plants under the lights seem to be putting on lots more and larger foliage. Sadly, the sunroom will soon become too hot for the gloxinias to survive the midday heat, with temperatures in the room reaching and exceeding 100° F. When I finally win the lottery (hard to do since I no longer buy tickets), I'll add heating and air conditioning to the lovely room that is usable now only in the spring and fall.
It's really great to have these beautiful plants blooming around us again. With gloxinias coming into their third year of blooming, space for the plants became a real problem. While I could jam eight to ten 4 or 4 1/2 inch pots in a tray when the plants were small, the now strong corms put out lots of leaf growth that demanded space. A standard seed flat or our preferred Perma-nest trays could hold only three or four of the large plants. It has turned out that our gloxinias thrive in our sunroom through the summer despite the room getting very hot. I could space out the plants there, as the bookshelves along the south facing windows could hold six flats. But it's a room we're not in much, so a gorgeous blooming plant there may go unappreciated. Having used our dining room table for transplants when we had to bring them in from the cold frame on extremely cold March nights, it finally dawned on me that we could put some gloxinias on the table. Three large bay windows edge the room, and with the dining room table pushed up to the windows, the gloxinias receive all the light they need. And of course, we could easily see and enjoy the blooming gloxinias.
Our routine since about April has been to move blooming plants to trays on the dining room table and then move them under our plant lights in the basement after the plants finish their blooming cycle. The cast of characters changes from week to week as new plants come into bloom and others fade.
Using the dining room table for the plants added a bonus I hadn't expected. Seeing the plants daily reminds me to grab a Q-tip and hand pollinate some of the blooms from time to time. Producing more seed became important after re-starting our collection put a dent in our frozen, saved seed. It has also allowed me to share seed with other growers.
Having overdone our seeding when I re-started our gloxinia collection in 2014, we were overwhelmed with plants coming out of dormancy this year. While giving away a beautiful blooming gloxinia is hard, we began giving plants to friends, family, and my wife's co-workers this year. My lovely wife, Annie, composed a page of instructions for caring for gloxinias for her friends at work to go along with the plants. On a recent trip to Annie's workplace to do some banking business, I was a bit taken aback by all the gloxinias on desks and the thanks from her co-workers. I don't often get back to updating this page, as I think I've written everything I need to already. But I need to post a quick photo of our gloxinias on our dining room table this summer.
Having seeded gloxinias last June for fall and winter blooms, the plants have pretty much all emerged from dormancy around the same time. That's given us a beautiful wealth of plants in bloom, although we may not have many bloomers this fall and winter. Having overplanted a bit last June, I haven't started any new plants from seed this year. I've actually been cutting down our collection by sending some spectacular plants in bloom to my wife's co-workers. We simply have more gloxinias than I can care for. What a wonderful first world problem to have. The Gesneriad Society has launched the Gesneriad Reference Web. Their press release states:
The site isn't complete as yet, and really should be an ongoing development as more information should be added continually. For growers of gloxinias and African violets, this site may become a very helpful resource.
We've been rewarded with an incredible amount of gloxinia seed. After some other problems with saved seed and fearing that our well water might have been contaminated with preemergents from nearby fields, I did a germination test with a "pinch' of our saved seed. Oh boy, did the seed germinate. I think I need to recalculate what my pinch of seed is. We now have hundreds of baby gloxinias growing in our standard gloxinia starting pot. Since I have more than enough gloxinia plants to care for, I'll gladly share a few baby plants with anyone living nearby who wants some. Do note that baby gloxinias are a devil to separate and transplant! For folks living further away, I'll gladly share some of our bounty of seed with you...while supplies last. Just send me an email with your postal address and I'll send a some of the tiny seeds.
We still have lots of gloxinia plants, although most of them are now moving into their required period of dormancy. The new plants should begin to bloom sometime in March or early April. I've been growing gloxinias from seed for forty years or so. The thrill of seeing them come into bloom still hasn't worn off. When working our plant rack today, I saw that one of our new gloxinia plants had opened a bloom. I moved the plant to a kitchen window so that we could enjoy it. It only has one open bloom with another about to open. But with our older gloxinias all in dormancy, it's nice to see a bloom.
For those wondering about the timing of growing gloxinias from seed to bloom, here are the pertinent dates for this planting.
Of course, your growing conditions may produce different timing. And four months is pretty quick to go from seed to blooms. A more accepted figure would be five to six months.
Since these are open pollinated plants produced from seed we saved, we never really know what we're going to get from first year plants. I try to note the bloom color and bloom type on the plants' labels, but don't always get that job done. Today's care included trimming off spent blossoms and damaged leaves and a good watering. Several plants that had finished their bloom cycle got a little fertilizer and were moved to our sunroom. I also moved a few plants from our plant room in the basement to our dining room table. We've had a nice range of bloom types and colors as shown here. Not shown are any of the velvety, deep purple blooms. I find trying to get a good shot of them like photographing a black cat at midnight.
I moved the last of our dormant plants back under our plant lights a week or so ago. A few corms, as usual, didn't survive dormancy. With the last of the plants breaking dormancy now, we should have gloxinias in bloom well into fall.
The trimmed plants were moved to shelves in a dark corner of our plant room. They'll remain there, unwatered, until they again put up some fresh growth. We do have one gloxinia plant actively growing. It's one that broke dormancy several weeks ago. I gave it some fresh potting mix at that time, watered it, and moved it under our plant lights. Starting More Gloxinias I certainly don't need any more gloxinia plants, but I went ahead and started a new "pot" of gloxinias this morning. In our breeding of gloxinias, I have let a variety with incredible blooms sort of take over our plants. Unfortunately, that variety also produces huge, ungainly leaves. So starting some of the old Empress variety may bring leaf growth back under control as we hand pollinate and save seed from our plants. I very sparingly used some of the last of a ten year old packet of commercial Empress seed I had in the freezer for the seeding. Gloxinia seed needs light to germinate, so I sprinkled the seed over a container filled with sterilized soil and topped with some vermiculite. I covered the container with clear wrap to admit light but hold in moisture. Gloxinias grown from seed usually begin to bloom four to six months after seeding. Assuming the old seed germinates, I'm hoping the new plants will be in bloom when some of our old plants that will emerge from dormancy are in bloom for cross pollinating. Another Season of Pretty Gloxinias We had another year of pretty gloxinia blooms, although not as spectacular as in some years past.
I again saved seed from our plants, but not as much in past years. I certainly have enough seed on hand to fill any gloxinia seed orders that come in. And even in a bit of a down year, we still had some beautiful displays of gloxinia blooms.
The Empress gloxinias I started in December are almost all in bloom now. Getting back to our original variety of gloxinias has brought back some color patterns we'd lost through our breeding of the plants.
I've been hand pollinating the gloxinias, mainly from the new Empress plants to the few of our older plants that are in bloom. We've actually sold out of our gloxinia seed produced in 2020. I still have lots of good 2019 seed which I can use to fill seed orders. But I'm working to produce a good bit more fresh seed than we did last year. Hurrying some of our gloxinias into dormancy last year was probably a mistake. We've lost more plants in dormancy than we ever have. I currently have a tray of eight or nine gloxinias on our dormancy shelf that are probably dead. In a normal year, we lose one to three plants that don't emerge from dormancy. I put up our Christmas tree yesterday. It took all of a half hour to pull the tree from its trash bag, straighten a few limbs, and hang more ornaments on it. With our kids grown and no family coming in for the holiday, we've made do with our two foot tall tree the last few years.
The tree is on our dining room table between a couple of flats of gloxinia plants that are putting on buds. The flats are there to weigh down a lovely but slick tablecloth Annie found. Our cats seem to love pushing or pulling the tablecloth off the table. So hopefully, the weight of the plants will keep things in place. These gloxinia plants are from cuttings I started months ago. The parent plants were double magenta and double pink gloxinias. So we may have gloxinias in bloom around Christmastime for the first time in years. I started some gloxinias from saved seed in mid-June. Today, I brought three trays of young gloxinias in bloom or coming into bloom from our basement plant rack to our dining room table.
From seed to bloom in just four months is about the fastest I've ever seen gloxinas mature. I again started gloxinia seed in June and have been rewarded with a bunch of new plants in bloom.
From Steve Wood, the at Senior Gardening
|
| Affiliated Advertisers |
last updated 11/8/2023
©2008-2022 Senior-gardening.com


 I start our gloxinias in shallow pots that used to come as reinforcement on the bottom of one and two liter soft drink bottles. Most any wide, shallow pot should really do for starting the seed.